Modify the Flow
Let's update the flow input to use a video file instead of a webcam.
Our Goal
In the previous section, we deployed a flow that takes input from a webcam. Now let's say we want to modify the flow to take input from a video file instead and make sure that our flow can stop itself when the video file has no more frames to read. To achieve this, we will need to:
- Replace the
Webcam Inputnode with aServer Media Inputnode and configure it to read from a video file - Update the input reference in the
Webcam General Detectionnode to use the output from theServer Media Inputnode - Redeploy the flow and see the changes in action!
Select the Node

To add a new Server Media Input node:
- Click the button in the top-left corner to open the node selector
- Click on
I/Oto expand the category - Drag and drop the
Server Media Inputnode onto the canvas
Rewire the Flow

Let's replace the Webcam Input node with the new Server Media Input node we just added. To do that we:
- Select the
Webcam Inputnode by clicking it - Delete the node by clicking the
Deletekey on your keyboard (or press and hold the button on the node) - Move the
Server Media Inputnode to the position where theWebcam Inputnode was - Connect the
Time Interval Triggernode to theServer Media Inputnode by dragging from the output handle of theTime Interval Triggernode to the input handle of theServer Media Inputnode - Connect the
Server Media Inputnode to theGeneral Detectionnode - Connect the
Server Media Inputnode (Errorport) to theStopnode
Configure the Nodes
Specify the Video File Path
Note
If you don't have a video file ready, you can download a sample video file from here to follow along with the guide.
Now we need to configure the Server Media Input node to read from a video file. To do that:
- Click on the button on the
Server Media Inputnode - Under the
Path to Mediafield, click on the button to browse the video file you want to use as input- Double-click the folder to open it, once you find the video file, select it (this highlights the file)
- Click
Selectin the bottom-right corner of the file browser dialog
- Click
Applyto save the changes - Close the configuration dialog by clicking
close(thexbutton in the top-right corner of the dialog or anywhere outside the dialog)
Update the Input Reference
Because we have replaced the Webcam Input node with a Server Media Input node, we also need to update the input reference in the Webcam General Detection node to use the output from the Server Media Input node instead. To do that:
- Click on the button on the
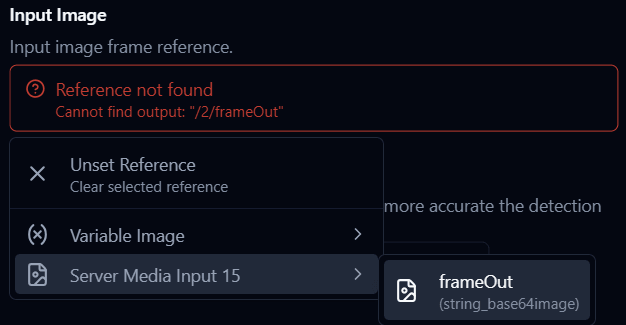
Webcam General Detectionnode to open the configuration dialog - You will see a warning under the
Input Imagefield indicating that the input reference is broken. - Click on it, navigate to the
Server Media Inputnode - Select
frameOutoutput from theServer Media Inputnode as the new input reference - Click
Applyto save the changes
Auto Stopping Logic
As you might have noticed, we have connected the Error port of the Server Media Input node to the Stop node. This is because when the Server Media Input node reaches the end of the video file, it will output an error indicating that there are no more frames to read, and by connecting it to the Stop node, we can make sure that our deployment can stop itself when the video file has no more frames to read.
Save the Project
It's always a good practice to save your project after making changes. To save the project:
- Click on the button in the top-left corner of the app to open the main menu, or use
Ctrl + S(orCmd + Son Mac). - Click on
Save Project As..., or useCtrl + Shift + S(orCmd + Shift + Son Mac) to save the project with a new name - Navigate to the folder where you want to save the project, enter a new name for the project, and click
Save.
Save as is a good way to keep the original project intact and have a new project with the modifications you just made.
Info
To load the project you just saved, you can find it in the Recent Projects section on the project page, use the Open Project option in the main menu to navigate to the project file (or use Ctrl + O or Cmd + O on Mac) to open it.
Redeploy the Flow
Awesome! Now we have successfully modified the flow to take input from a video file, with the logic to stop the flow when the video file has no more frames to read, and saved the modified flow as a new project.
Now let's deploy the flow again by clicking on the Deploy () button.
Navigate to the Dashboard page, and you should see the Image Frame widget showing the detected objects from the video file in real-time. Once the flow reaches the end of the video file, it will automatically stop and you will see that the status indicator in the bottom-left corner of the app changes from green (running) to grey (not deployed).
Note
Depending on your hardware performance (faster with GPU acceleration) the time it takes for each frame to be processed may vary, so you may see the frames being processed at a different speed than the actual video.
Shutdown Nara
To safely shutdown Nara:
- Make sure to stop any running flows by clicking the
Stop() button in theFlowspage. - Navigate to the options page by clicking on the
Optionsicon on the navigation bar. - In the top-right corner of the
Generaloptions page, click onShutdown Narabutton to shut down the app. - Once Nara is shutdown, it will navigate to the
loginpage. Note that you will not be able to access the app at all after it is shutdown until you start Nara again.
What's Next?
You have made it!
🎉 Congratulations on making it to the end of the quick start guide!
If you want to continue exploring and learning more about Nara, you can check out the Basic Course which will give you a comprehensive introduction to Nara's features and how to use them effectively.