Create Your First Dataset
Quick start guide to creating and managing your first dataset in Reva.
Goal
You will learn how to
- Create a dataset and subsets for object detection tasks
- Annotate your dataset with bounding boxes and category labels
- Create a new version of your dataset for training
You will need a dataset for this guide, to make it easy for you to follow along, we have prepared a sample dataset for you. You can download and unzip the sample dataset from the link below:
Home Page
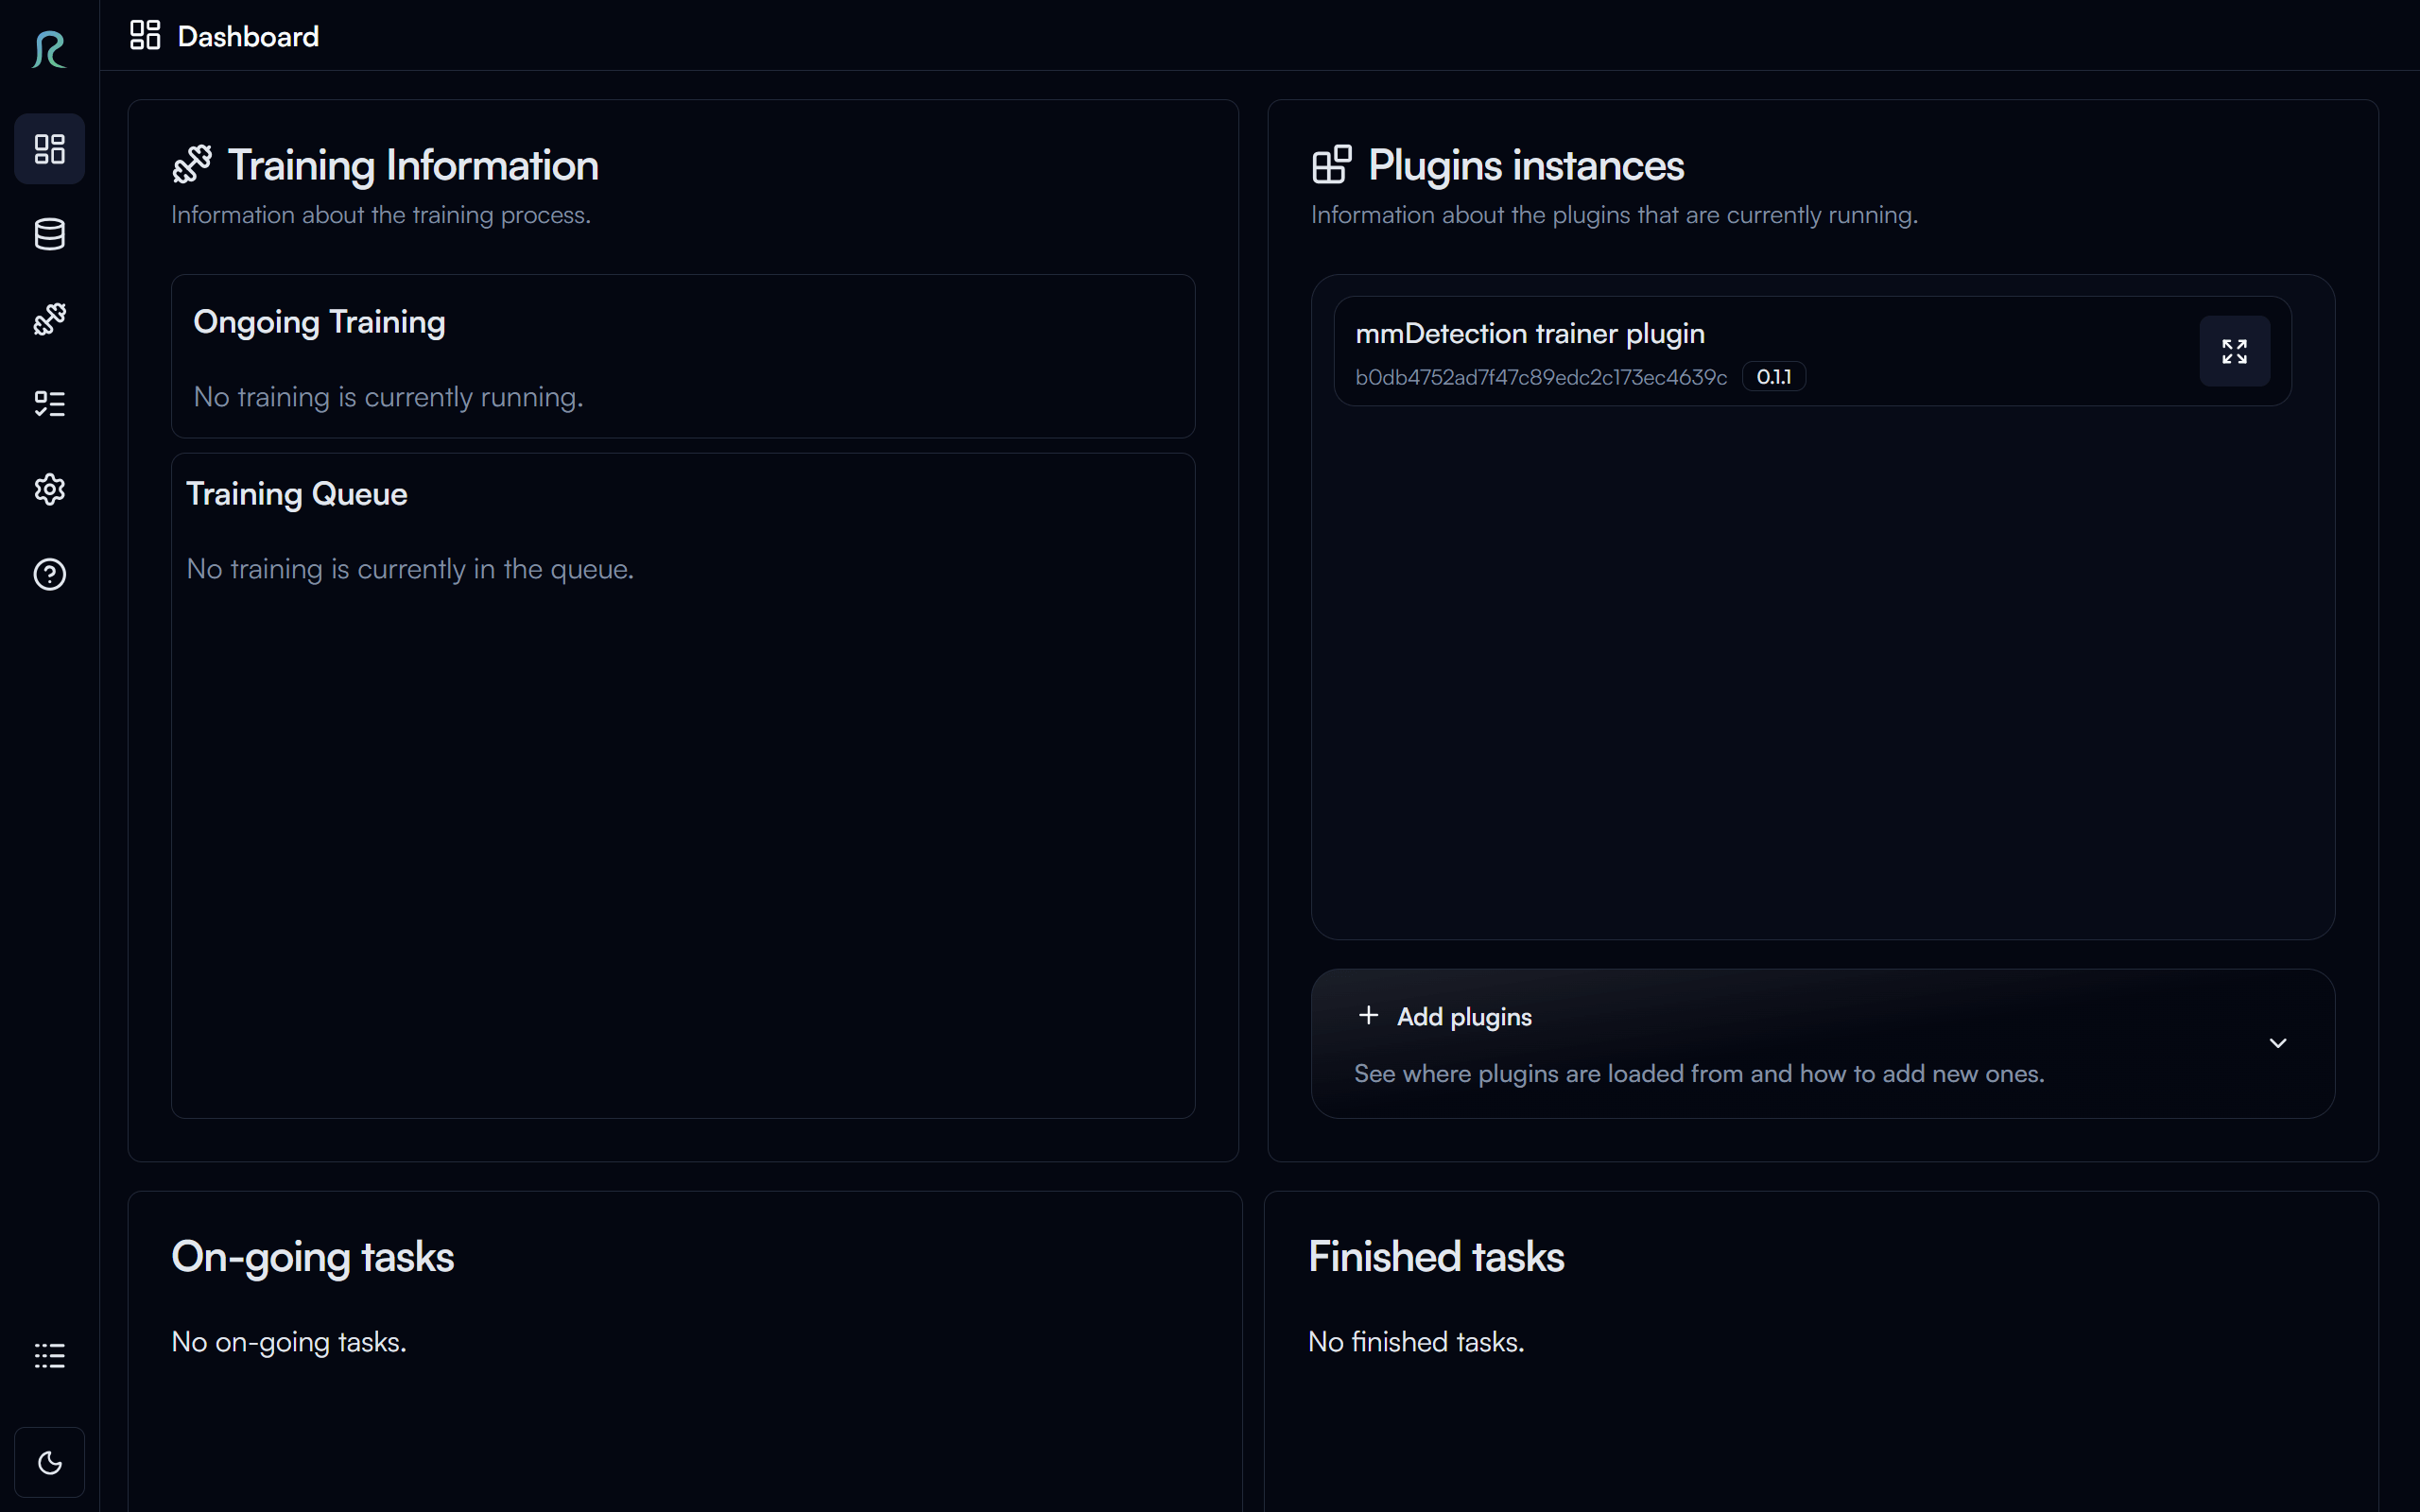
Home page is where you can see the ongoing, finished tasks, training status, and plugins.
From here let's click on the Dataset button on the left sidebar to go to the dataset page.
Datasets
Welcome to the dataset page! This is where you can create and manage your datasets in Reva, let's create a dataset!
Create a Dataset

Click on the New Dataset button in the top right corner to start creating a dataset.
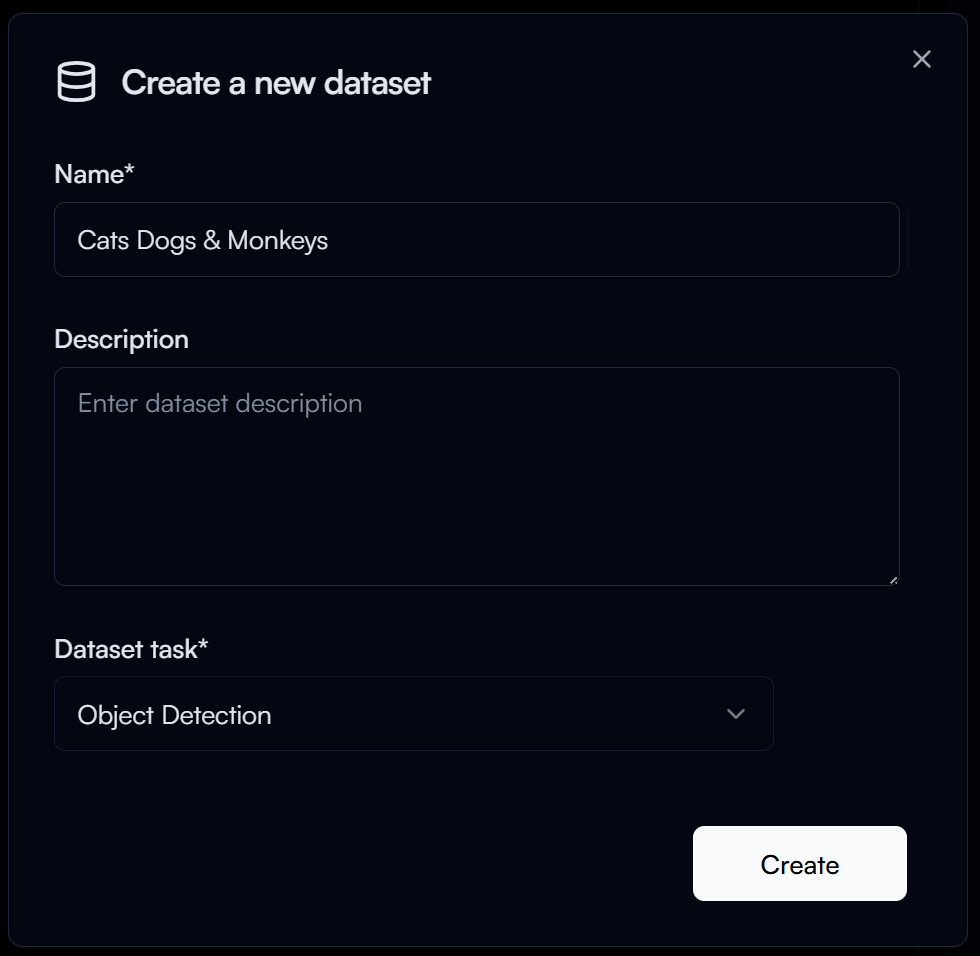
In the Create a new dataset dialog, enter the following:
- Name: Name of your dataset (e.g.
Cats Dogs & Monkeys) - Dataset Task: The task type of your dataset (e.g.
Object Detection)
Then click on the Create button to create the dataset.
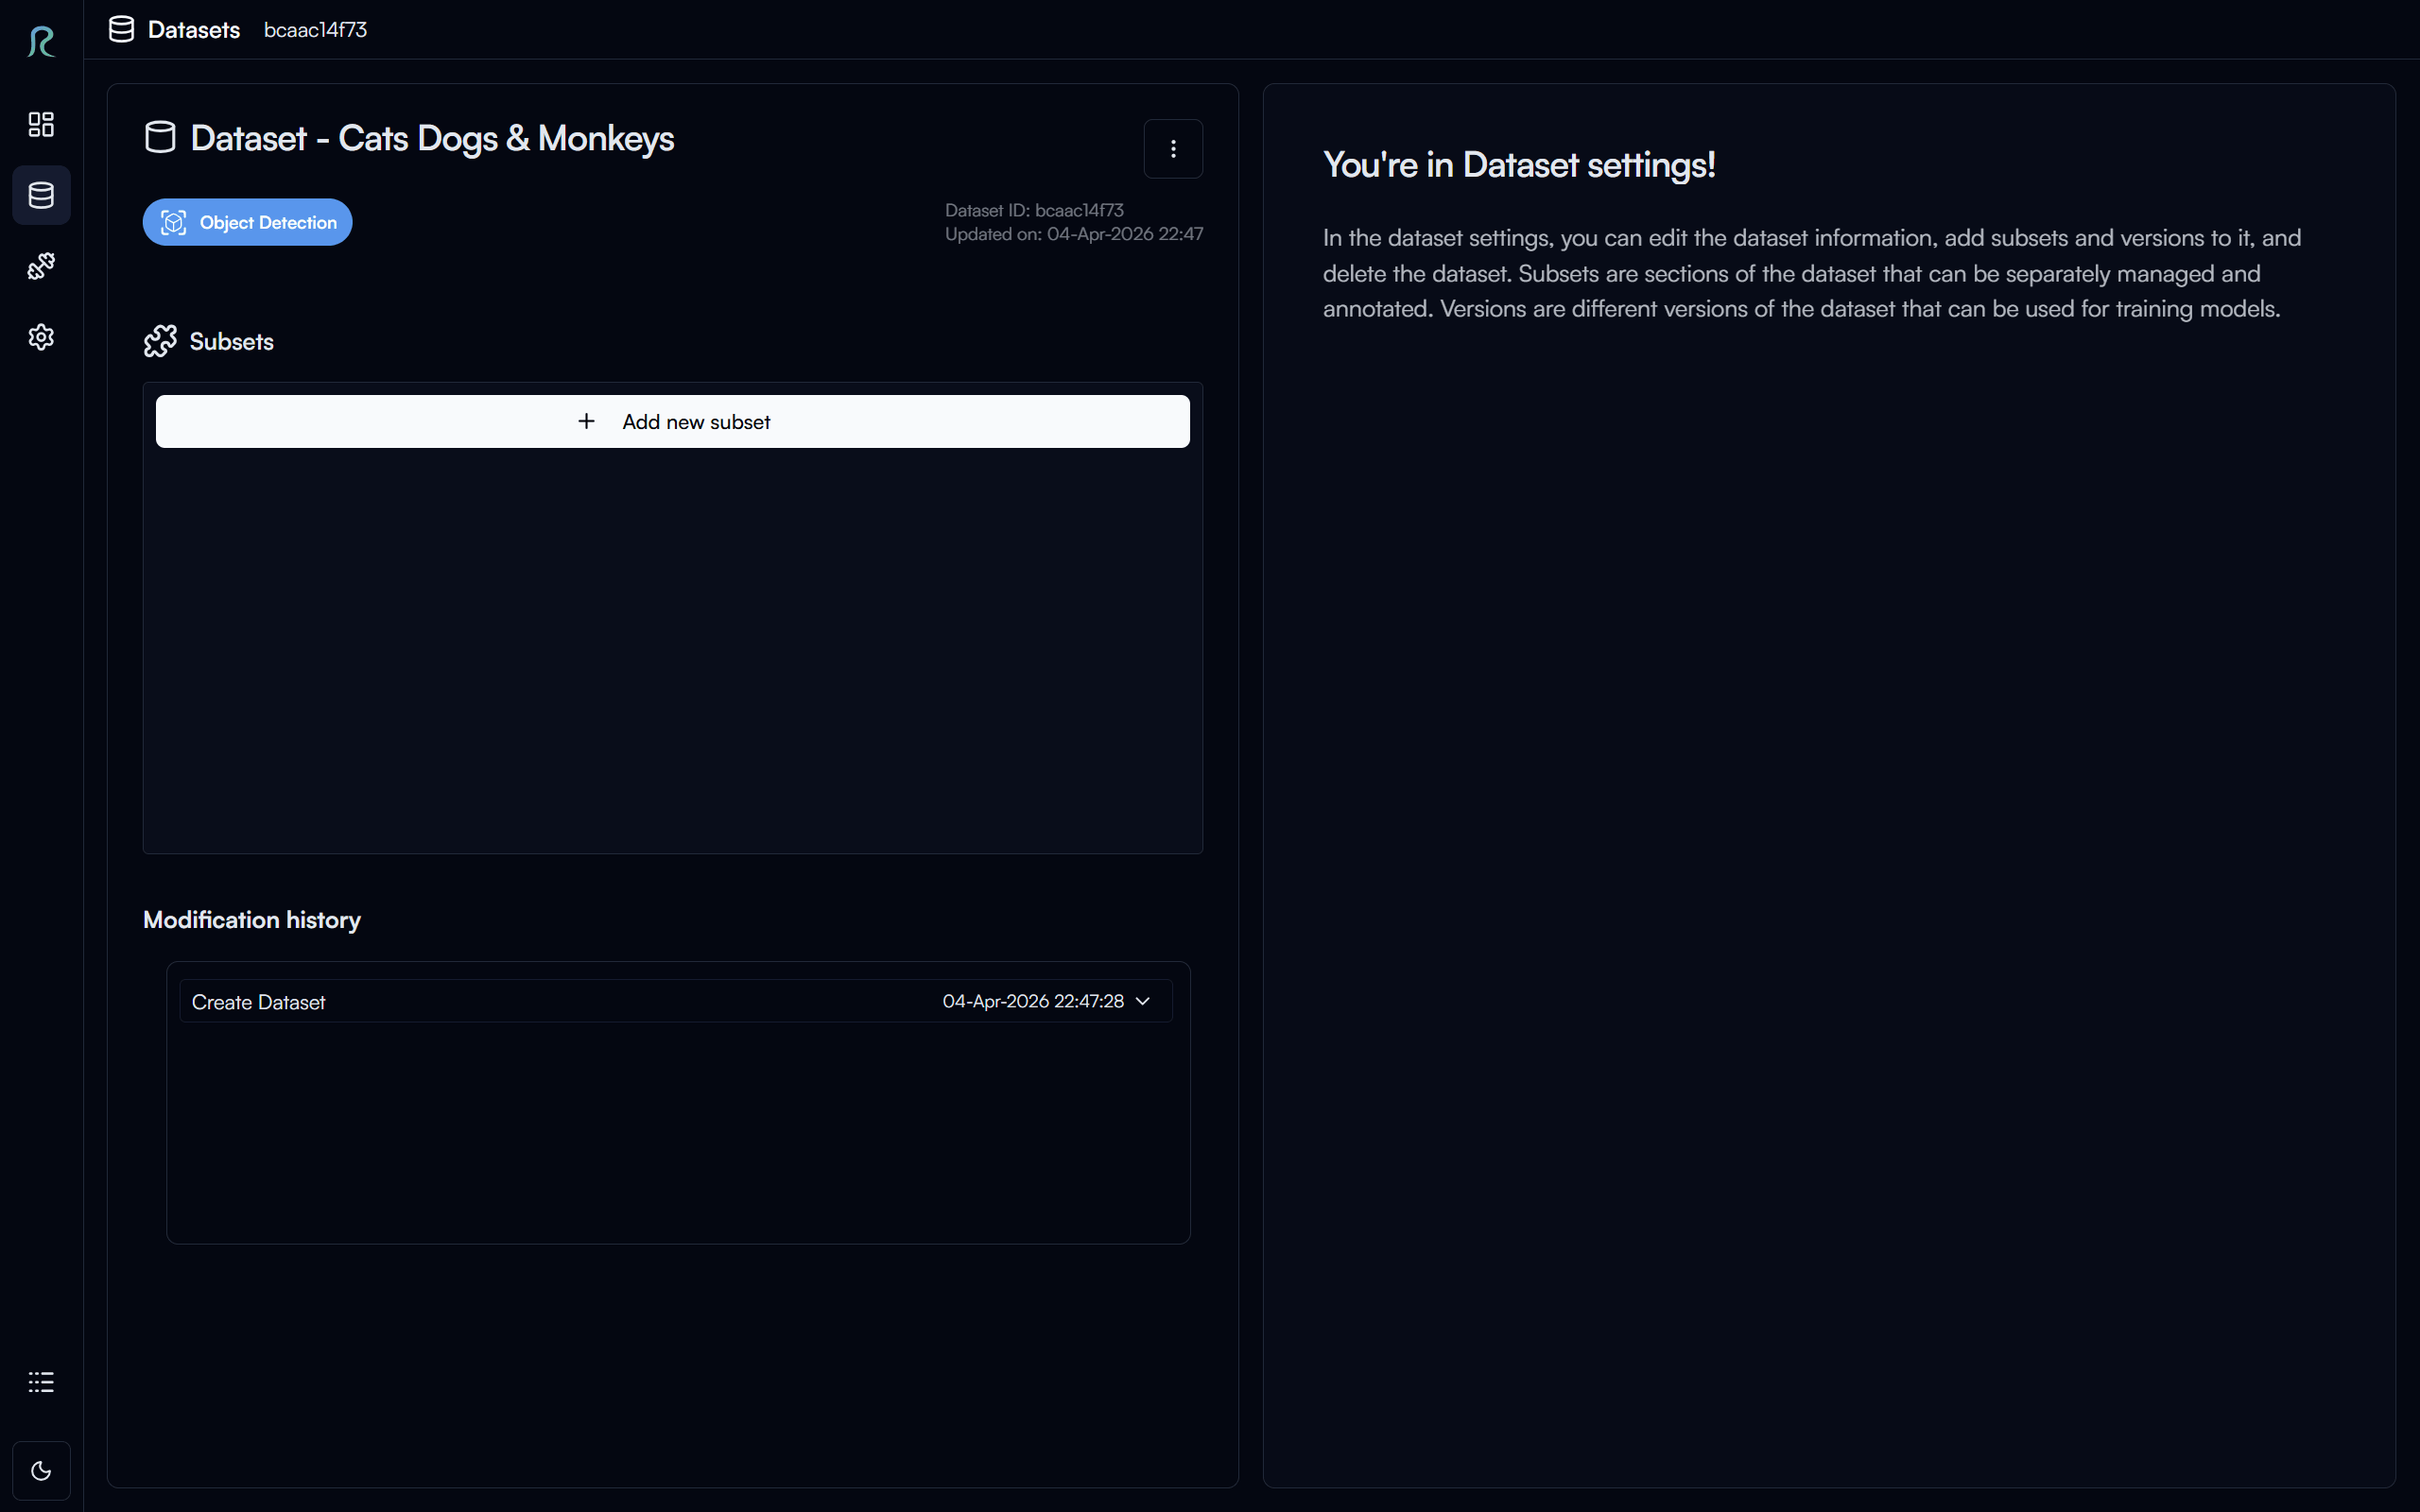
Above is the dataset settings page, where you can manage your dataset information, subset and version of your dataset, and view the dataset details.
Subset
Subset is a way to organize your dataset into a smaller group. For example, you can start your dataset with a subset of 100 images, and then add more subsets to the dataset later on.
Create a New Subset
To create a new subset, click on the Add New Subset button in the Subset section.
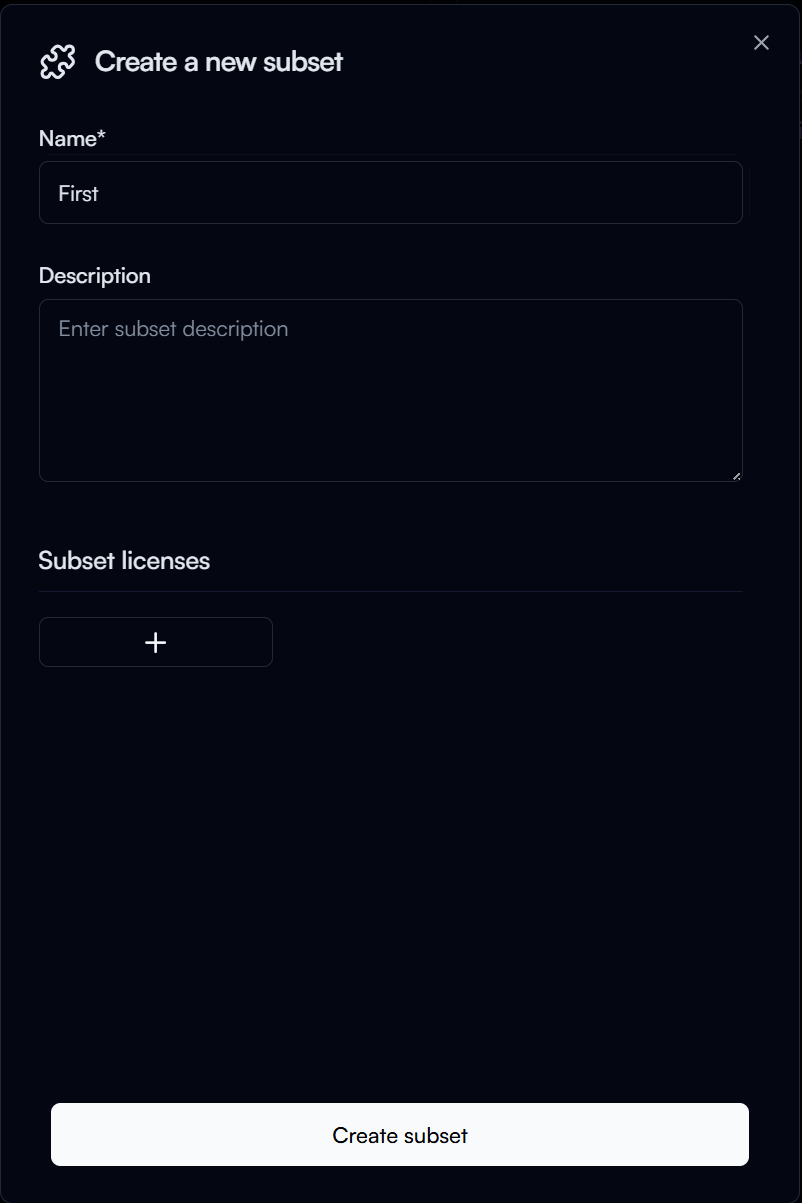
In the Create a new subset dialog, enter the following:
- Name: Name of your subset (e.g.
First)
Then click on the Create button to create the subset.
Subset Page
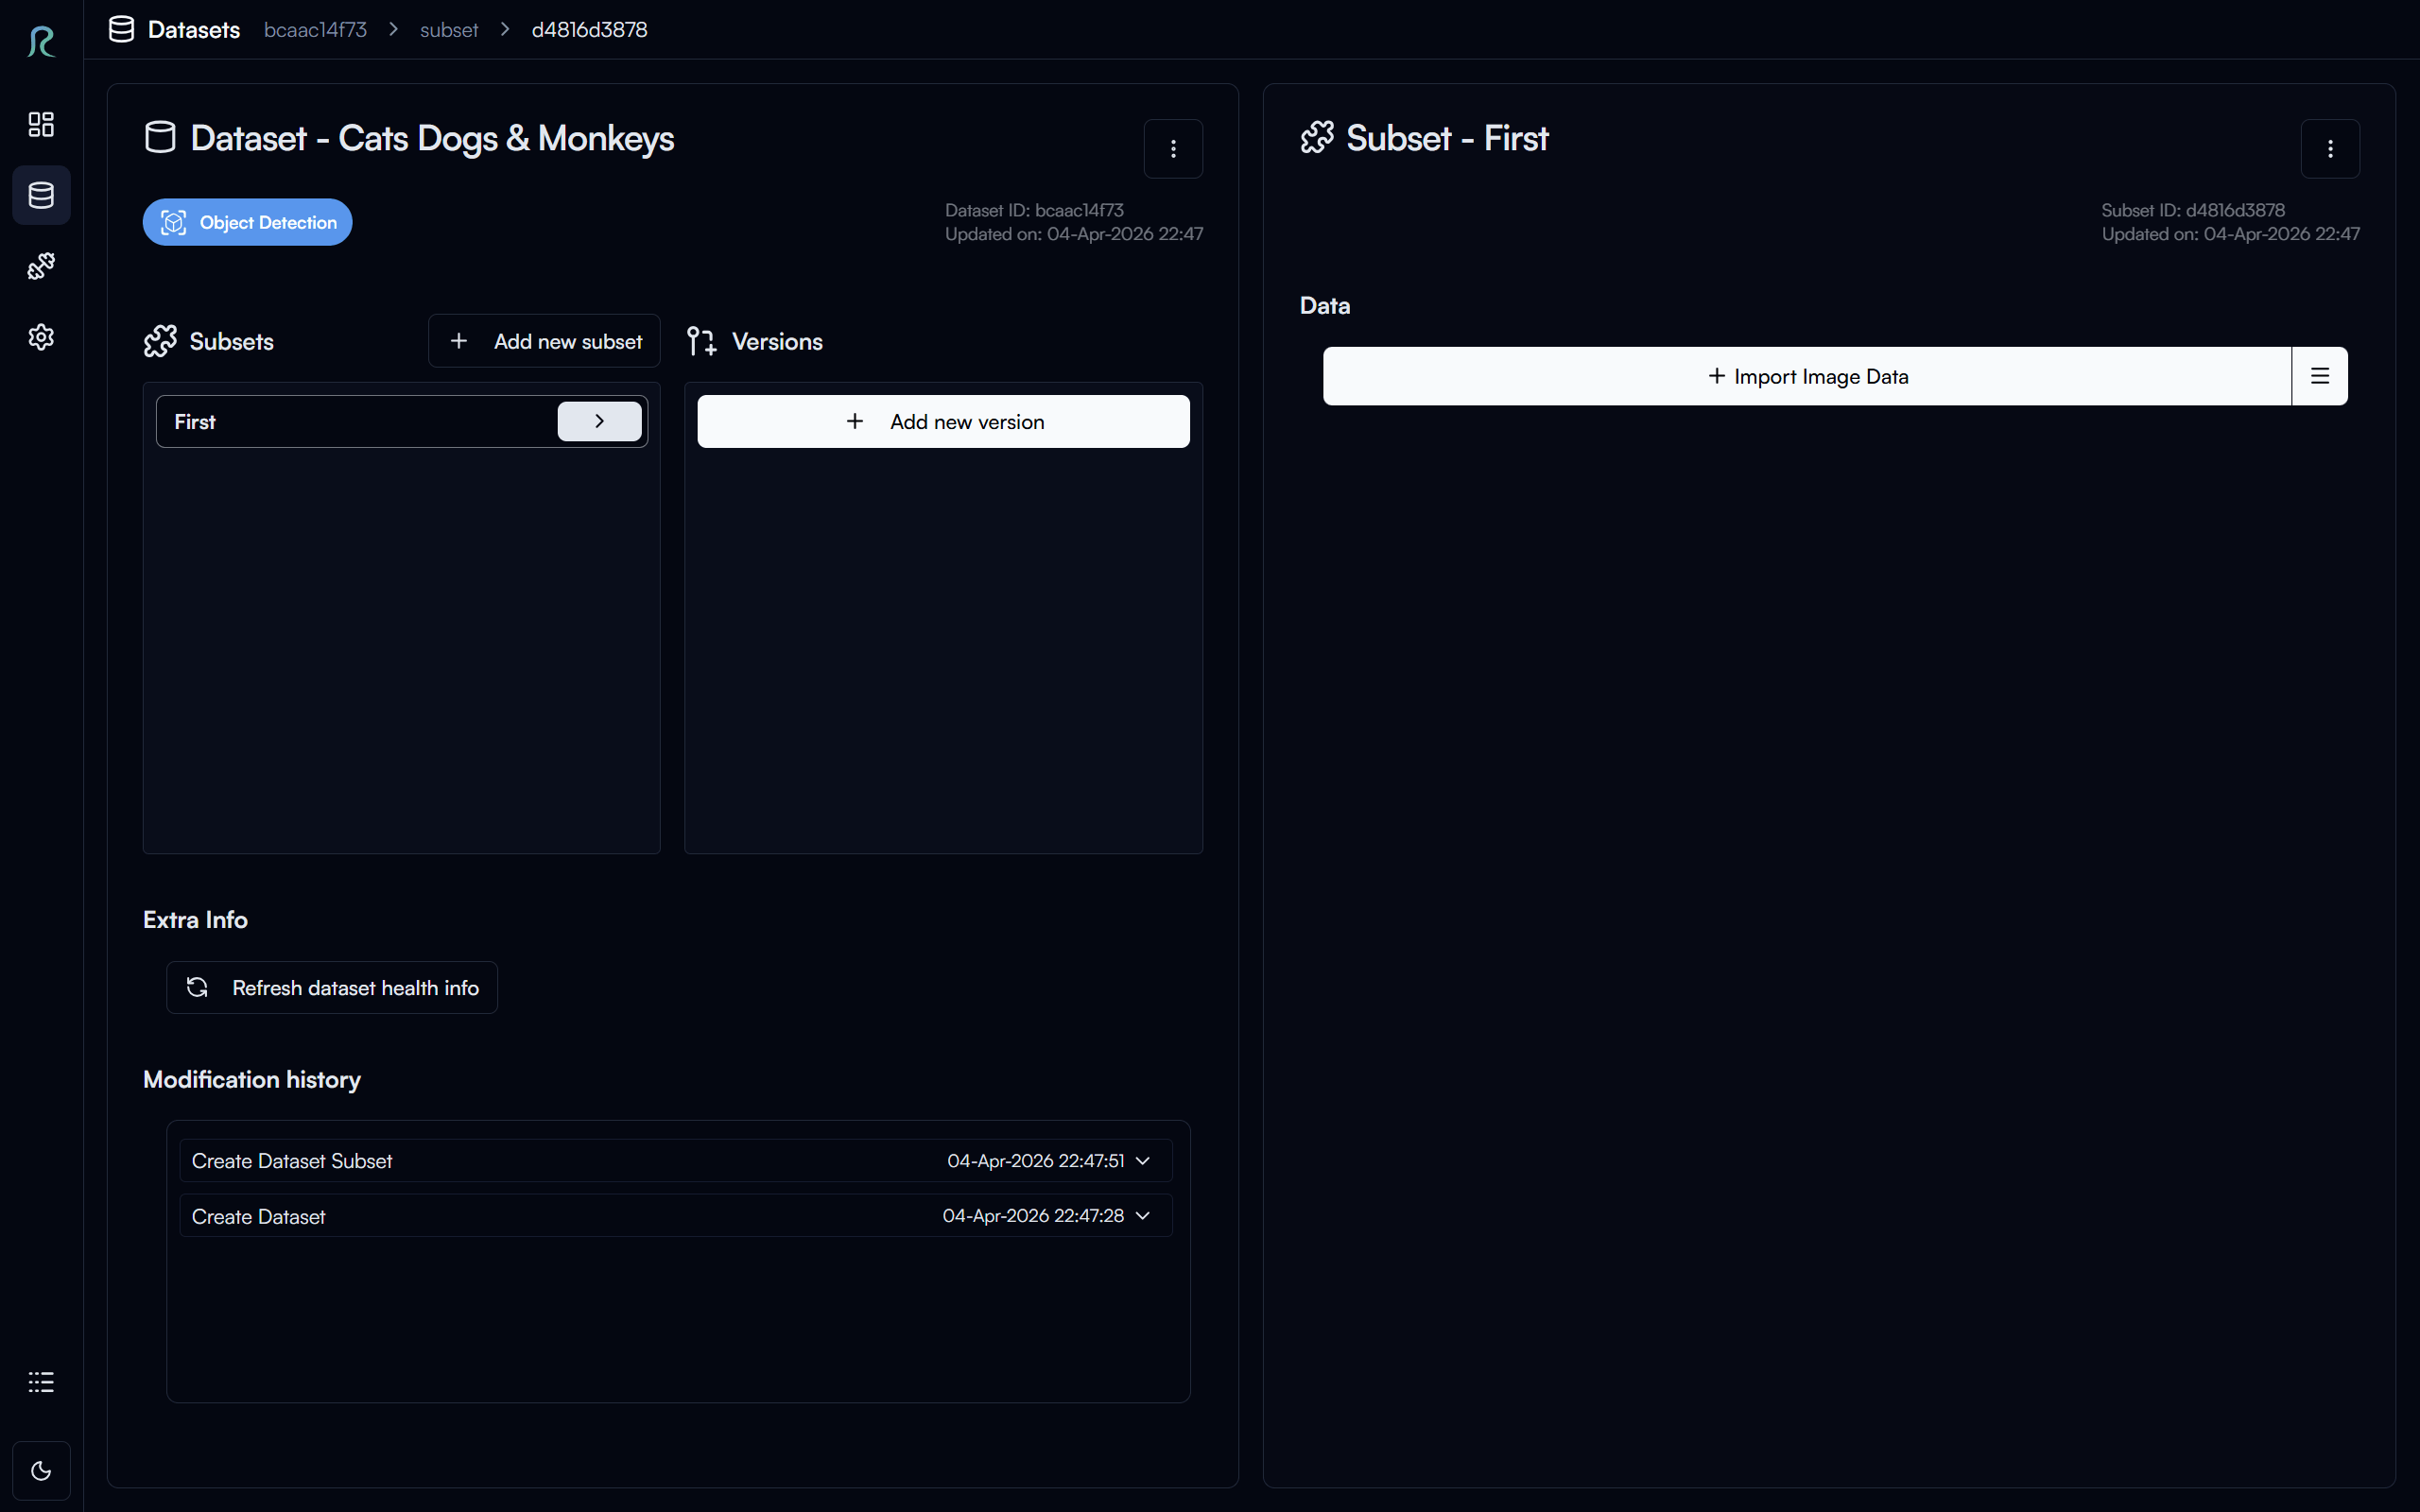
After creating the subset, you will be directed to the subset page, where you can manage your subset information, add data to your subset, annotate your data, export data, and more.
Note
Depending on your screen size, the layout of the dataset settings page and subset page may be different.
Importing Images Data
Let's import the sample dataset we downloaded earlier to the subset. Click on the Import Image Data button in the subset page.
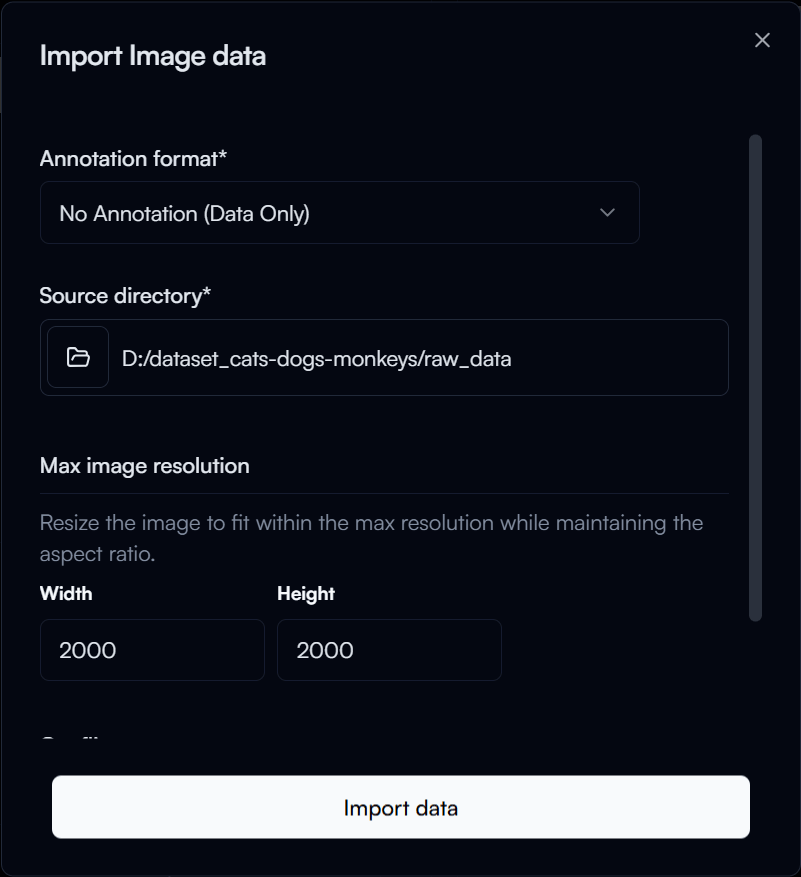
In the Import image data dialog, you enter the following:
- Annotation format: The annotation format of your dataset (for this step we will select
No Annotationsince we will annotate the data later) - Source Directory: The directory of your dataset (e.g.
D:\datset_cats-dogs-monkeys\raw_data)
Then click on the Import data button to start importing the data.
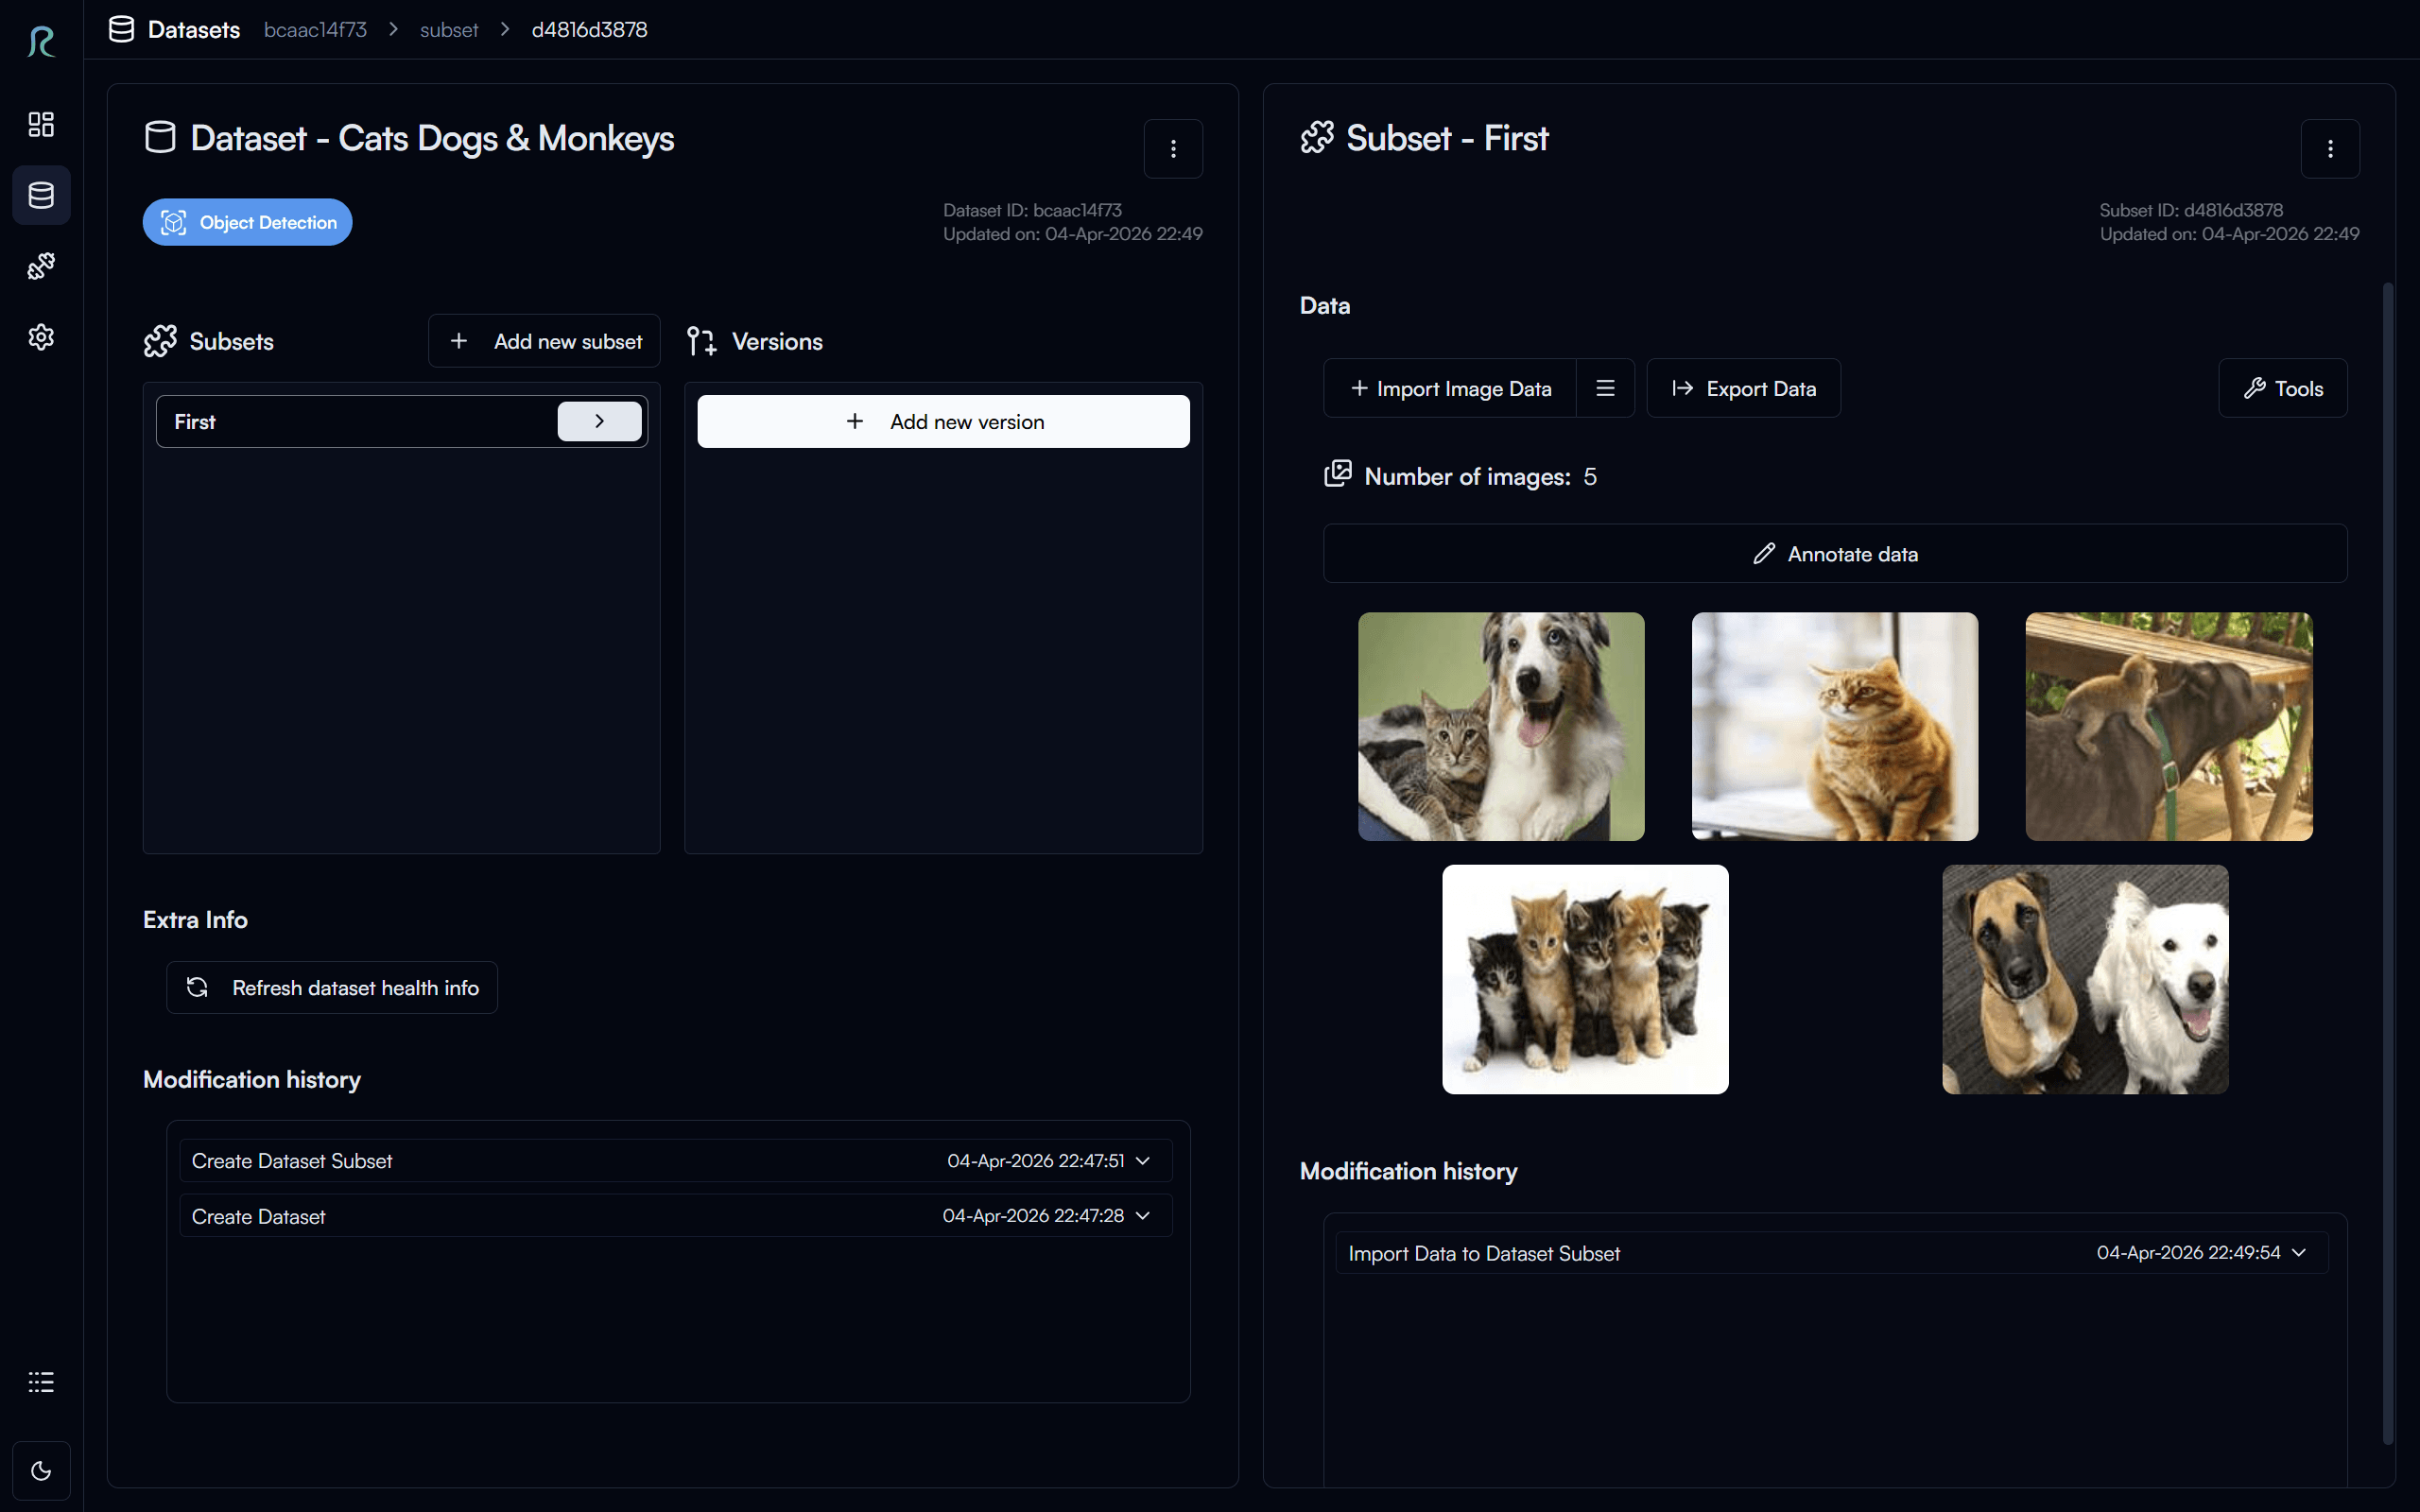
Once the data is imported, you will see the images in the subset page.
Annotate Data
Since we imported the data without annotation, let's annotate the data now! Click on the Annotate data button in the subset page to start annotating the data.
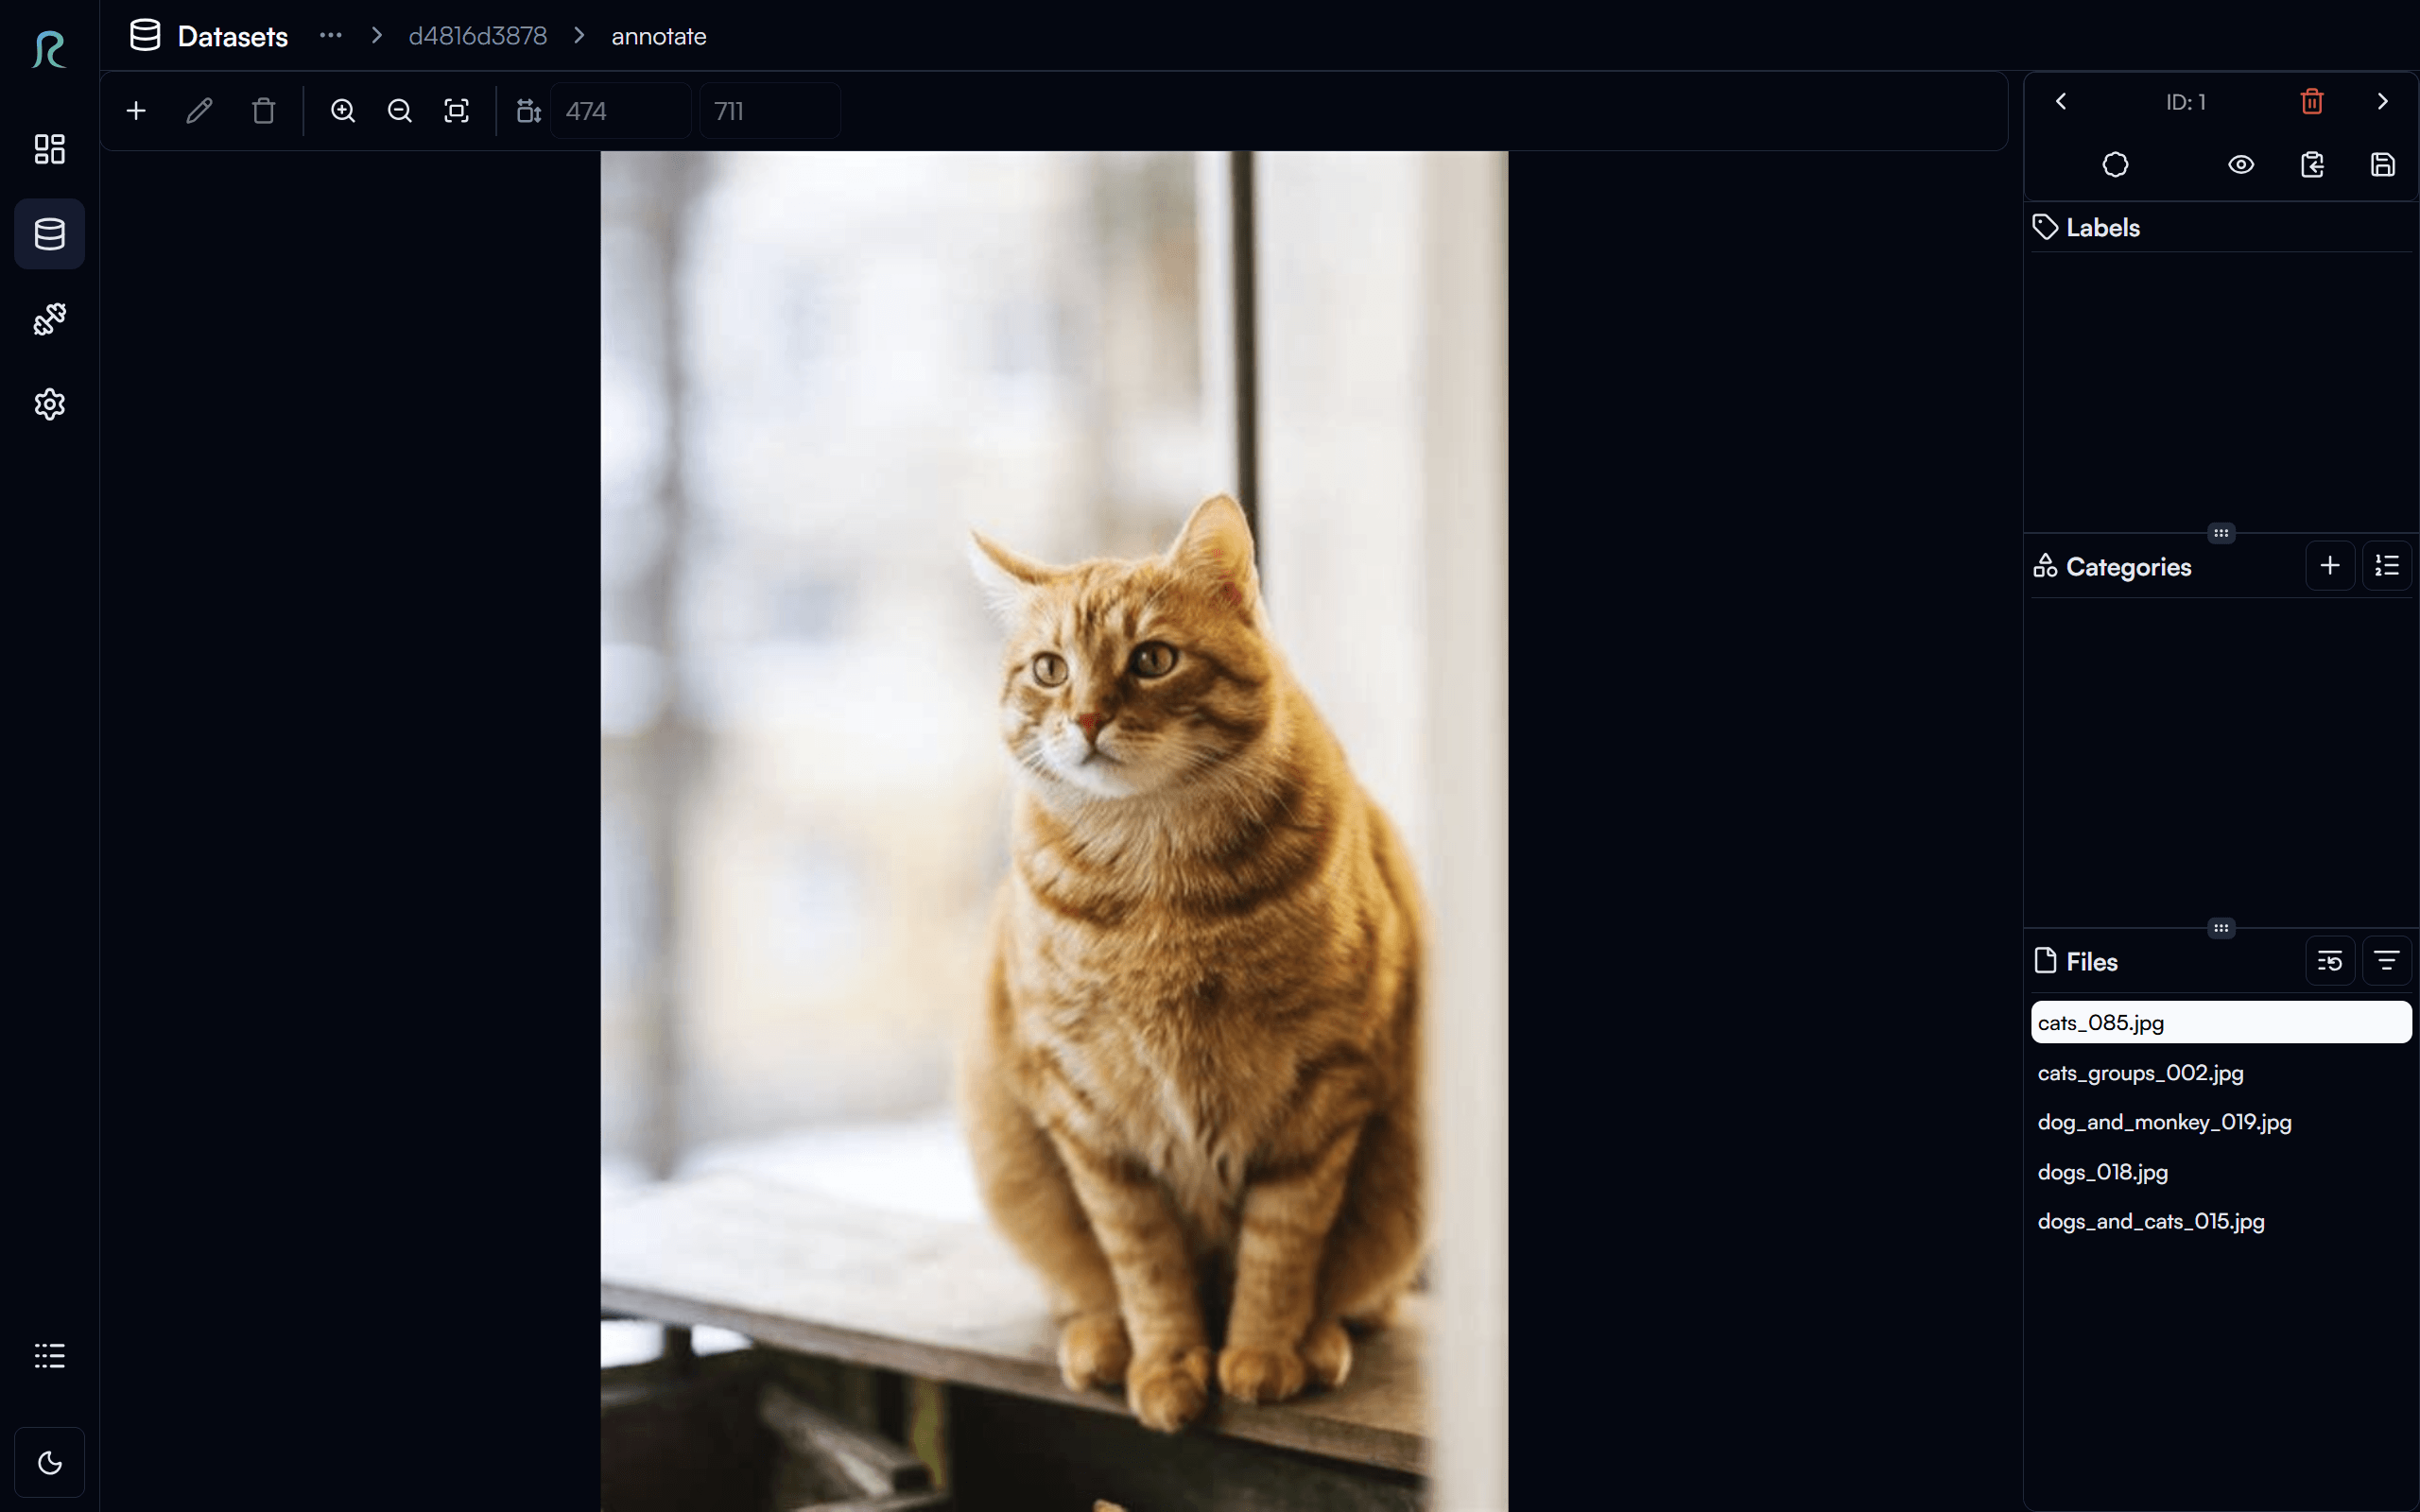
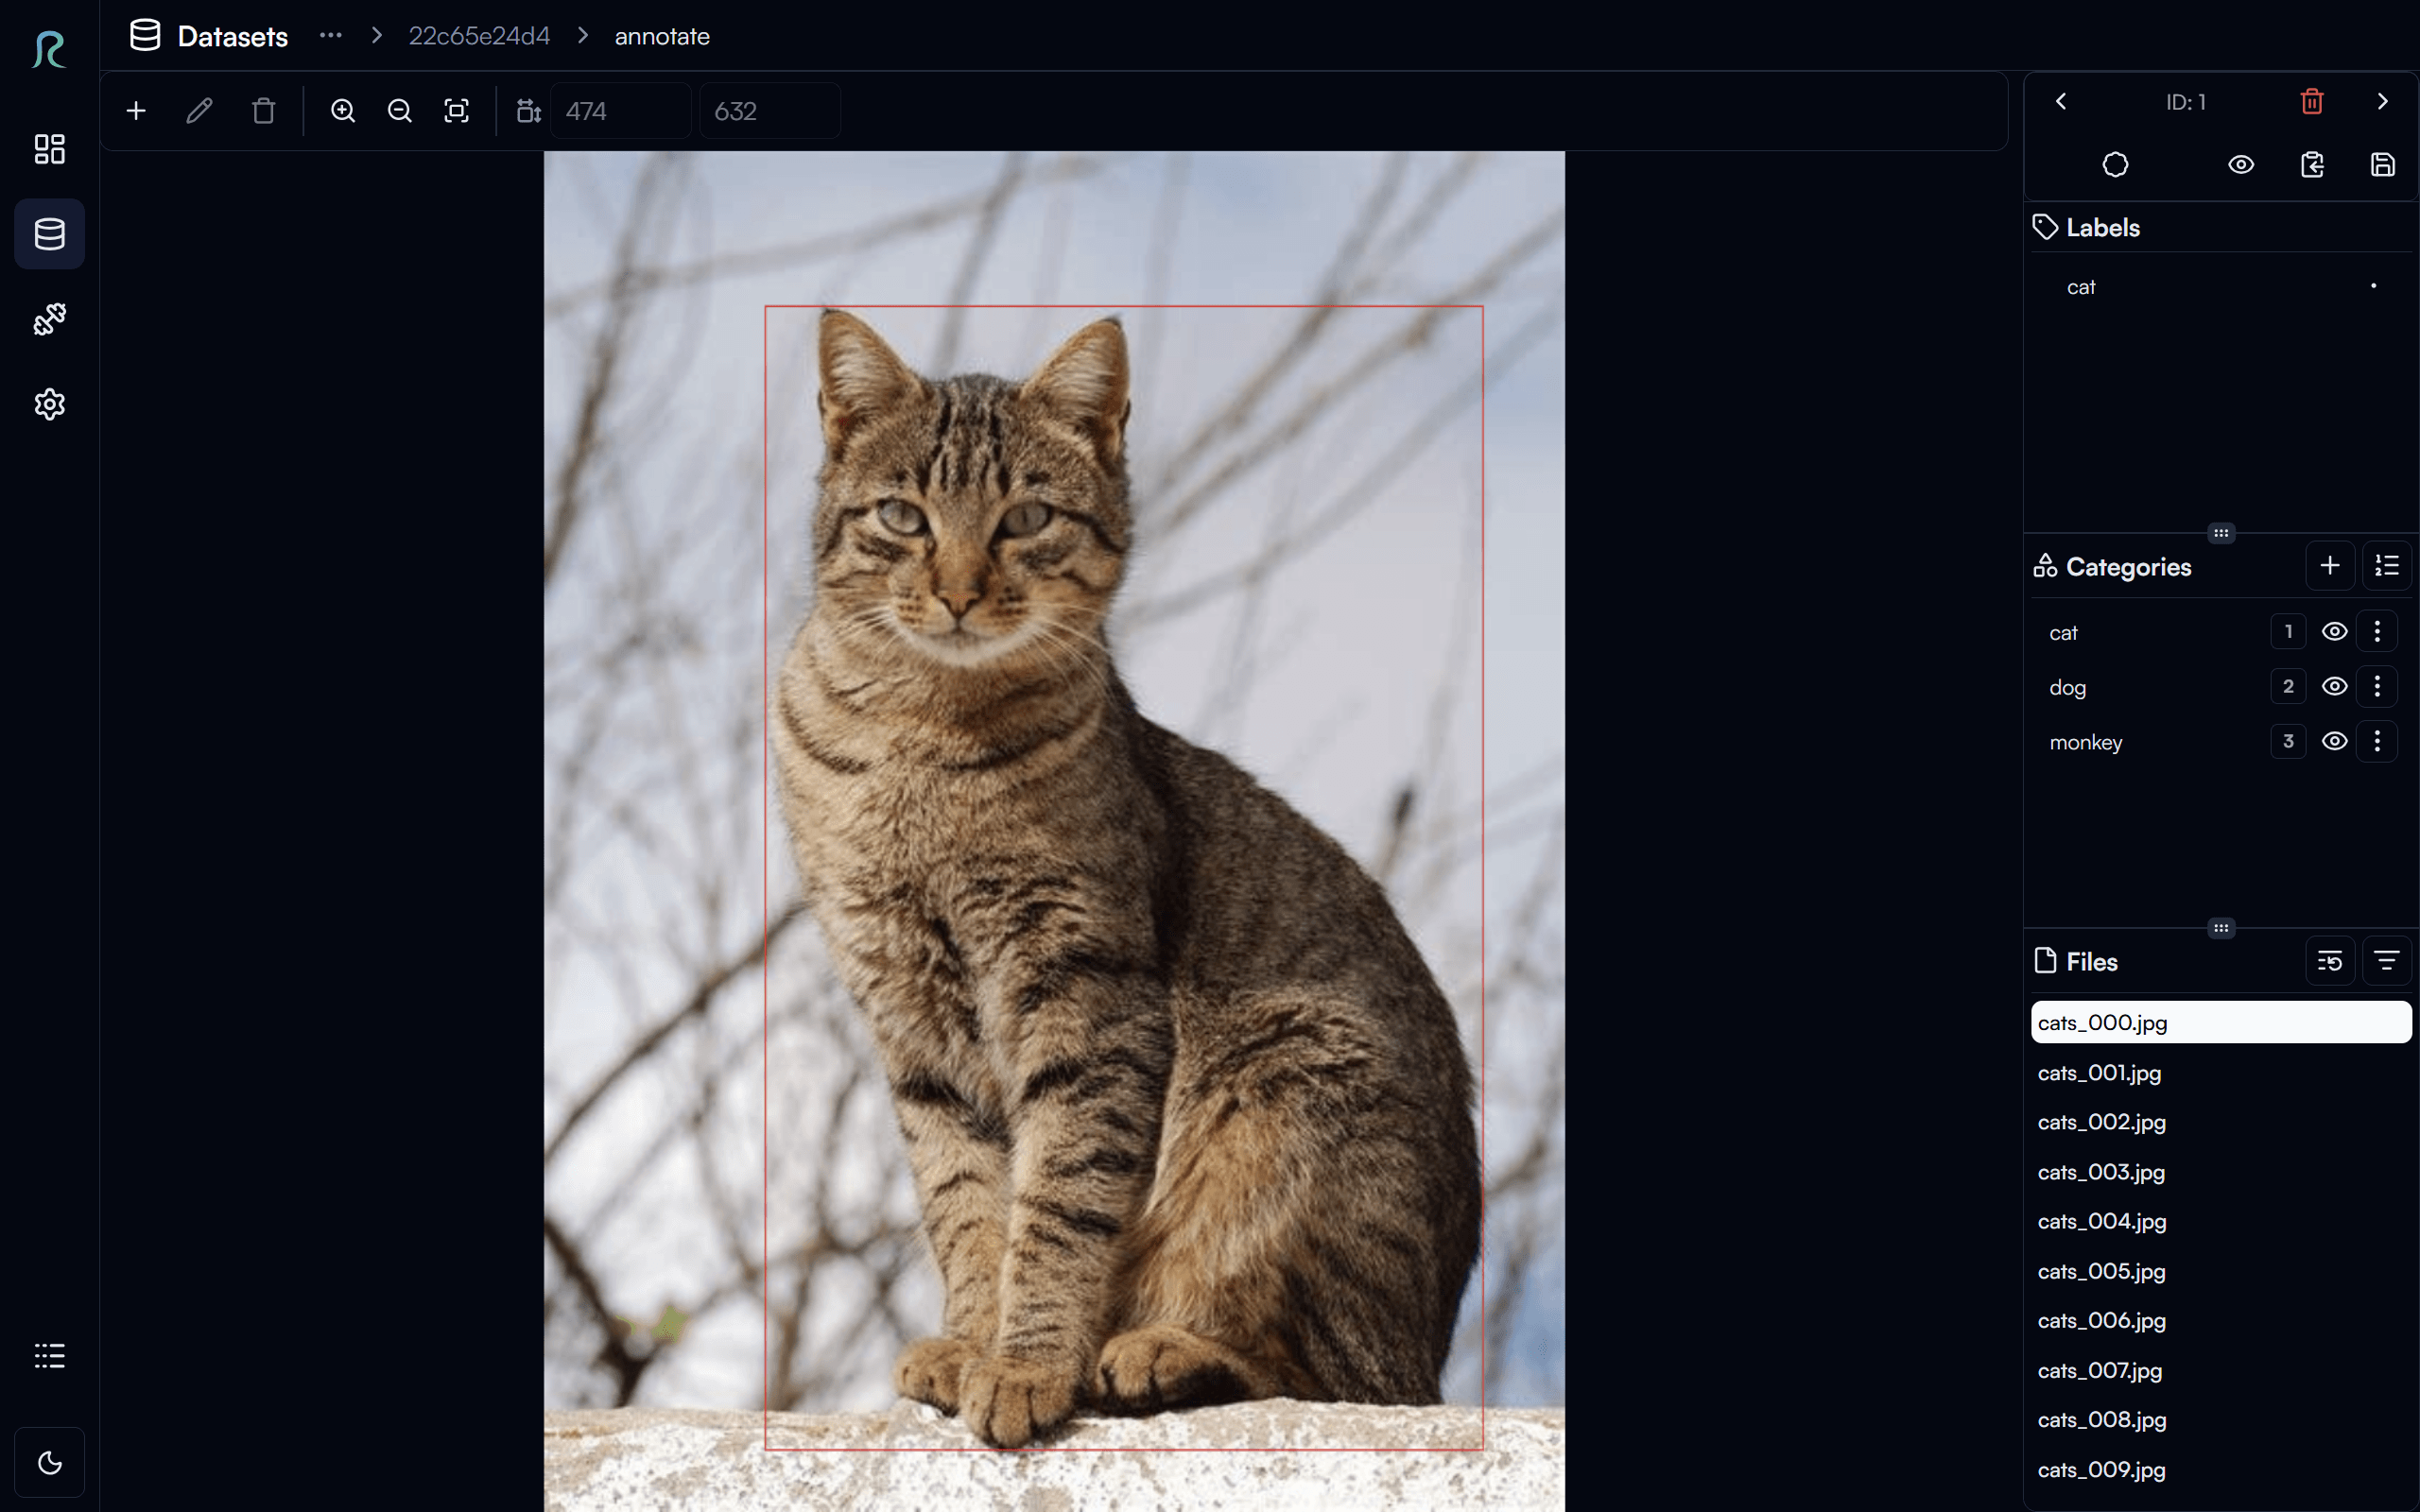
In the annotation page for object detection task, you can draw bounding boxes on the images and label them with the corresponding class names (e.g. cat, dog, monkey).
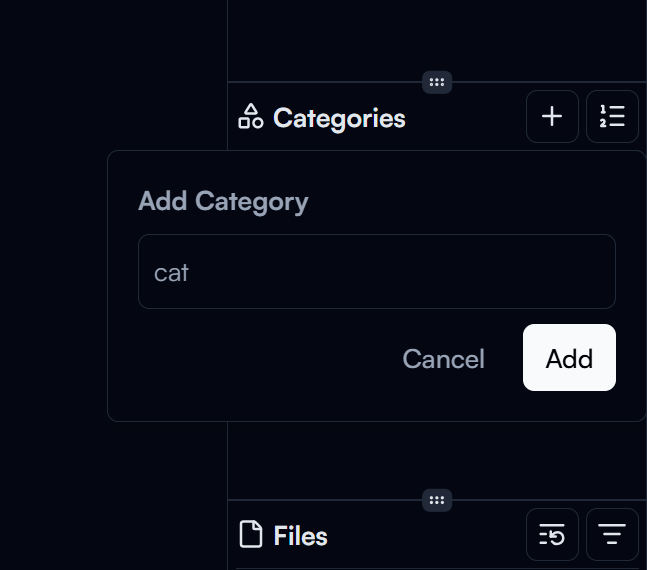
Let's add a category for each class in the dataset first. Under the Categories section on the right panel, click on the Add Category button to add a new category. Enter the category name (e.g. cat) and click on the Add button to create the category. Repeat this step to create categories for dog and monkey.
Note
Category names are case-sensitive. So for example, cat and Cat will be considered as two different categories.
Let's start annotating the images now! Click on the button in the top left corner (or press W on your keyboard) to start drawing a bounding box on the image.

Click on the image to place the top-left corner of the bounding box, click again to place the bottom-right corner of the bounding box, and then select the category of the bounding box (e.g. cat) to label the bounding box.
Tip
For more efficient annotation, you can pre-select the category you want to annotate before drawing the bounding box by either:
- Click the category in the
Categoriessection - Press the corresponding number key on your keyboard (e.g.
1forcat,2fordog,3formonkey).
You may find the default category color is not very visible on the image. To change this:
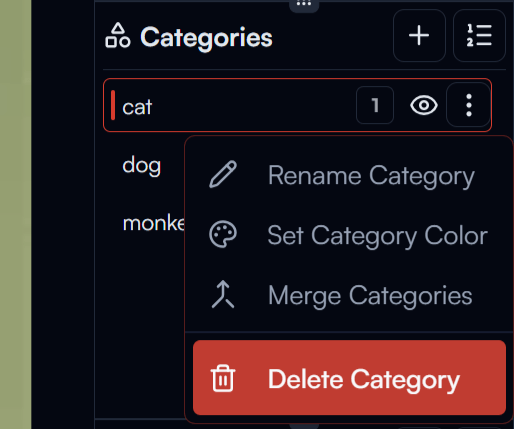
- Click on the category menu button in the category list
- Click the
Set Category Colorbutton, and then select a color you like for the category.
In the category dropdown menu, you can also Rename Category, Merge Category with another category, or Delete Category (which will also delete all the annotations with this category on all subsets in the dataset).
To save the annotation, click on the button in the top right corner, or press Ctrl + S on your keyboard.
You can navigate to the next image by clicking on the button in the top right corner, or by pressing D on your keyboard. Similarly, you can navigate to the previous image by clicking on the button, or by pressing A on your keyboard.
Note
Annotation progress is automatically saved when you navigate to the next/previous image, or when you navigate back to the subset page.
Let's annotate all the images in the subset now! Take your time to annotate the images, and feel free to explore the annotation tool and its features.
Import Pre-Annotated Data in a New Subset
For object detection task, if you already have annotations for your dataset, you can also import the annotations the subset.
Let's create a new subset for the pre-annotated data first. Click on the Add New Subset button in the Subset section, enter the name of the subset (e.g. Import), and then click on the Create button to create the subset.
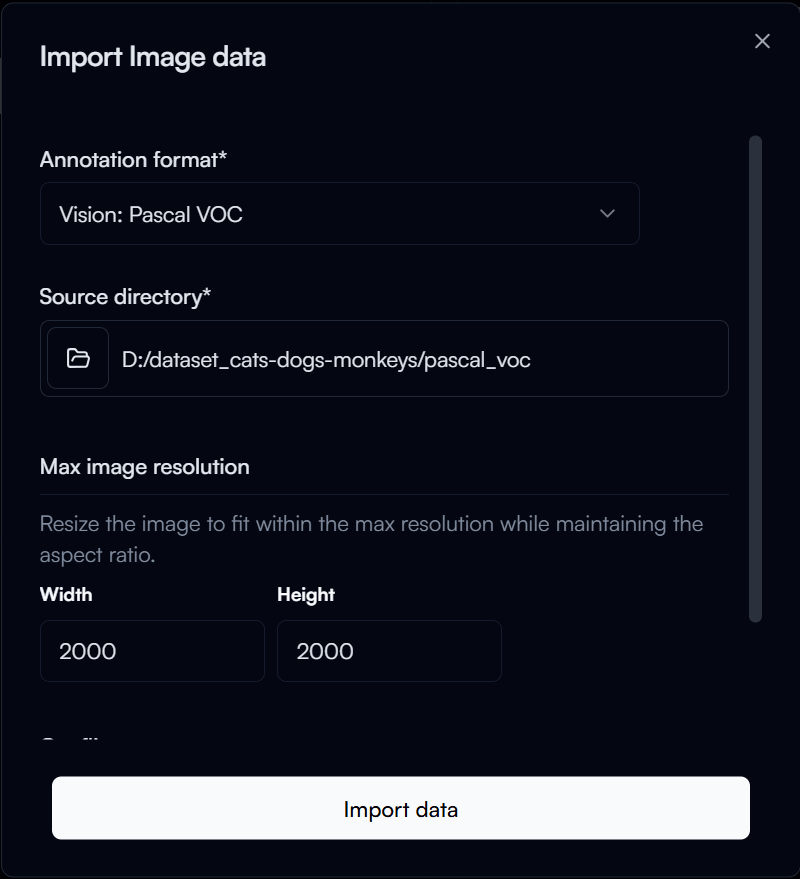
Like before, click on the Import Annotation button in the subset page to start importing the annotations. In the Import annotation dialog:
- Annotation format: The annotation format of your dataset (for this step we will select
Pascal VOCsince the sample dataset has annotation in Pascal VOC format) - Source Directory: The directory of your dataset (e.g.
D:\datset_cats-dogs-monkeys\pascal_voc)
Then click on the Import data button to start importing the annotations.
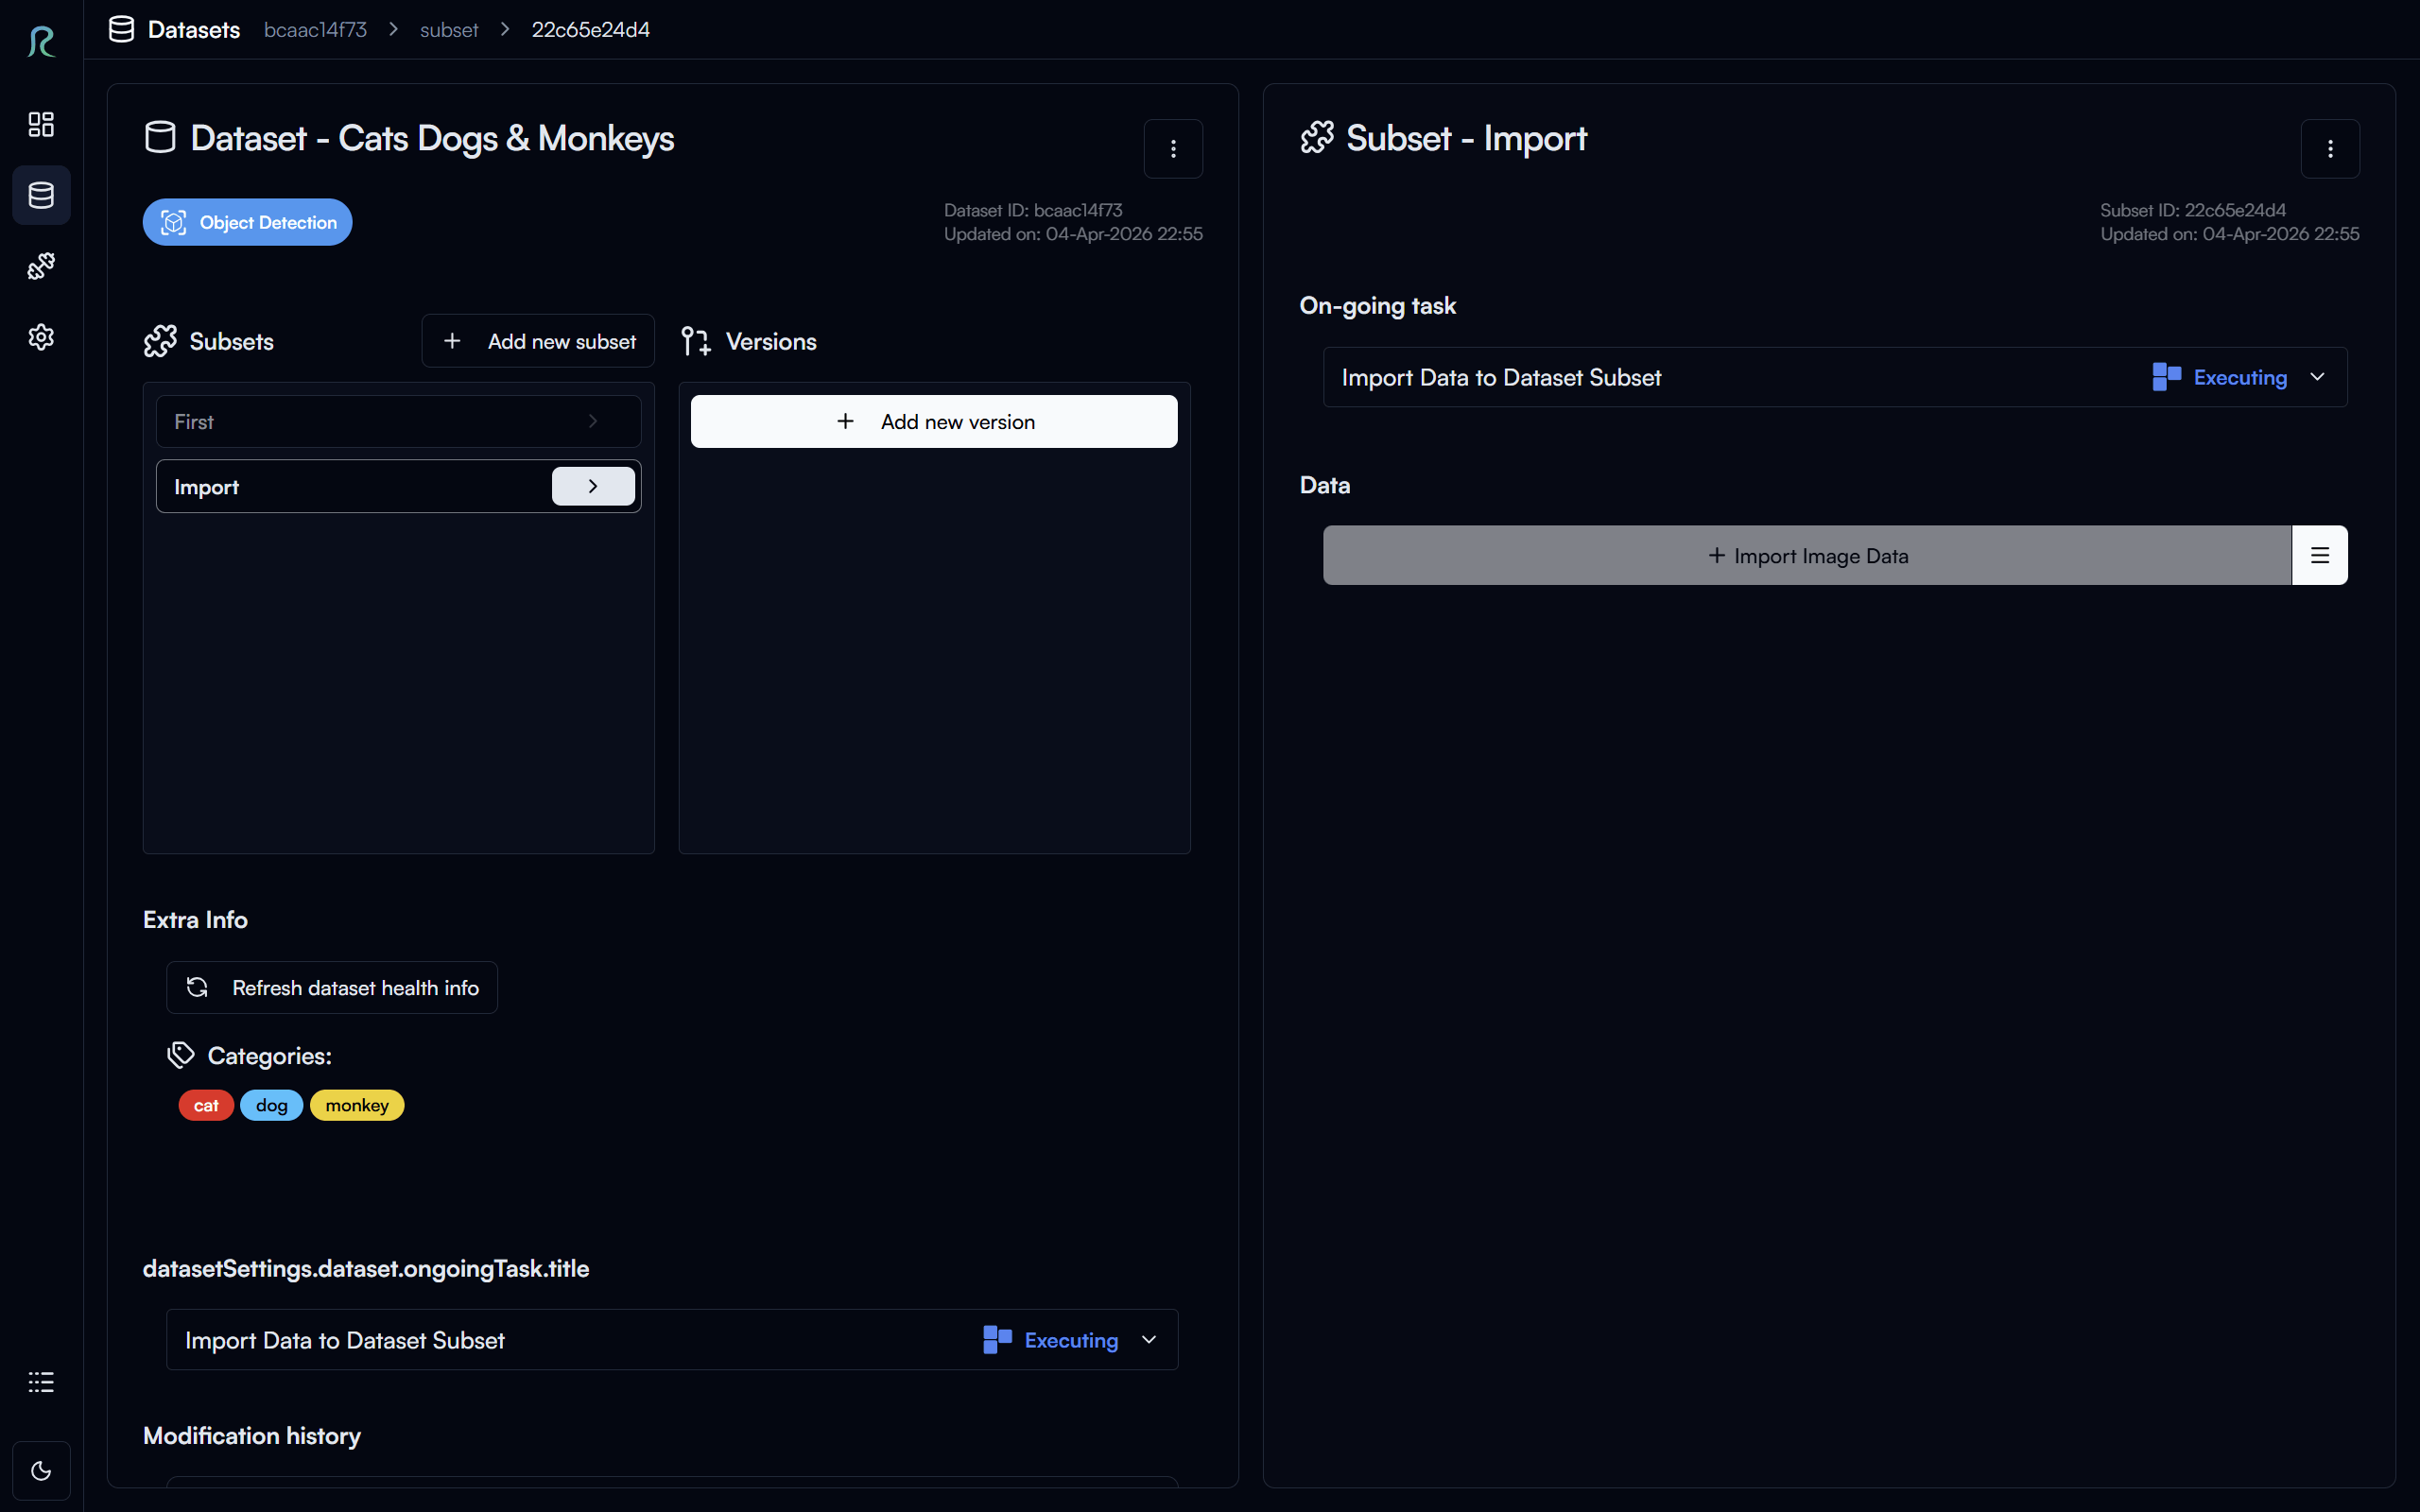
Since this imported data is much larger than the previous subset, it may take a while to import the data and annotations, you will see this in the On-going Tasks section on similar to the image above.
Once the data and annotations are imported, you can click on the Annotate data button to view the imported annotations on the images.
As you can see, the bounding boxes are already on the images after importing the annotations.
Dataset Statistics
In the dataset settings page, you can also view the statistics of your dataset in the Extra Info section.
Click on the Refresh dataset health info button to get the latest statistics of your dataset.
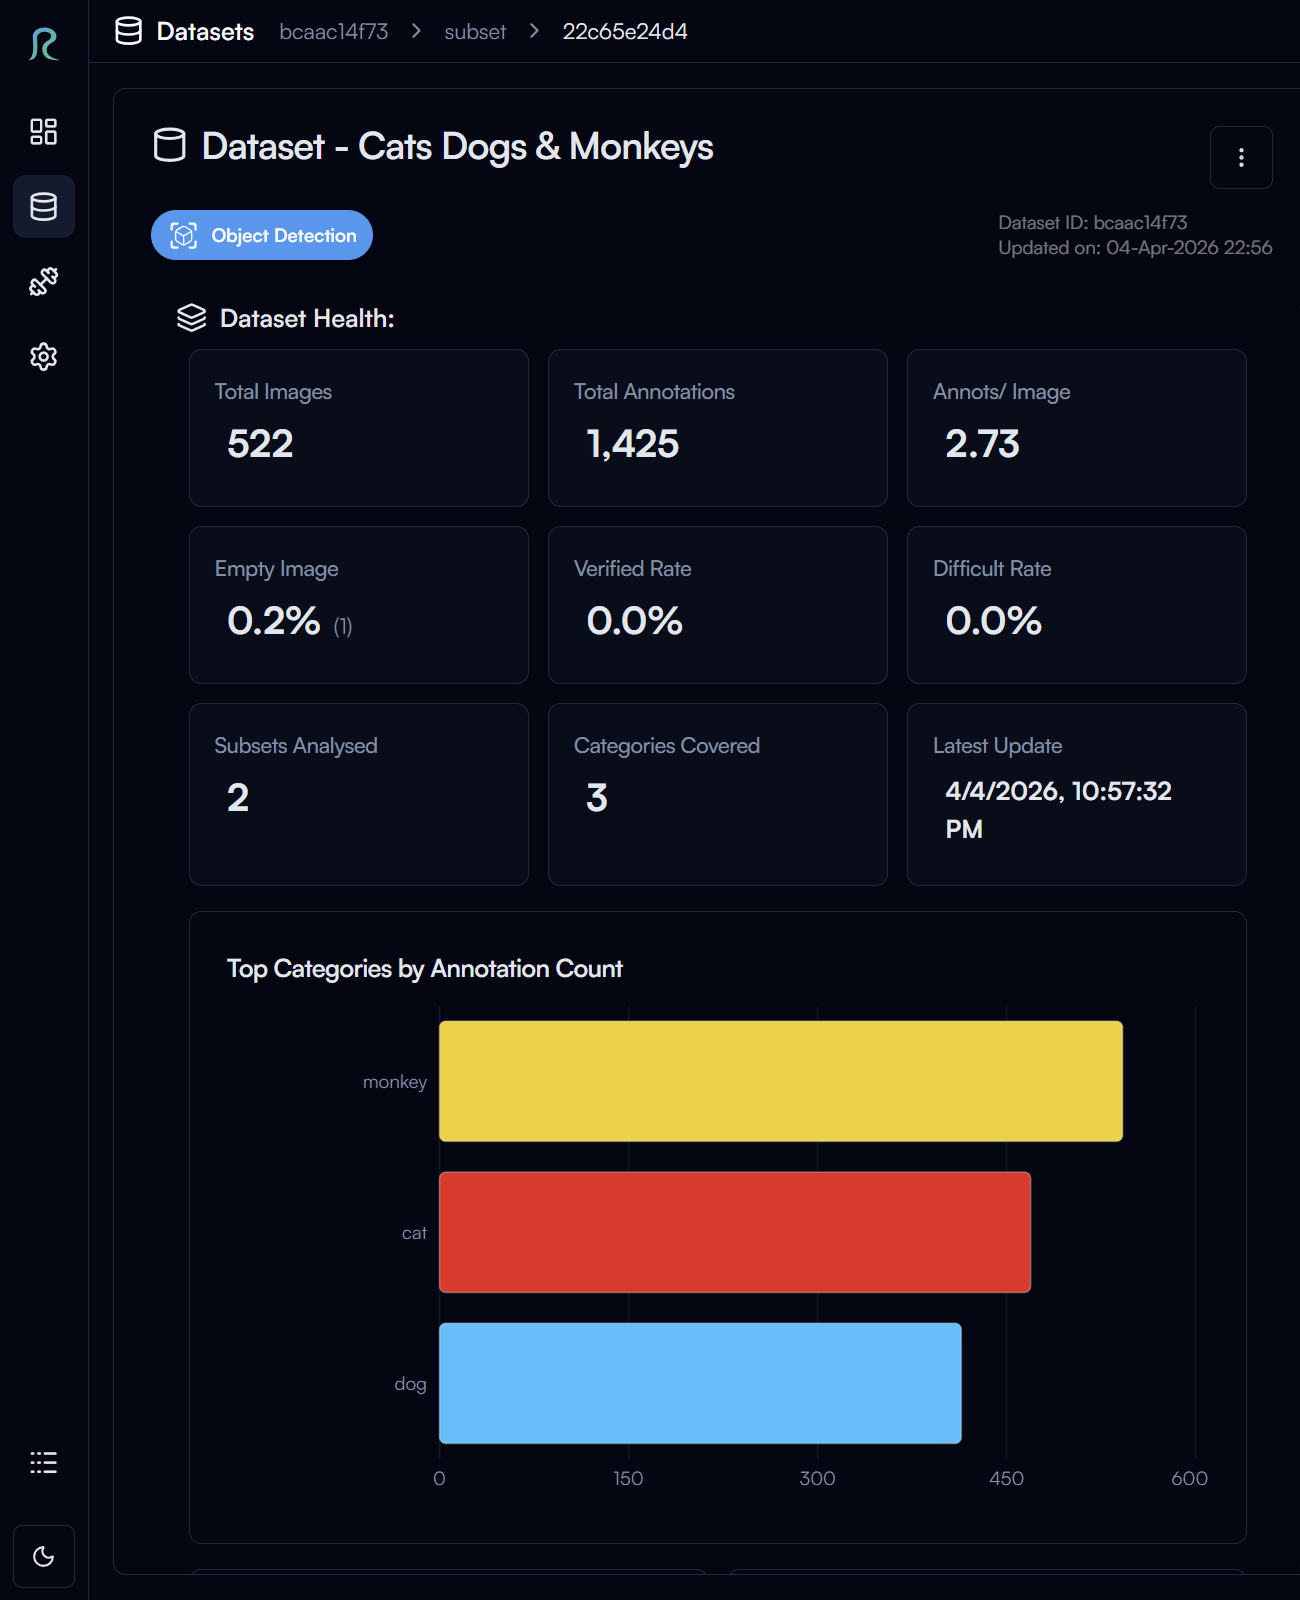
For object detection task, you can see multiple statistics of your dataset, such as the number of images, number of annotations, category distribution, and more.
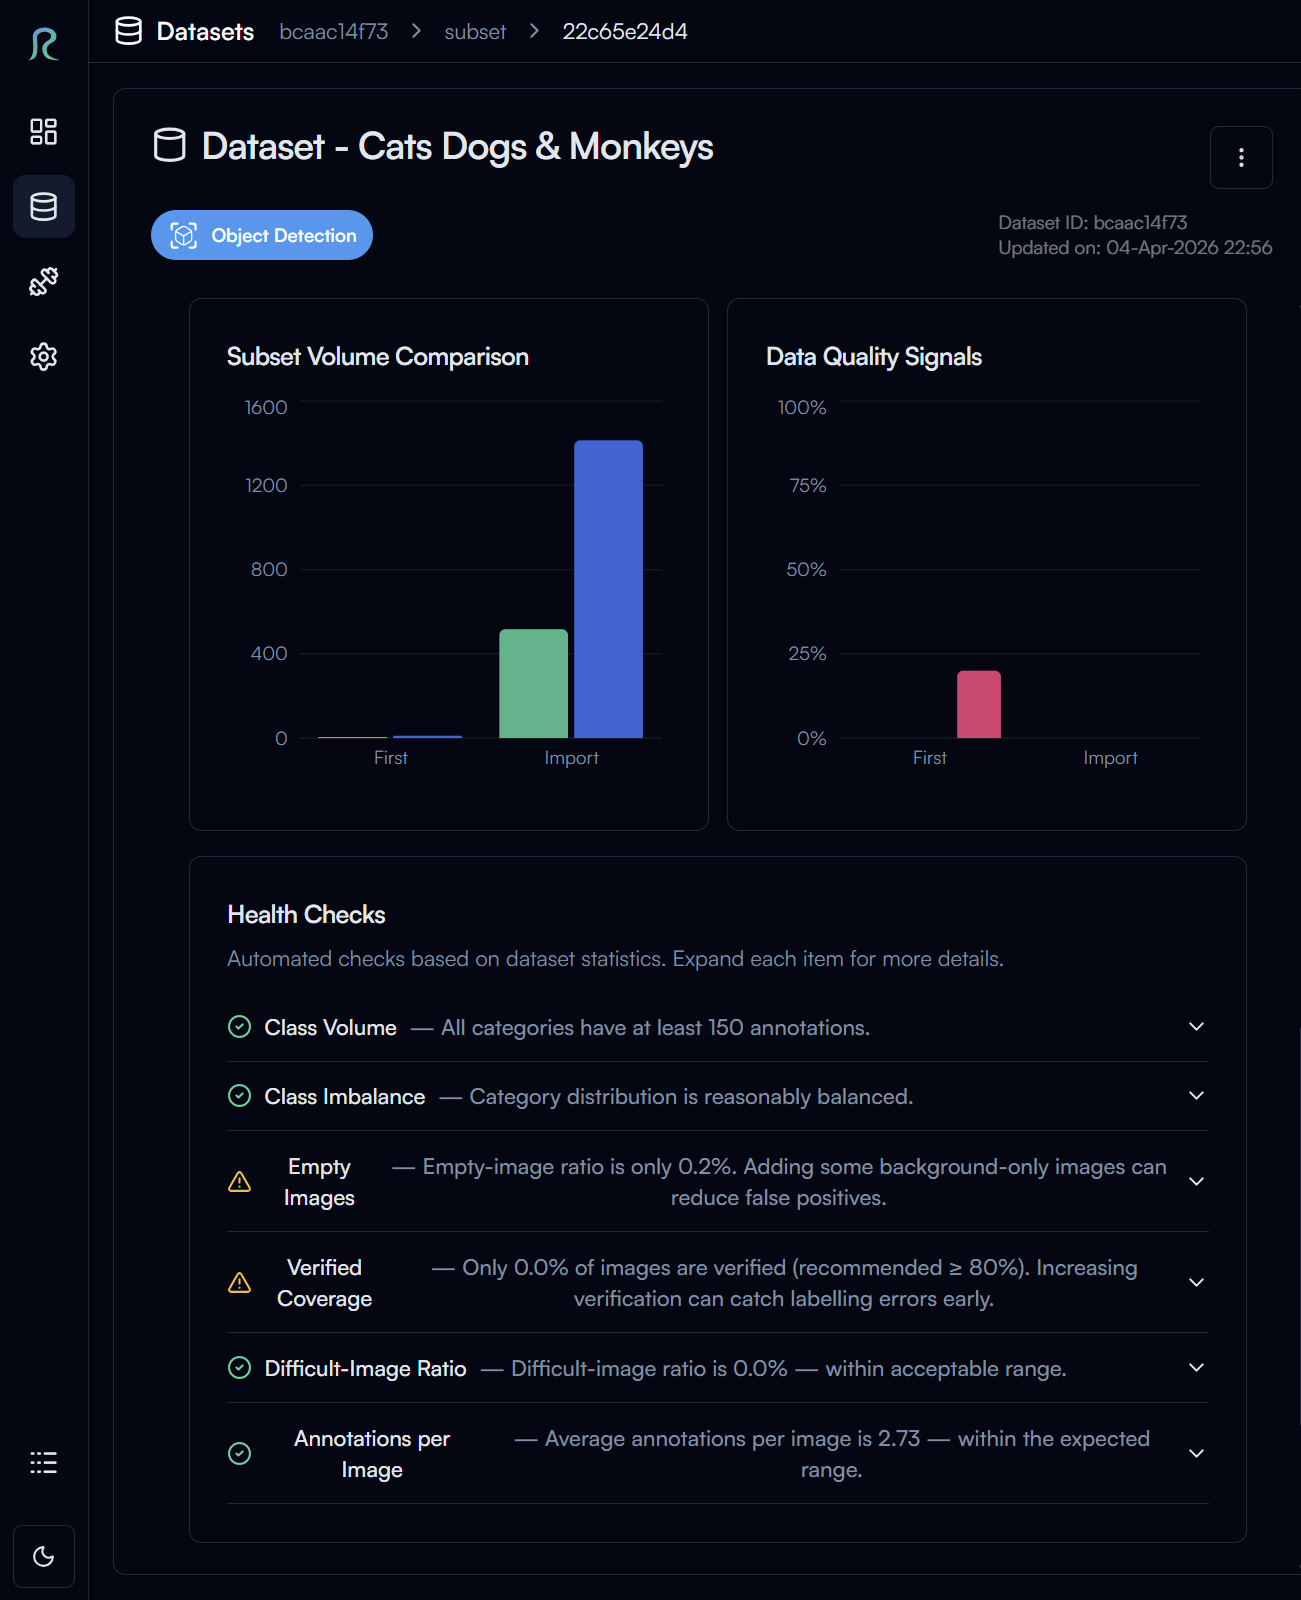
At the bottom of the section, you can also find the Health Checks which will advice you on how to improve your dataset.
Version
Dataset version is a way to keep track and manage the changes in your dataset. Version is where the training data for your model will be referenced from.
Create a New Version
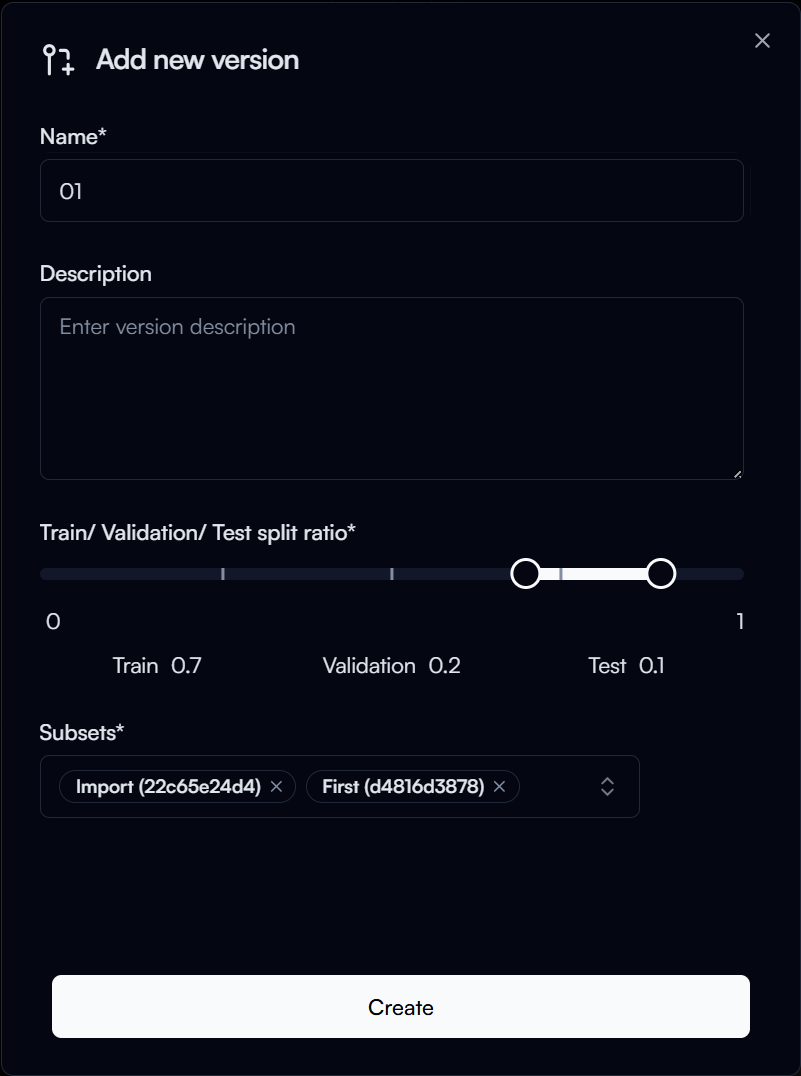
To add a new version, click on the Add New Version button in the Version section.
In the Create a new version dialog for object detection, enter the following:
- Name: Name of your version (e.g.
01) - Train/ Validation/ Test Split Ratio: The split ratio of your dataset for training, validation, and testing (e.g.
70/20/10) - Subsets: The subset(s) you want to include in this version, this is default to all subsets in the dataset, but you can also choose to only include certain subset(s) in the version.
Then click on the Create button to create the version.
No support for Test split yet
With the current version of Reva, we are only using the Train and Validation split for training and validating the model, the Test split is not used for now but we will support it in the future for evaluating the model performance.
Therefore, when you create a new version, you can choose to only split the dataset into Train and Validation sets (e.g. 80/20), and leave the Test split empty.
Version Details

After creating the version, you can see on the version details page the information of the version, such as the split ratio and subsets included in the version.