Train Your First Model
Quick start guide to training your first model in Reva.
Goal
You will learn how to:
- Create a training project and set up your training experiment
- Configure augmentation and training parameters for object detection tasks
- Start training your model and monitor the training process
- Understand the results of your training and export your trained model for deployment
Note
This guide assumes you have already created a dataset and annotated it for object detection tasks. If you haven't done that yet, please refer to the First Dataset Guide before proceeding with this training guide.
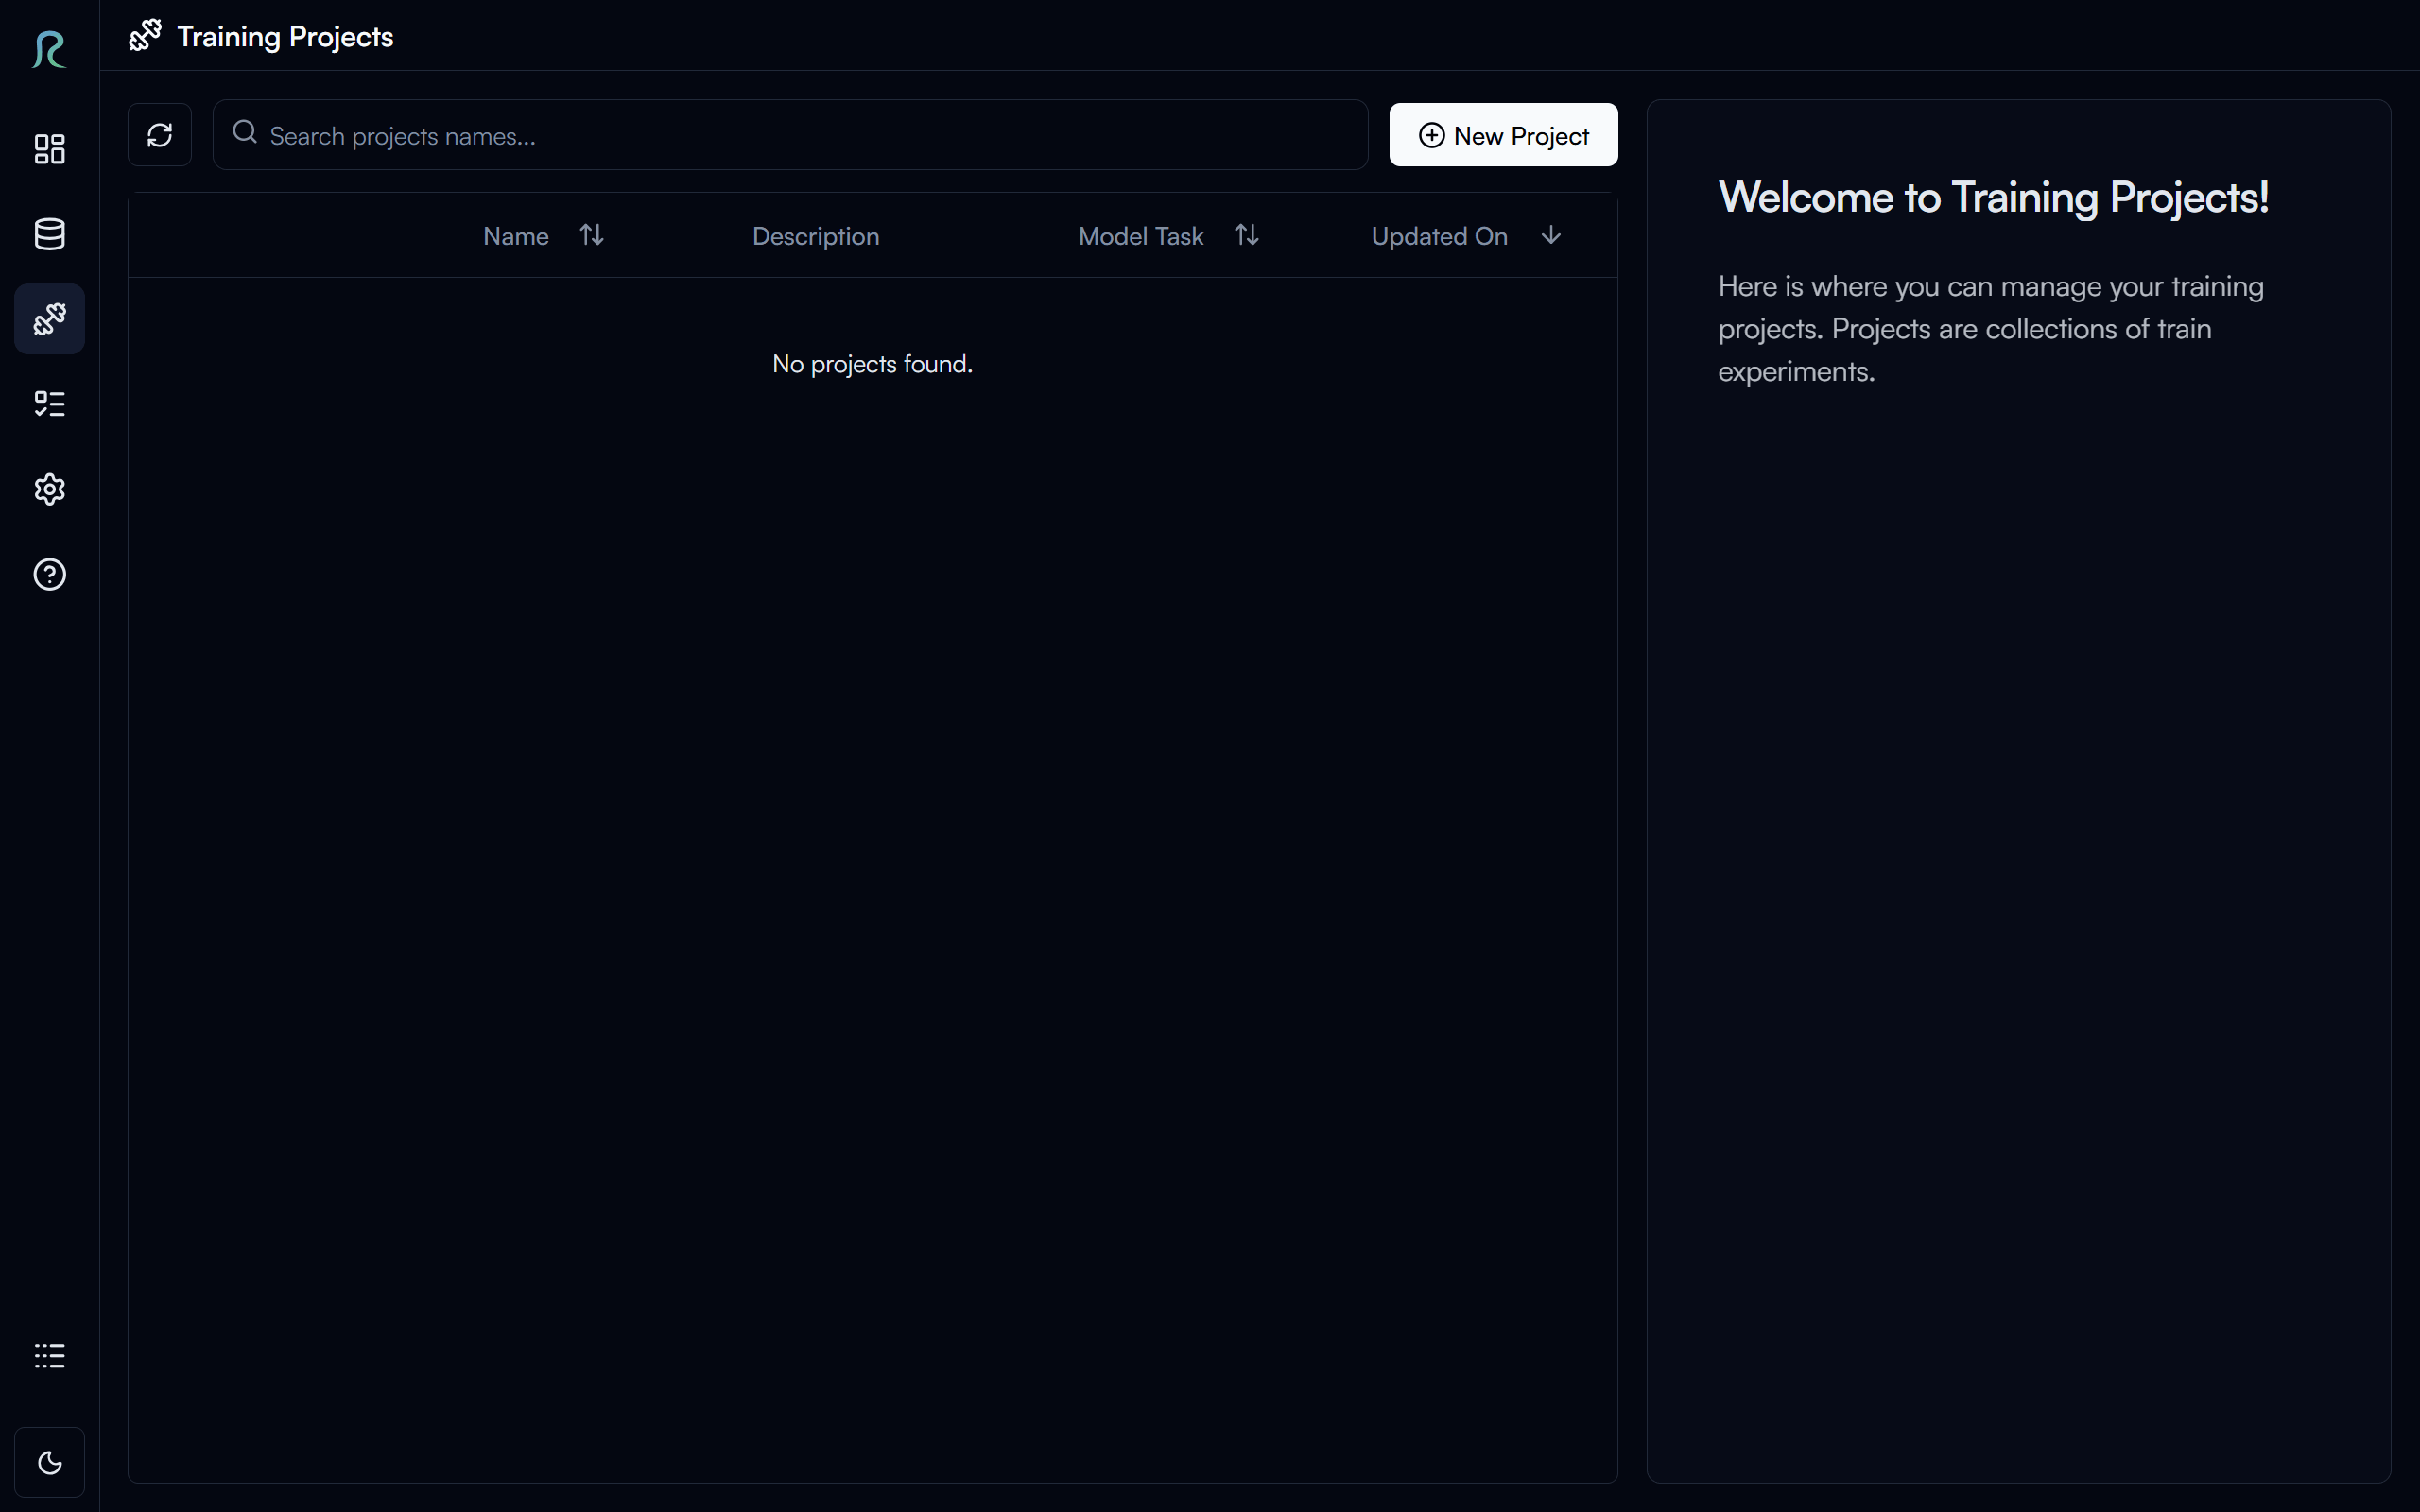
Training Project
In Reva, you can create a training project to manage your training experiments, which allows you to organize your training runs, track their configurations and results, and compare different experiments. Each project is linked to a specific dataset.
To go to the project page, click on the Project tab in the left sidebar.
Create a Project
To create a new training project, click on the New Project button in the top right corner of the projects page.

In the New Project form, you will need to provide the following information:
- Project Name: A unique name for your project (e.g., "Cats Dogs & Monkeys").
- Dataset: Select the dataset you want to use for training (e.g., "Cats Dogs & Monkeys" Dataset).
Then click on the Create button to create your project.
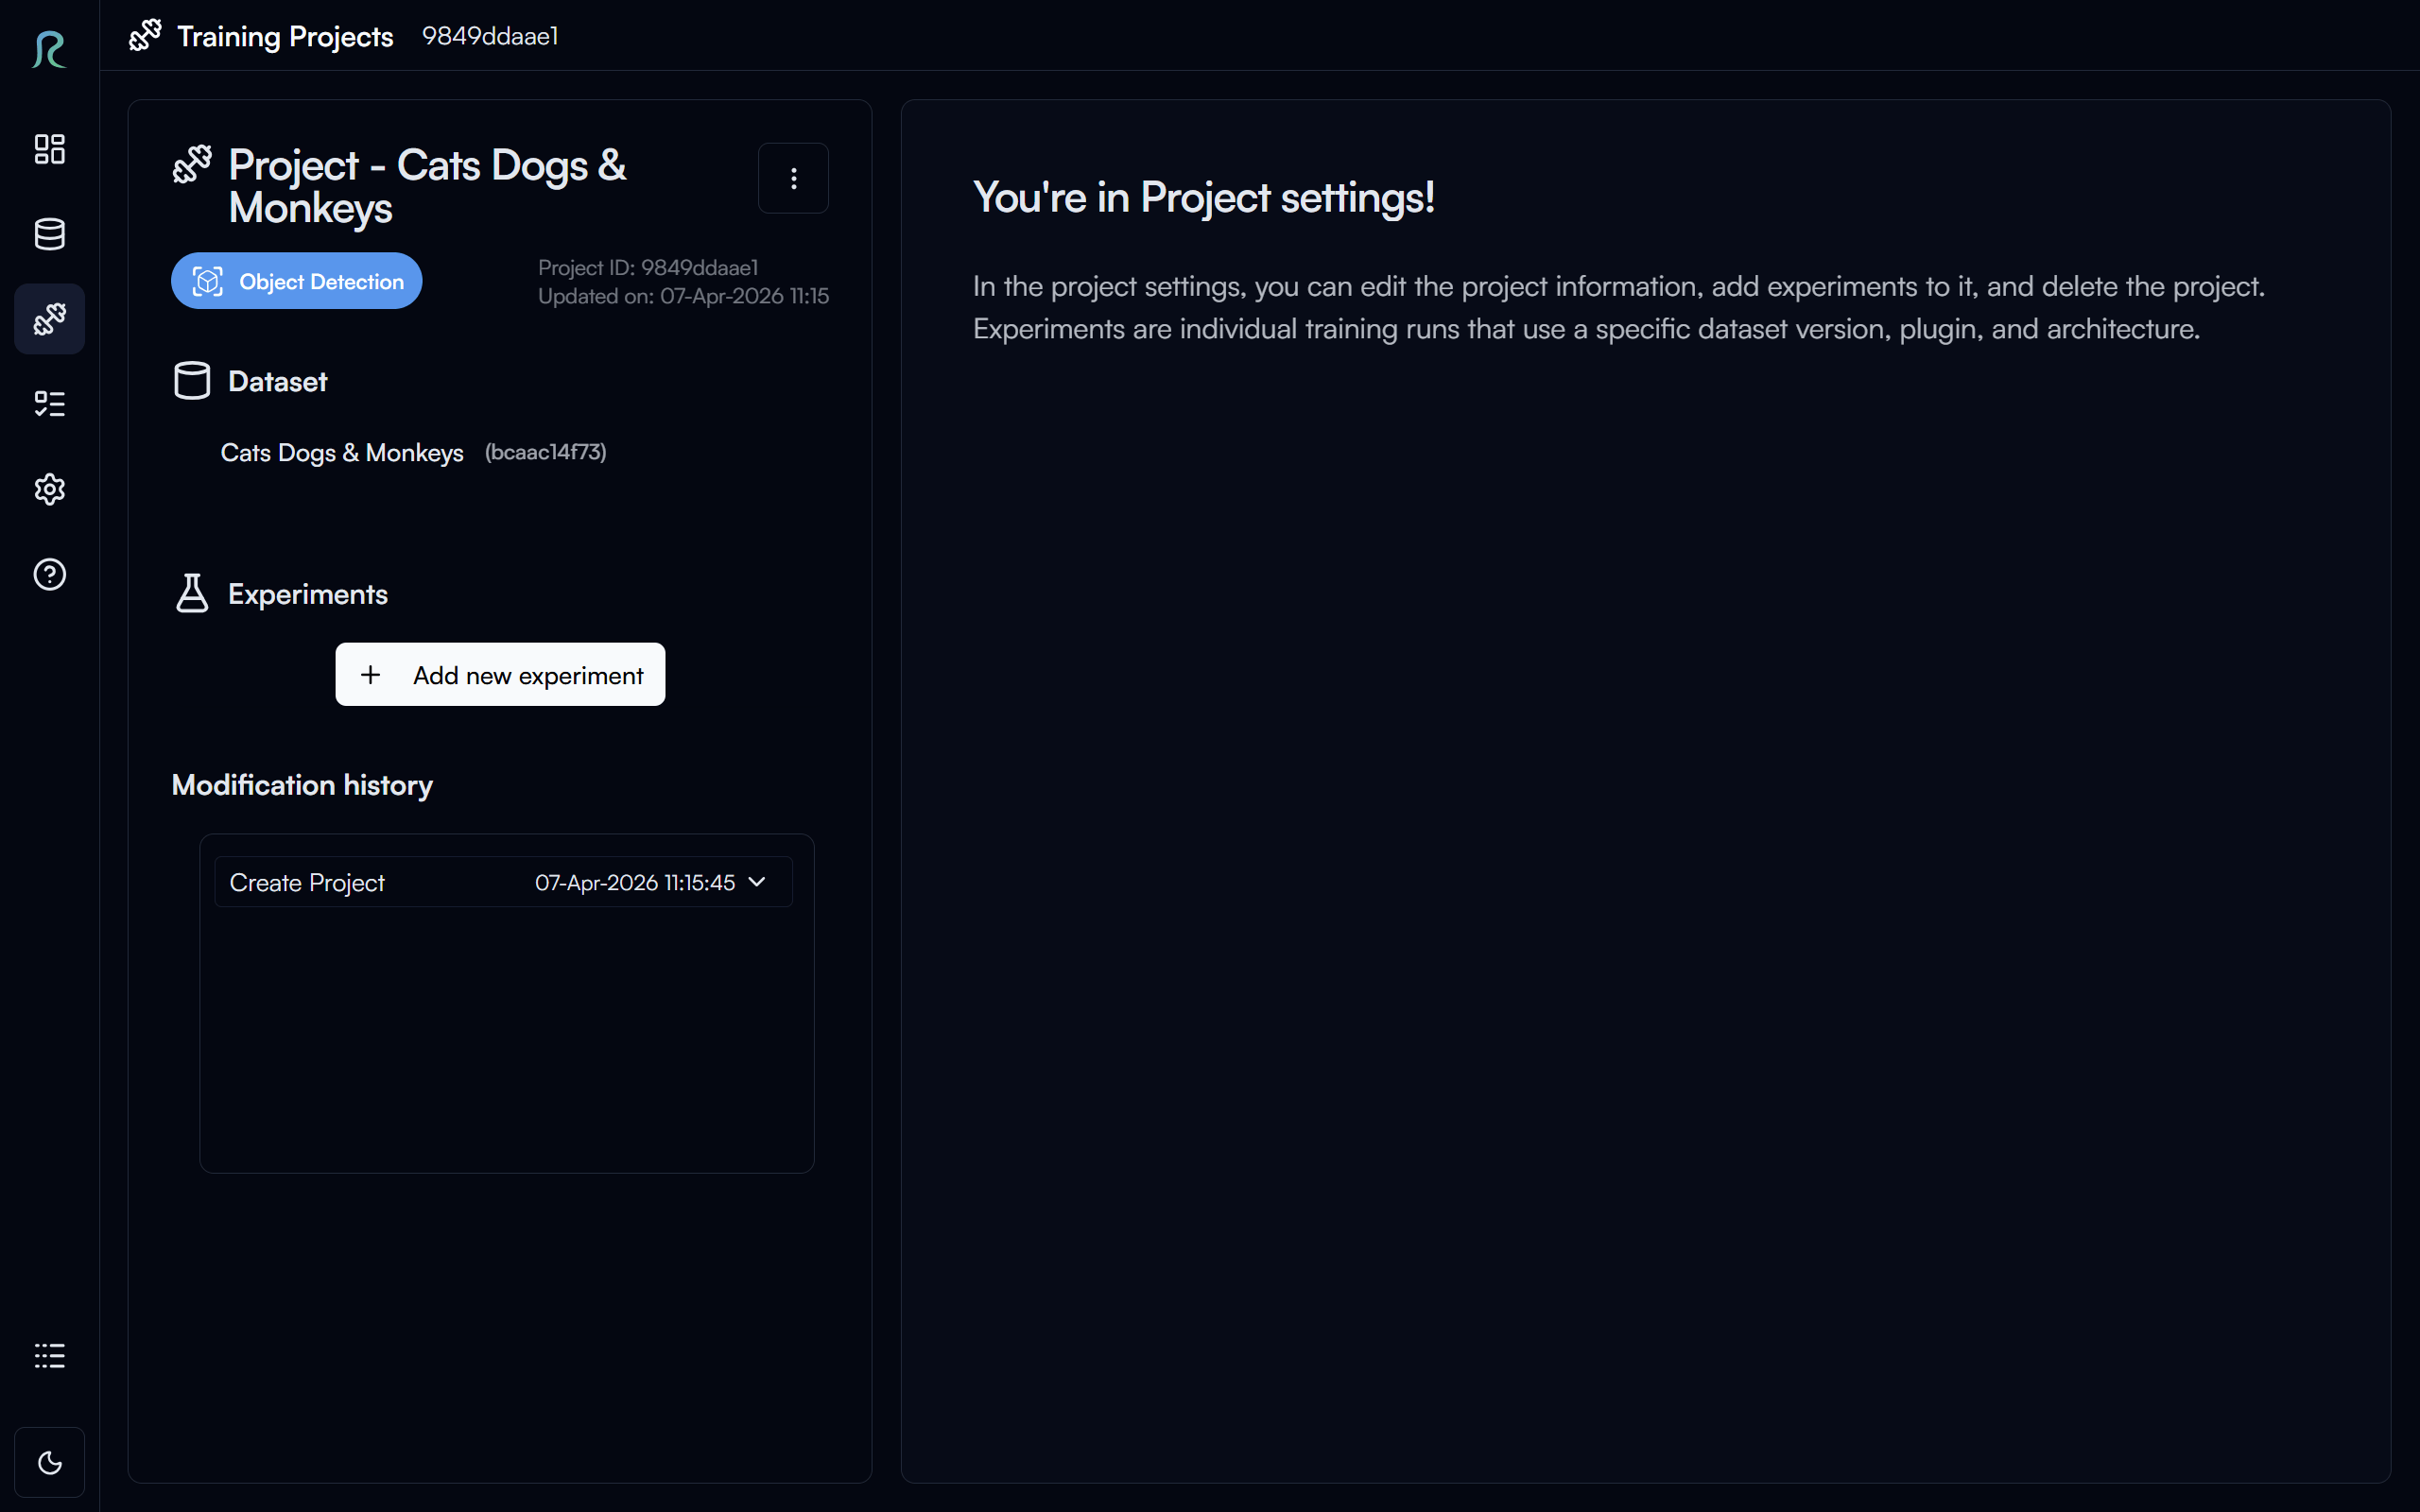
Above is the project settings page, where you can manage your project information and experiments.
Experiment
An experiment is a specific training run with its own configuration and results. You can create multiple experiments under the same project to compare different training configurations.
Create an Experiment
To create a new experiment, click on the Add New Experiment button, under the Experiments section of your project page.
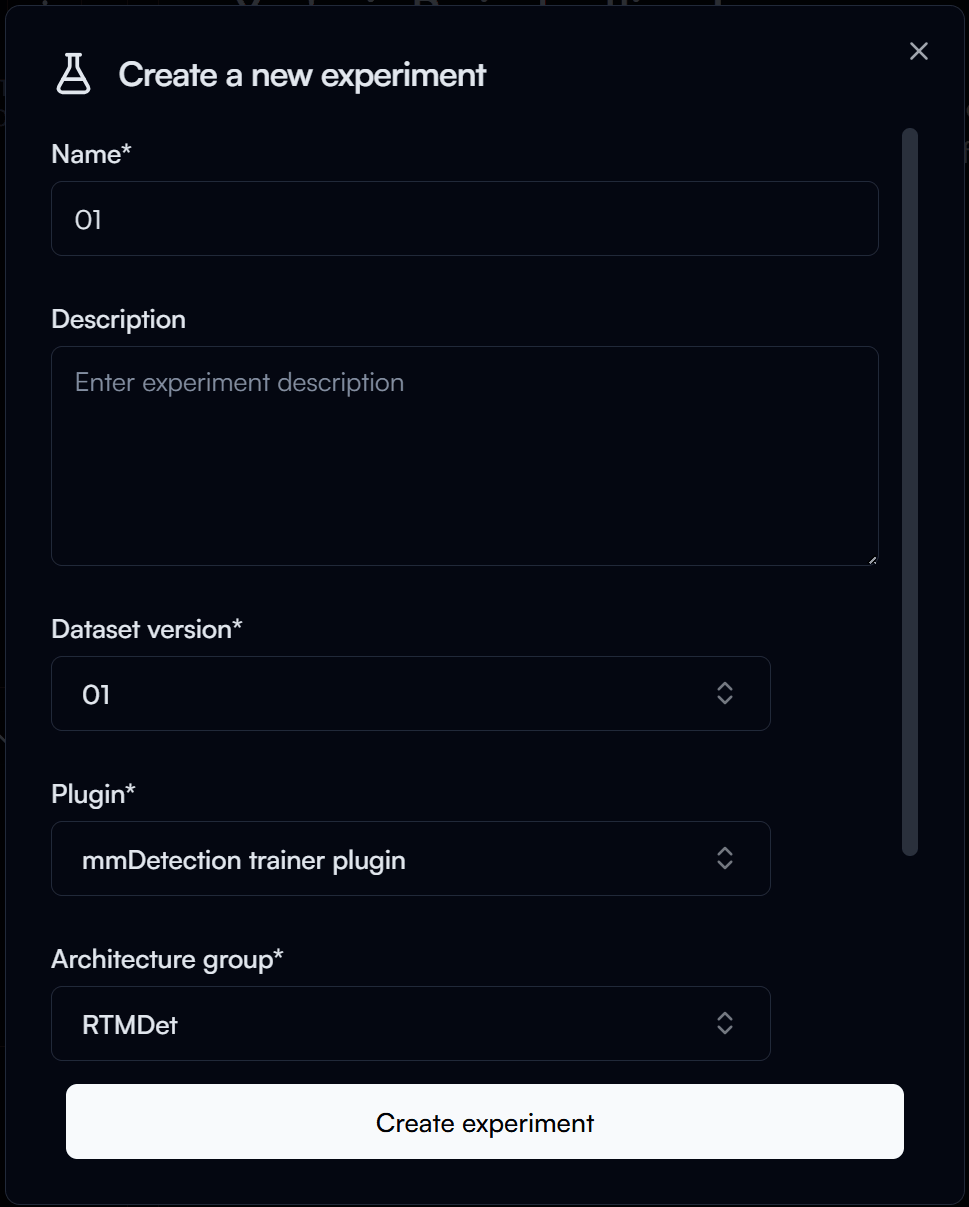
In the New Experiment form, you will need to provide the following information:
- Experiment Name: A unique name for your experiment (e.g., "01").
- Dataset Version: Select the version of the dataset you want to use for training (e.g., "01").
- Plugin: Select the training plugin you want to use.
- For this guide, we will use the
mmDetection trainer plugin.
- For this guide, we will use the
- Architecture Group: Select the architecture group you want to use for training
- For this guide, we will use the
RTMDet.
- For this guide, we will use the
Then click on the Create experiment button to create your experiment.
Experiment Settings
After creating your experiment, you will be taken to the experiment page, where you can configure your training parameters, start training your model and more.
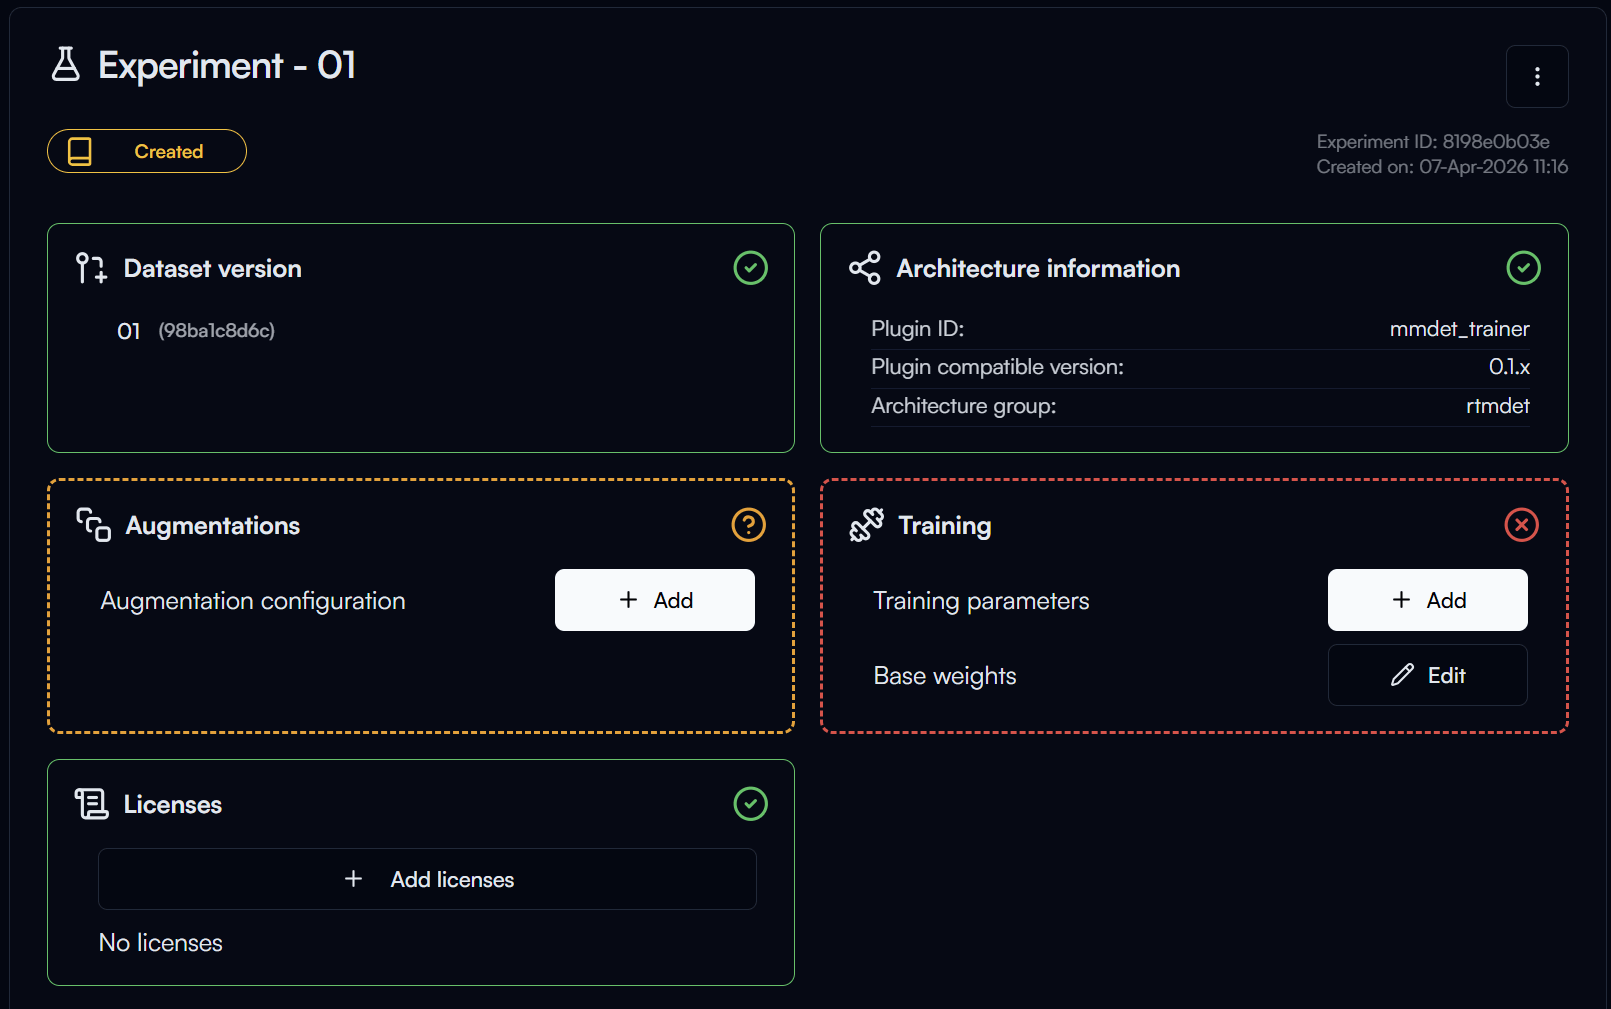
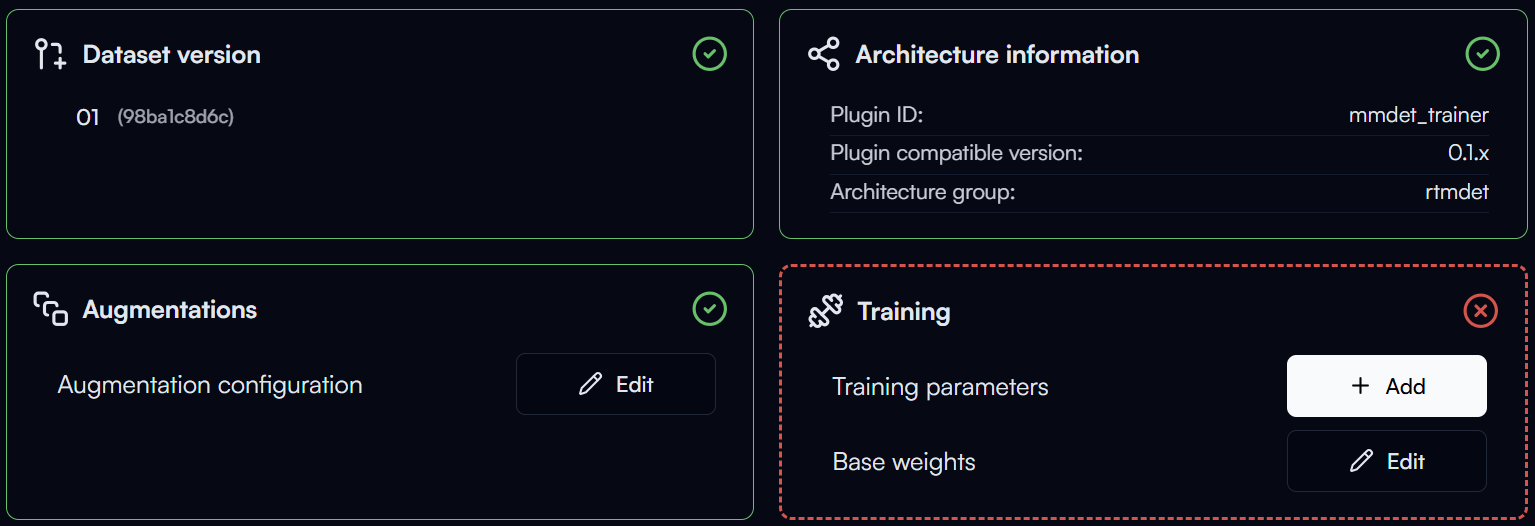
In the experiment page you can see multiple sections with the following statuses:
- Ready: This section is ready, no further action is needed.
- Optional Action: Configuration for this section is optional, you can choose to configure it or skip it.
- Required Action: You need to complete the configuration for this section before you can start training.
- Ready to Start Training: Unique status for the
Trainingsection, which indicates that all required configurations are completed and you can start training.
Augmentation Settings
Augmentation is a technique used to increase the diversity of your training data by applying random transformations to your images, such as flipping, rotating, scaling, and more. This can help improve the generalization of your model and prevent overfitting.
To add augmentation to your training, click on the Add button in the Augmentation section.
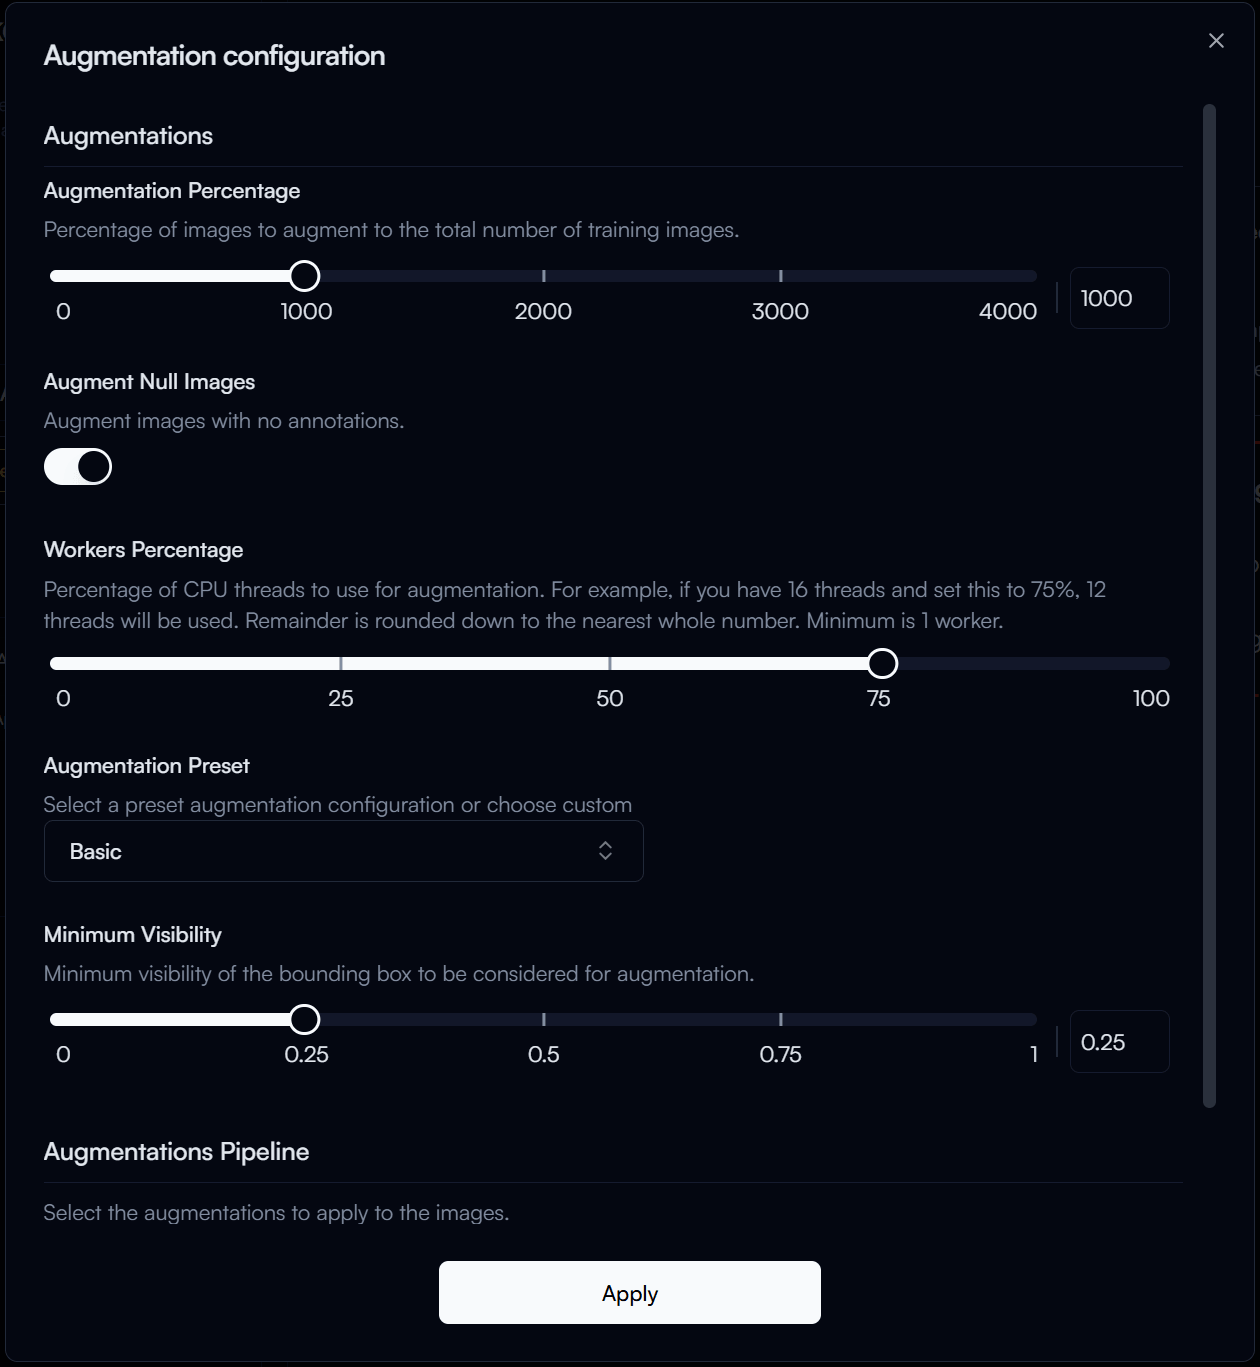
In the Augmentation Configuration form, you can select the augmentations you want to apply to your training data, for our guide, we will use the following configuration:
- Augmentation Percentage: 1000% (This means that the number of augmented images will be 10 times the original dataset size).
- Augmentation Preset:
Basic(This preset includes common augmentations such as random flip, random rotation, random scale, and more).
Then click on the Apply button to save your augmentation configuration.
You may notice the status of the augmentation section changes to , which means the augmentation configuration is ready.
Training Parameters
Training parameters are the settings that control how your model is trained. Configuring these parameters properly can help improve the performance of your model.
Note
Training parameters can be complex and may require some understanding of machine learning concepts. If you are new to training models, we recommend starting with the default parameters and experimenting with them as you gain more experience.
To configure your training parameters, click on the Add button in the Training section.
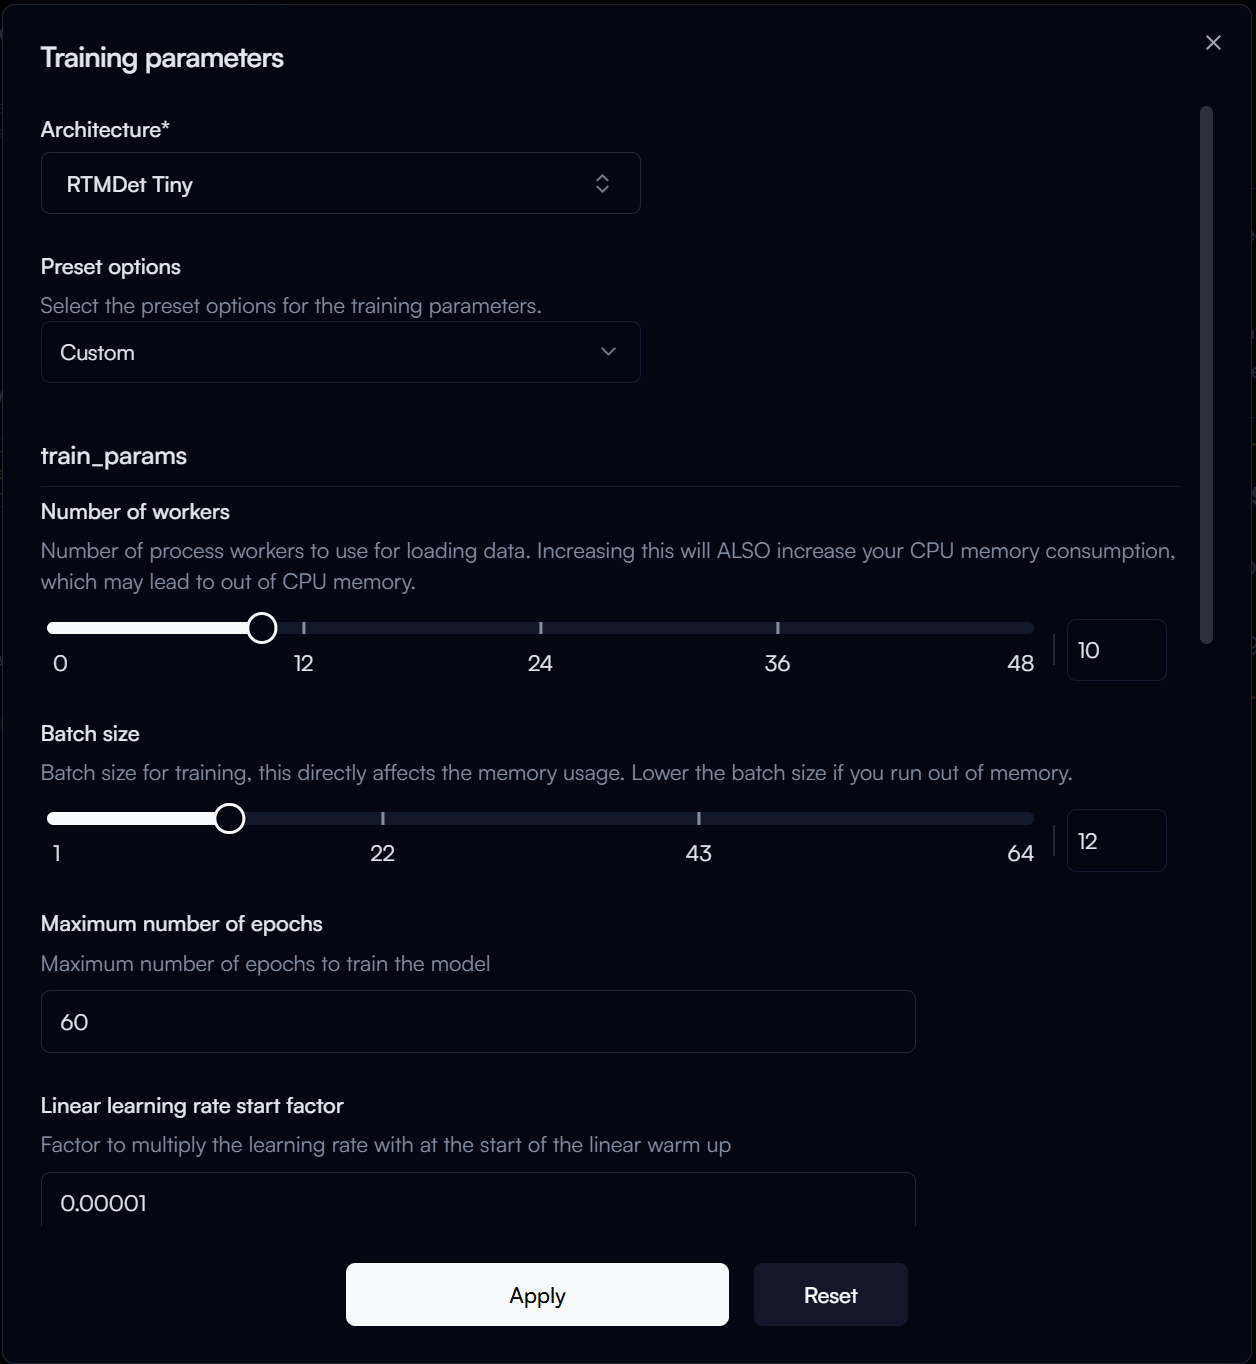
In the Training Parameters Configuration form, you can configure the following parameters:
-
Architecture: The specific model architecture you want to train, let's select
RTMDet Tinyfor this guide. -
Preset Options: Predefined sets of training parameters that are optimized for different scenarios. Let's select
Finetuning (single GPU). -
Number of Workers: The number of worker threads to use for data loading. If you don't know what that means,
4is usually a good starting point. The higher the number, the faster your training will be, but it will utilize more memory.Use with Caution
If you set the number of workers too high, it may cause your training or even your system to run out of memory, which can lead to crashes. Use Task Manager or other monitoring tools to monitor your system's memory usage and adjust the number of workers accordingly.
-
Batch Size: The number of samples that will be propagated through the network at once. A larger batch size can lead to faster training, but it also requires more memory. To stay on the safe side, let's set it to
4.Tip
If you have a powerful GPU with a large amount of memory, you can try increasing the batch size to speed up your training and use Task Manager or GPU monitoring tools to keep an eye on your GPU memory usage. There should be around 1GB of margin left during training to avoid out of memory issues.
Use with Caution
Setting the batch size too high can cause your training to run out of GPU memory, which can spill over to your system memory and cause crashes.
-
Maximum Number of Epochs: The number of times the entire training dataset will pass through the network. Getting this number right can be a bit tricky, as it depends on the size of your dataset and the complexity of your model. You may have to experiment with this number to find the optimal value for your specific use case. For our guide, let's set it to
30. -
Stage 2 Number of Epochs: This parameter is specific to the
RTMDetarchitecture, which uses a two-stage training process. You may need to experiment with this number to find the optimal value for your use case, but our rule is to set it to around 1/3 of the maximum number of epochs, so let's set it to10.
Then click on the Apply button to save your training parameters configuration.
TL;DR for Training Parameter Configuration
- If you are new to training models, start with the default parameters and experiment with them as you gain more experience.
- Monitor your system's memory usage when adjusting the number of workers and batch size to avoid out of memory issues.
- The optimal number of epochs depends on your specific use case, so you may need to experiment with this number to find the best value for your model.
Now that you have completed the required configurations for training, you should see the status of the training section changes to , which means you are ready to start training your model.
Start Training
Reva has a queue system for training, which means that if there are multiple experiments ready for training, they will be trained one by one based on the order they were created.
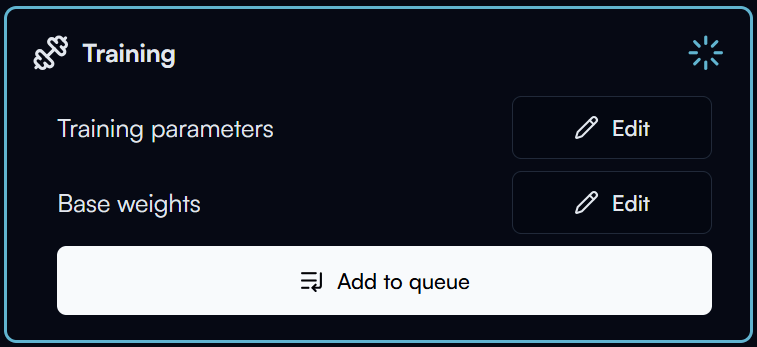
To start training your model, click on the Add to Queue button in the training section.

As there is only one training in the queue, your training will start immediately. It will first go through a preprocessing stage, where your dataset will be processed and prepared for training.
Tip
You can go to the Dashboard page view the current training queue and process. If you have multiple experiments in the queue, you can also reorder the queue or remove experiments from the queue there.
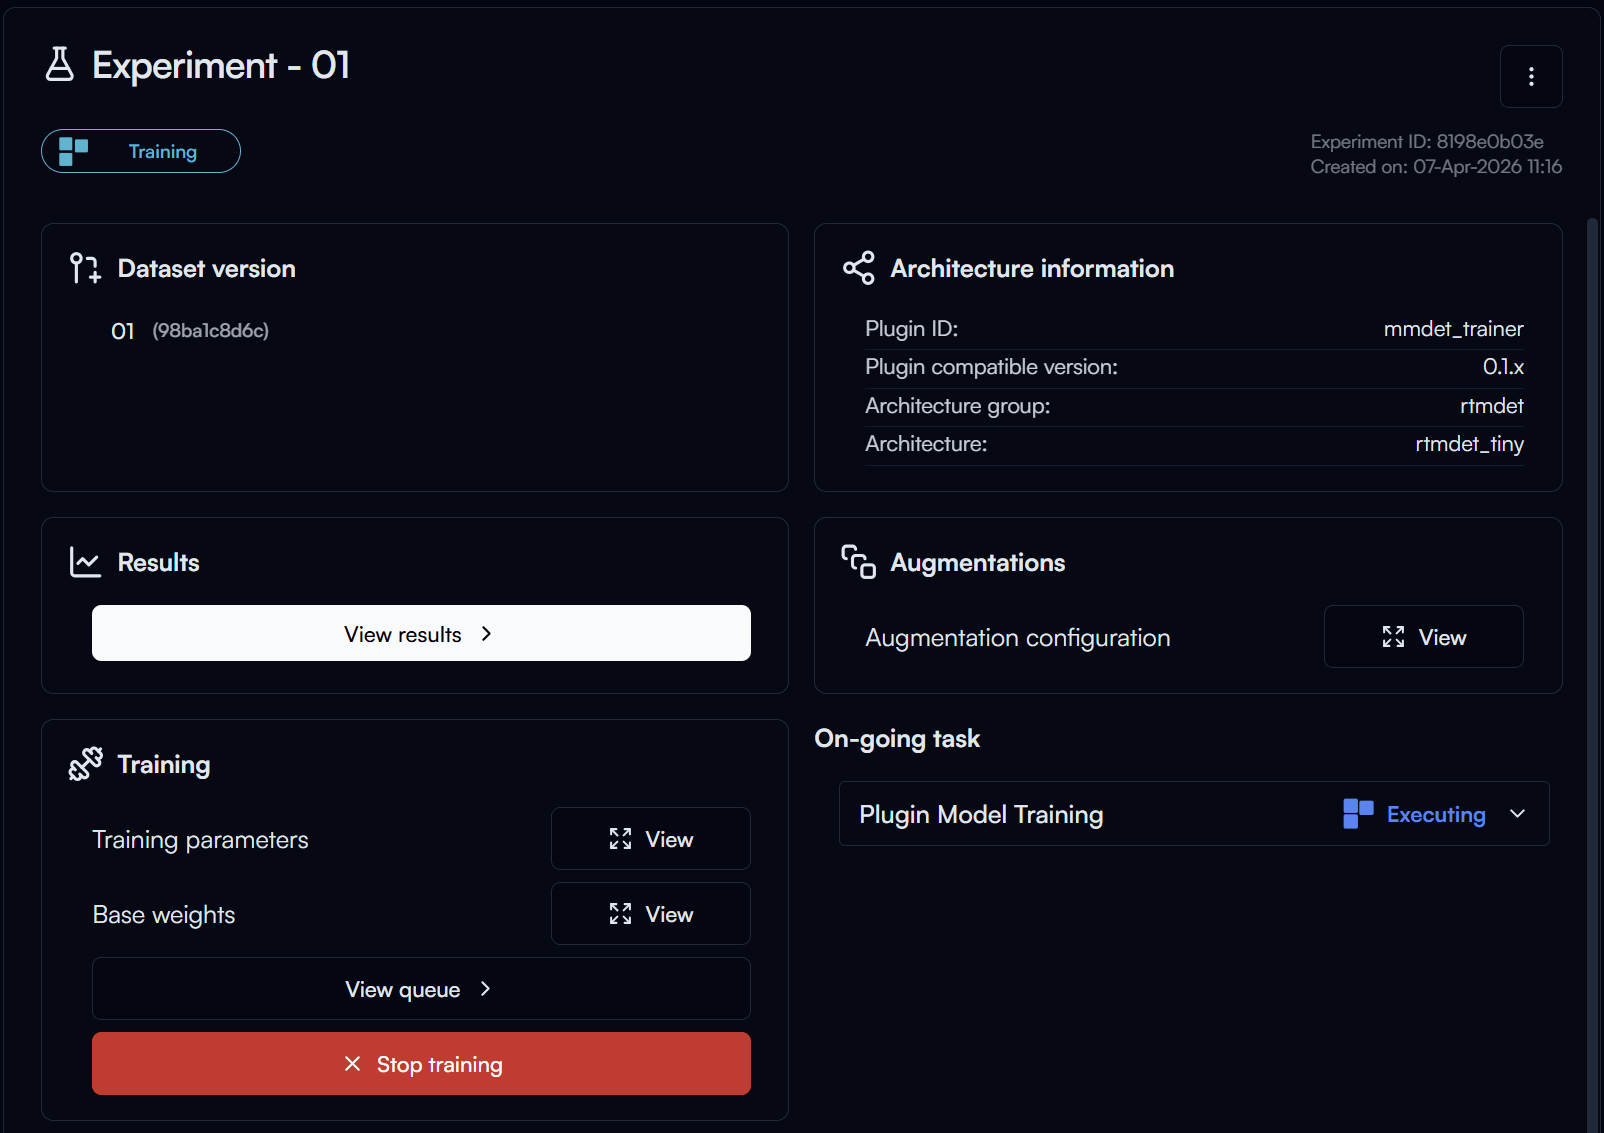
After the preprocessing is completed, the training will start. Click on the View Results button in the Results section to view the training progress.
Tip
You can Stop Training at any time if you want to end the training early, but keep in mind that you will lose all the progress of the current training run and restarting the training will start from the beginning.
Note
Training time varies greatly depending on the size of your dataset, the complexity of your model, the training parameters you have configured and the hardware capabilities of your machine.
It can take anywhere from a few minutes to several hours. It's important to be patient and monitor the training process to ensure everything is running smoothly.
Training Results
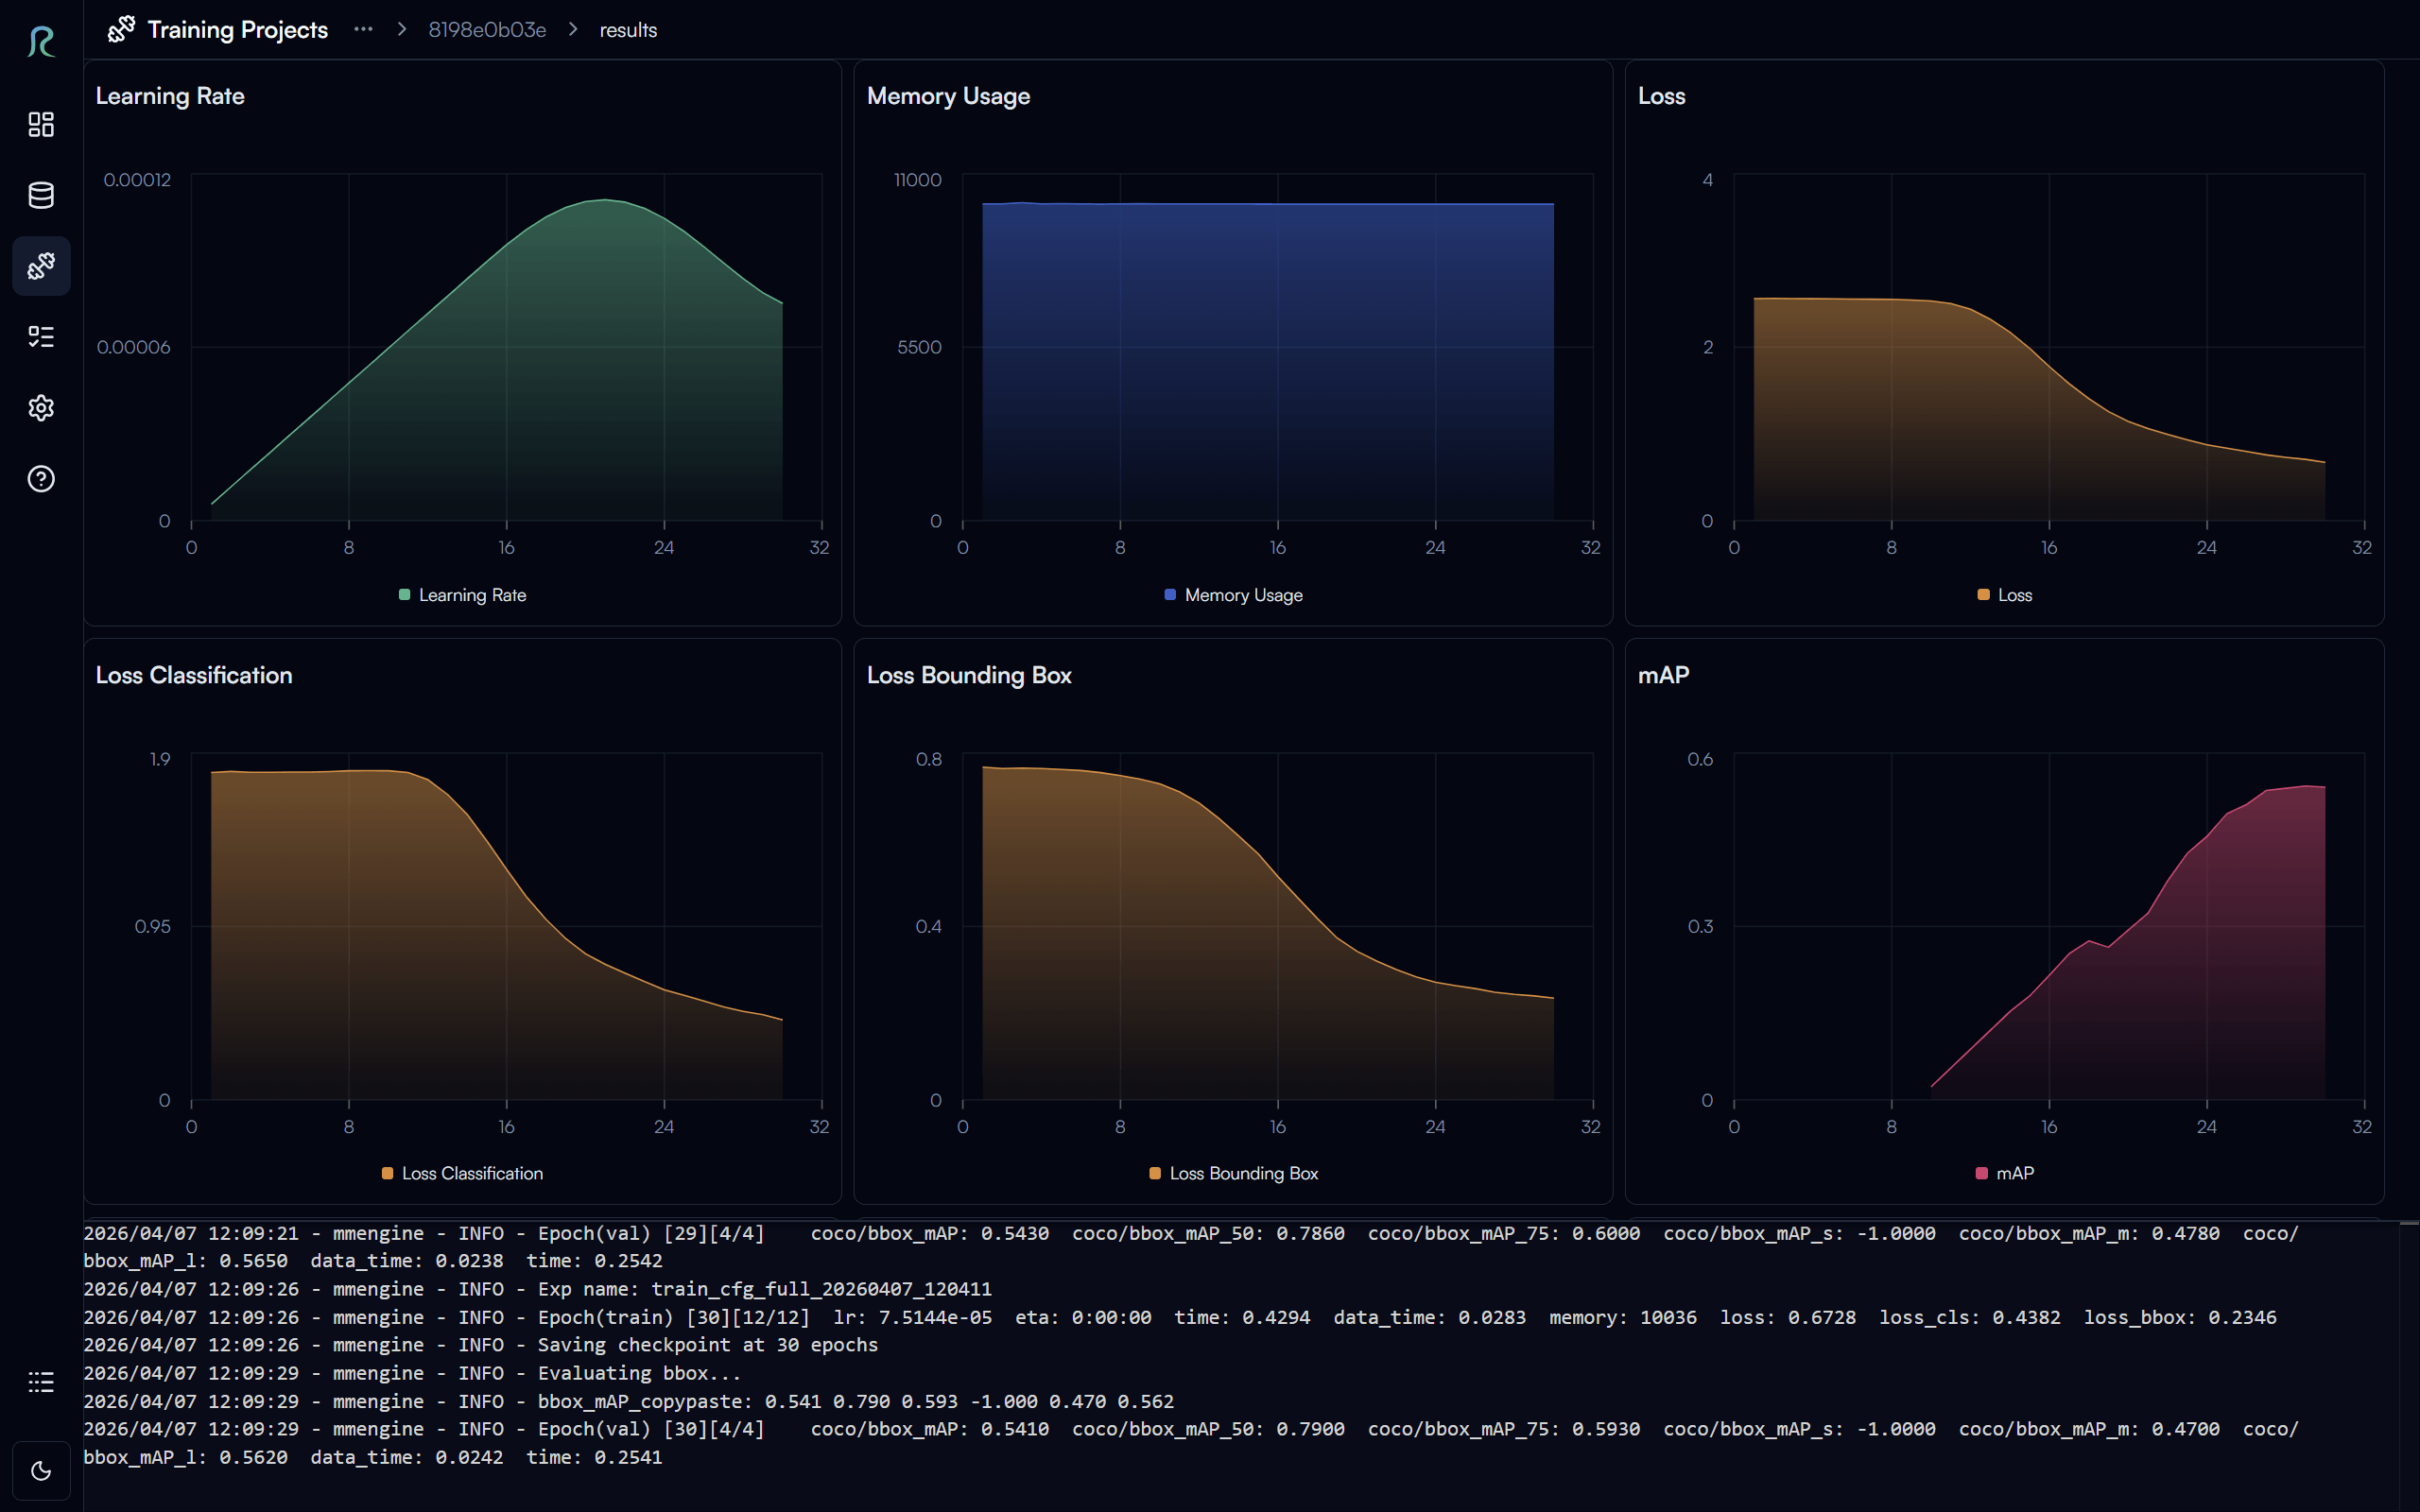
In the training results page, you can monitor the training progress in real time, view the loss curves, and see the evaluation metrics for your model.
We want to highlight a few key metrics in the evaluation results:
- Learning Rate: This is the rate at which your model learns during training. If you see that the learning rate is too high, it may cause your training to diverge and the loss to increase. If it's too low, it may cause your training to be very slow and get stuck in a local minimum. You may need to experiment with different learning rates to find the optimal value for your specific use case.
- Loss Curves: The loss curves can help you understand how well your model is learning. Ideally, you want to see the curves decreasing over time.
- Evaluation Metrics: The evaluation metrics can help you understand the performance of your model on the validation set.
- mAP (mean Average Precision): This is a common metric for object detection tasks, which measures the average precision of your model across different classes and IoU thresholds. A higher mAP indicates better performance.
TL;DR for Training Object Detection Models
- Loss decreasing + mAP increasing = Good training progress
- Loss increasing or fluctuating + mAP decreasing = Bad training progress, you may want to stop the training and adjust your training parameters.
Tip
You can find ETA (Estimated Time of Arrival) for the completion of your training in the logs at the bottom of the training results page.
To go back to the experiment page, click on the experiment ID at the top of the page.
Export Trained Model
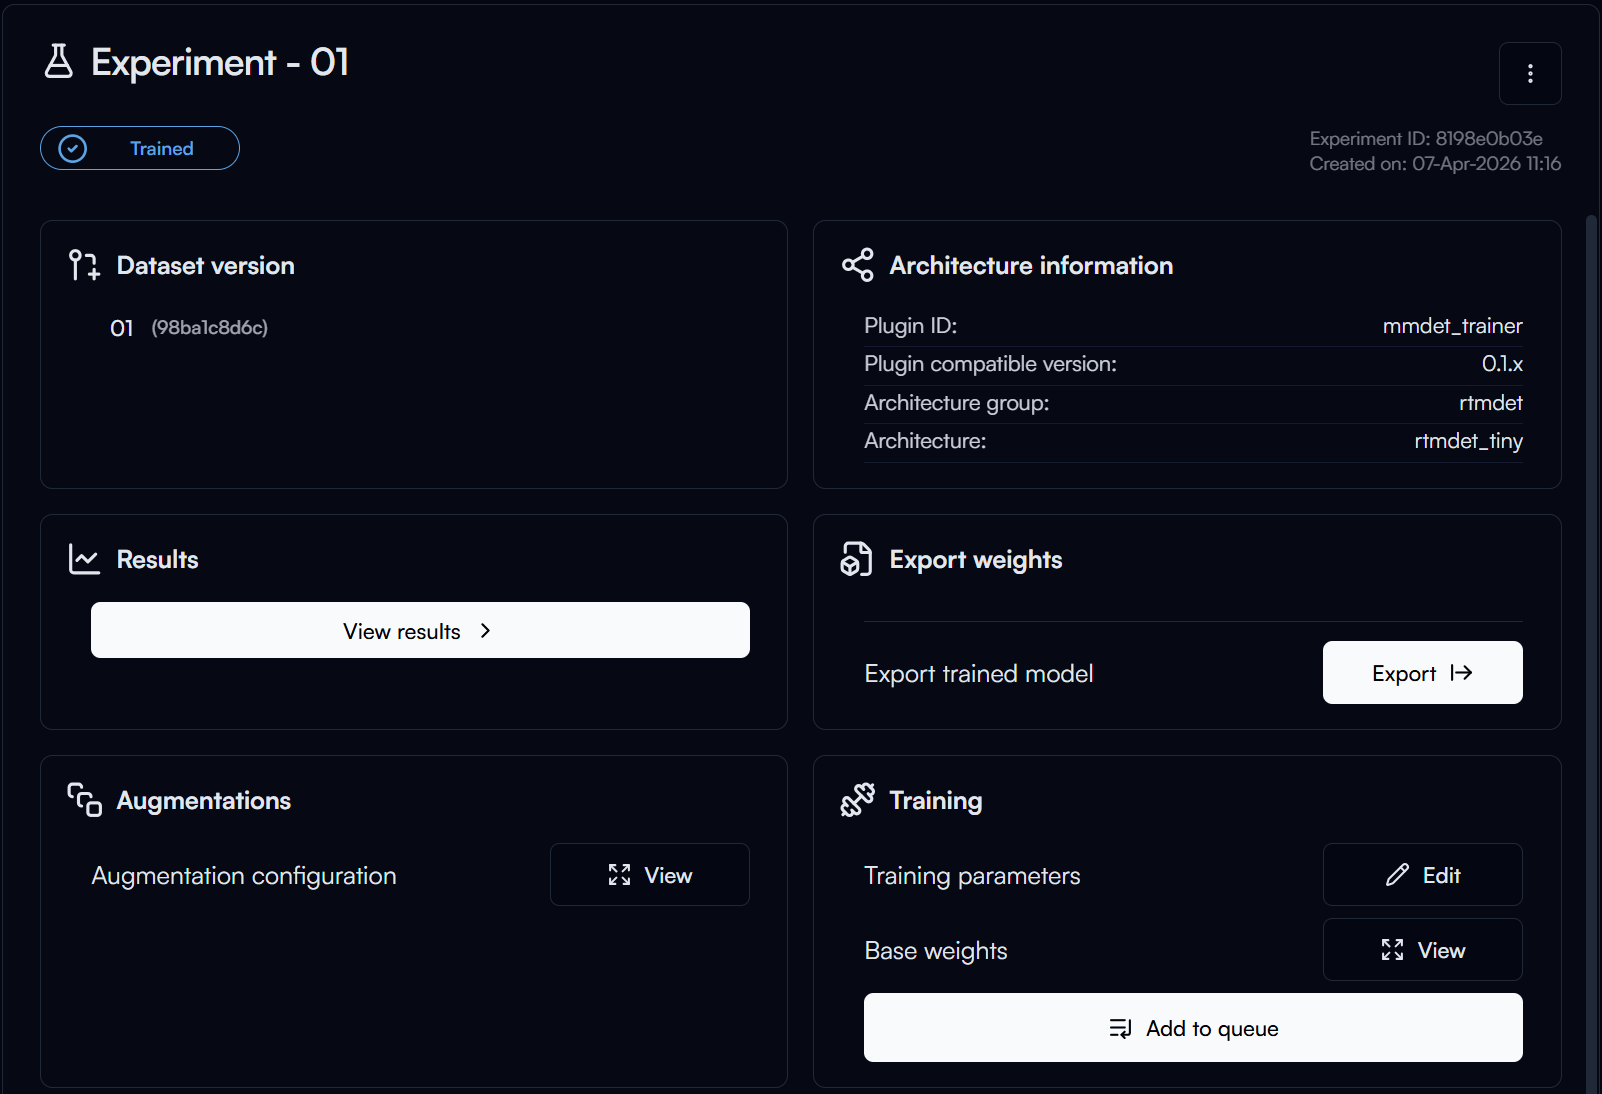
After your training is completed, you can click on the Export button in the Export Weights section to export your trained model for deployment.
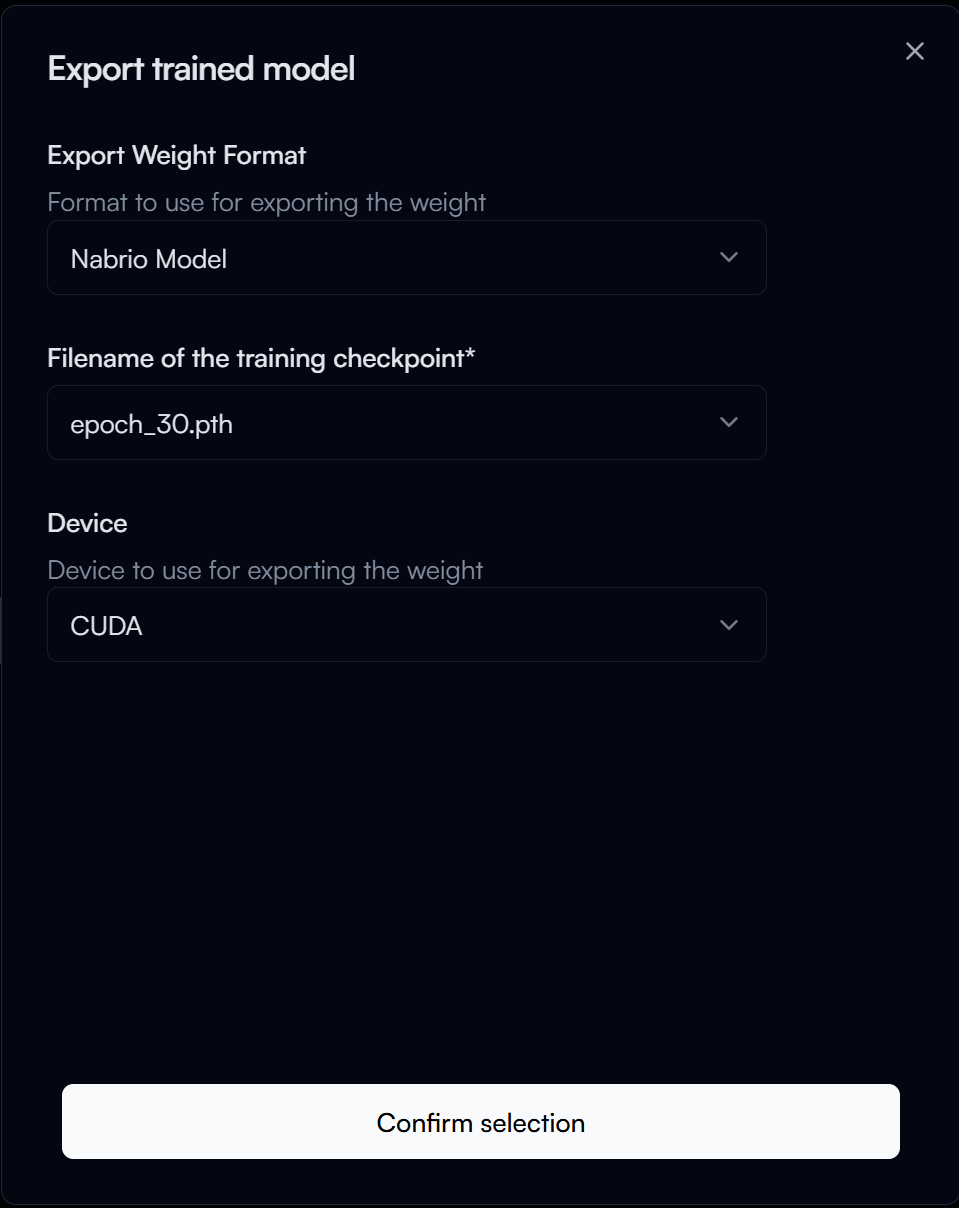
In the Export Trained Model form, configure the following options:
- Export Weight Format: The format in which you want to export your trained model.
- Nabrio Model: This is the recommended format for deploying your model in Nara, allow for plug-and-play deployment in Nara without any configuration needed. Let's select this option for our guide.
- Filename of the Checkpoint: The filename for the trained model checkpoint, this is named of its epoch number. Check with the results page to find the checkpoint with the best performance (e.g., highest mAP) and use that epoch number for the filename. This is usually the highest epoch number, so let's set it to
30for our guide.
Then click on the Confirm Selection button to start exporting your trained model.
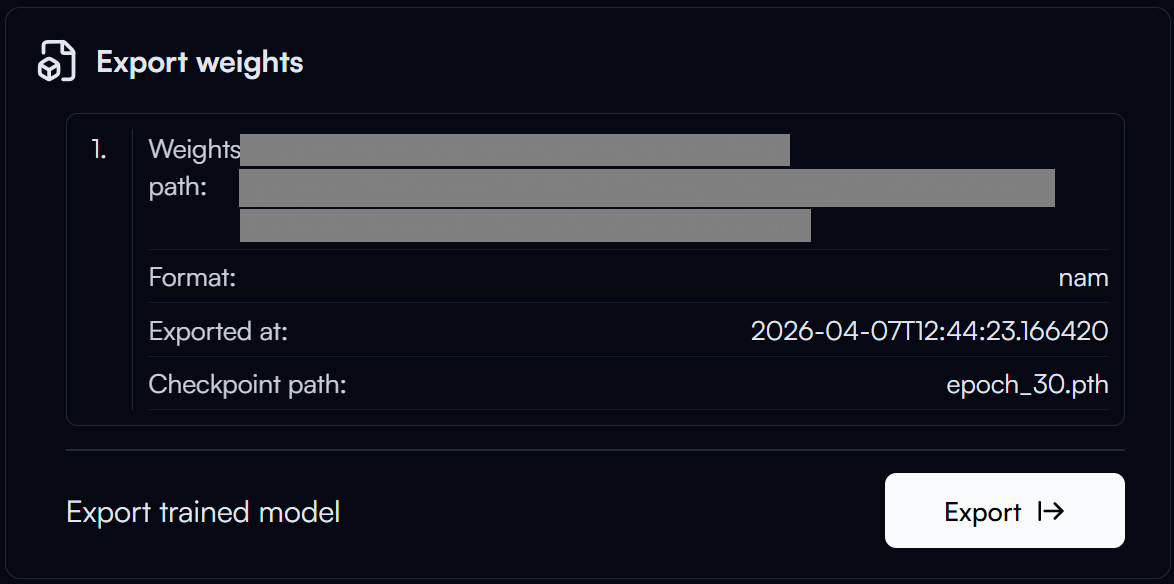
The export process may take a few minutes to complete. After the export is completed, you can click on the Weight Path to copy the path of your exported model.
Train Data
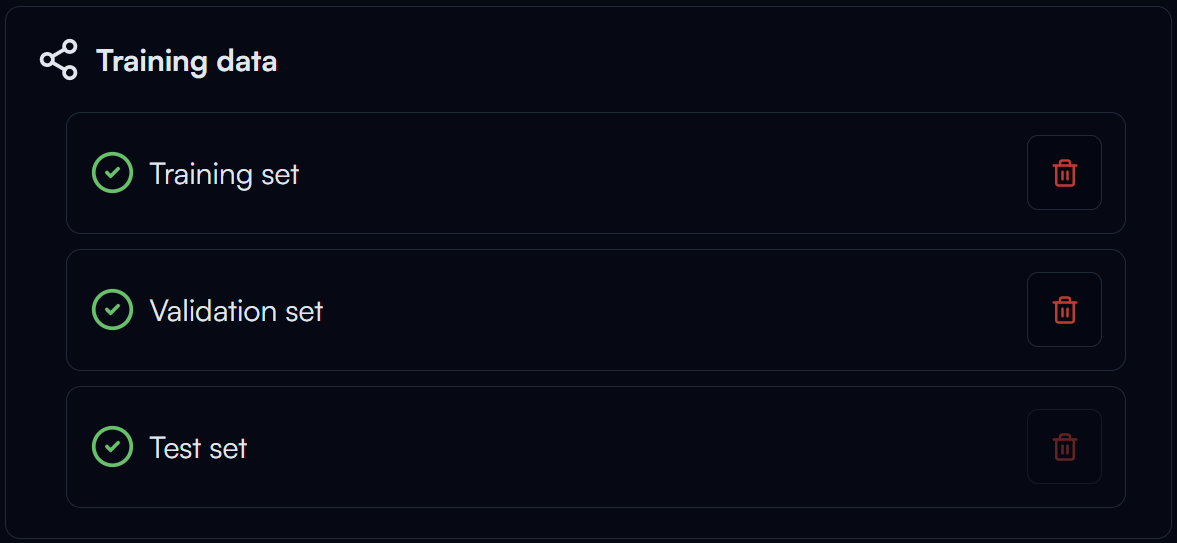
Once completed the training of your model, if you don't plan to retrain the model anymore and want to free up some storage space, you can click on the button in the Training Data section to delete the training data. This will delete all the data generated for training, including the augmented dataset.
Please note that this action is irreversible, so make sure you no longer need the training data before you delete it.
Dataset Not Affected
Deleting the training data will not affect your original dataset or its versions, so you can still use your dataset for other experiments.