Flow Page
Learn how to navigate through the flow page and understand its components.
Flow
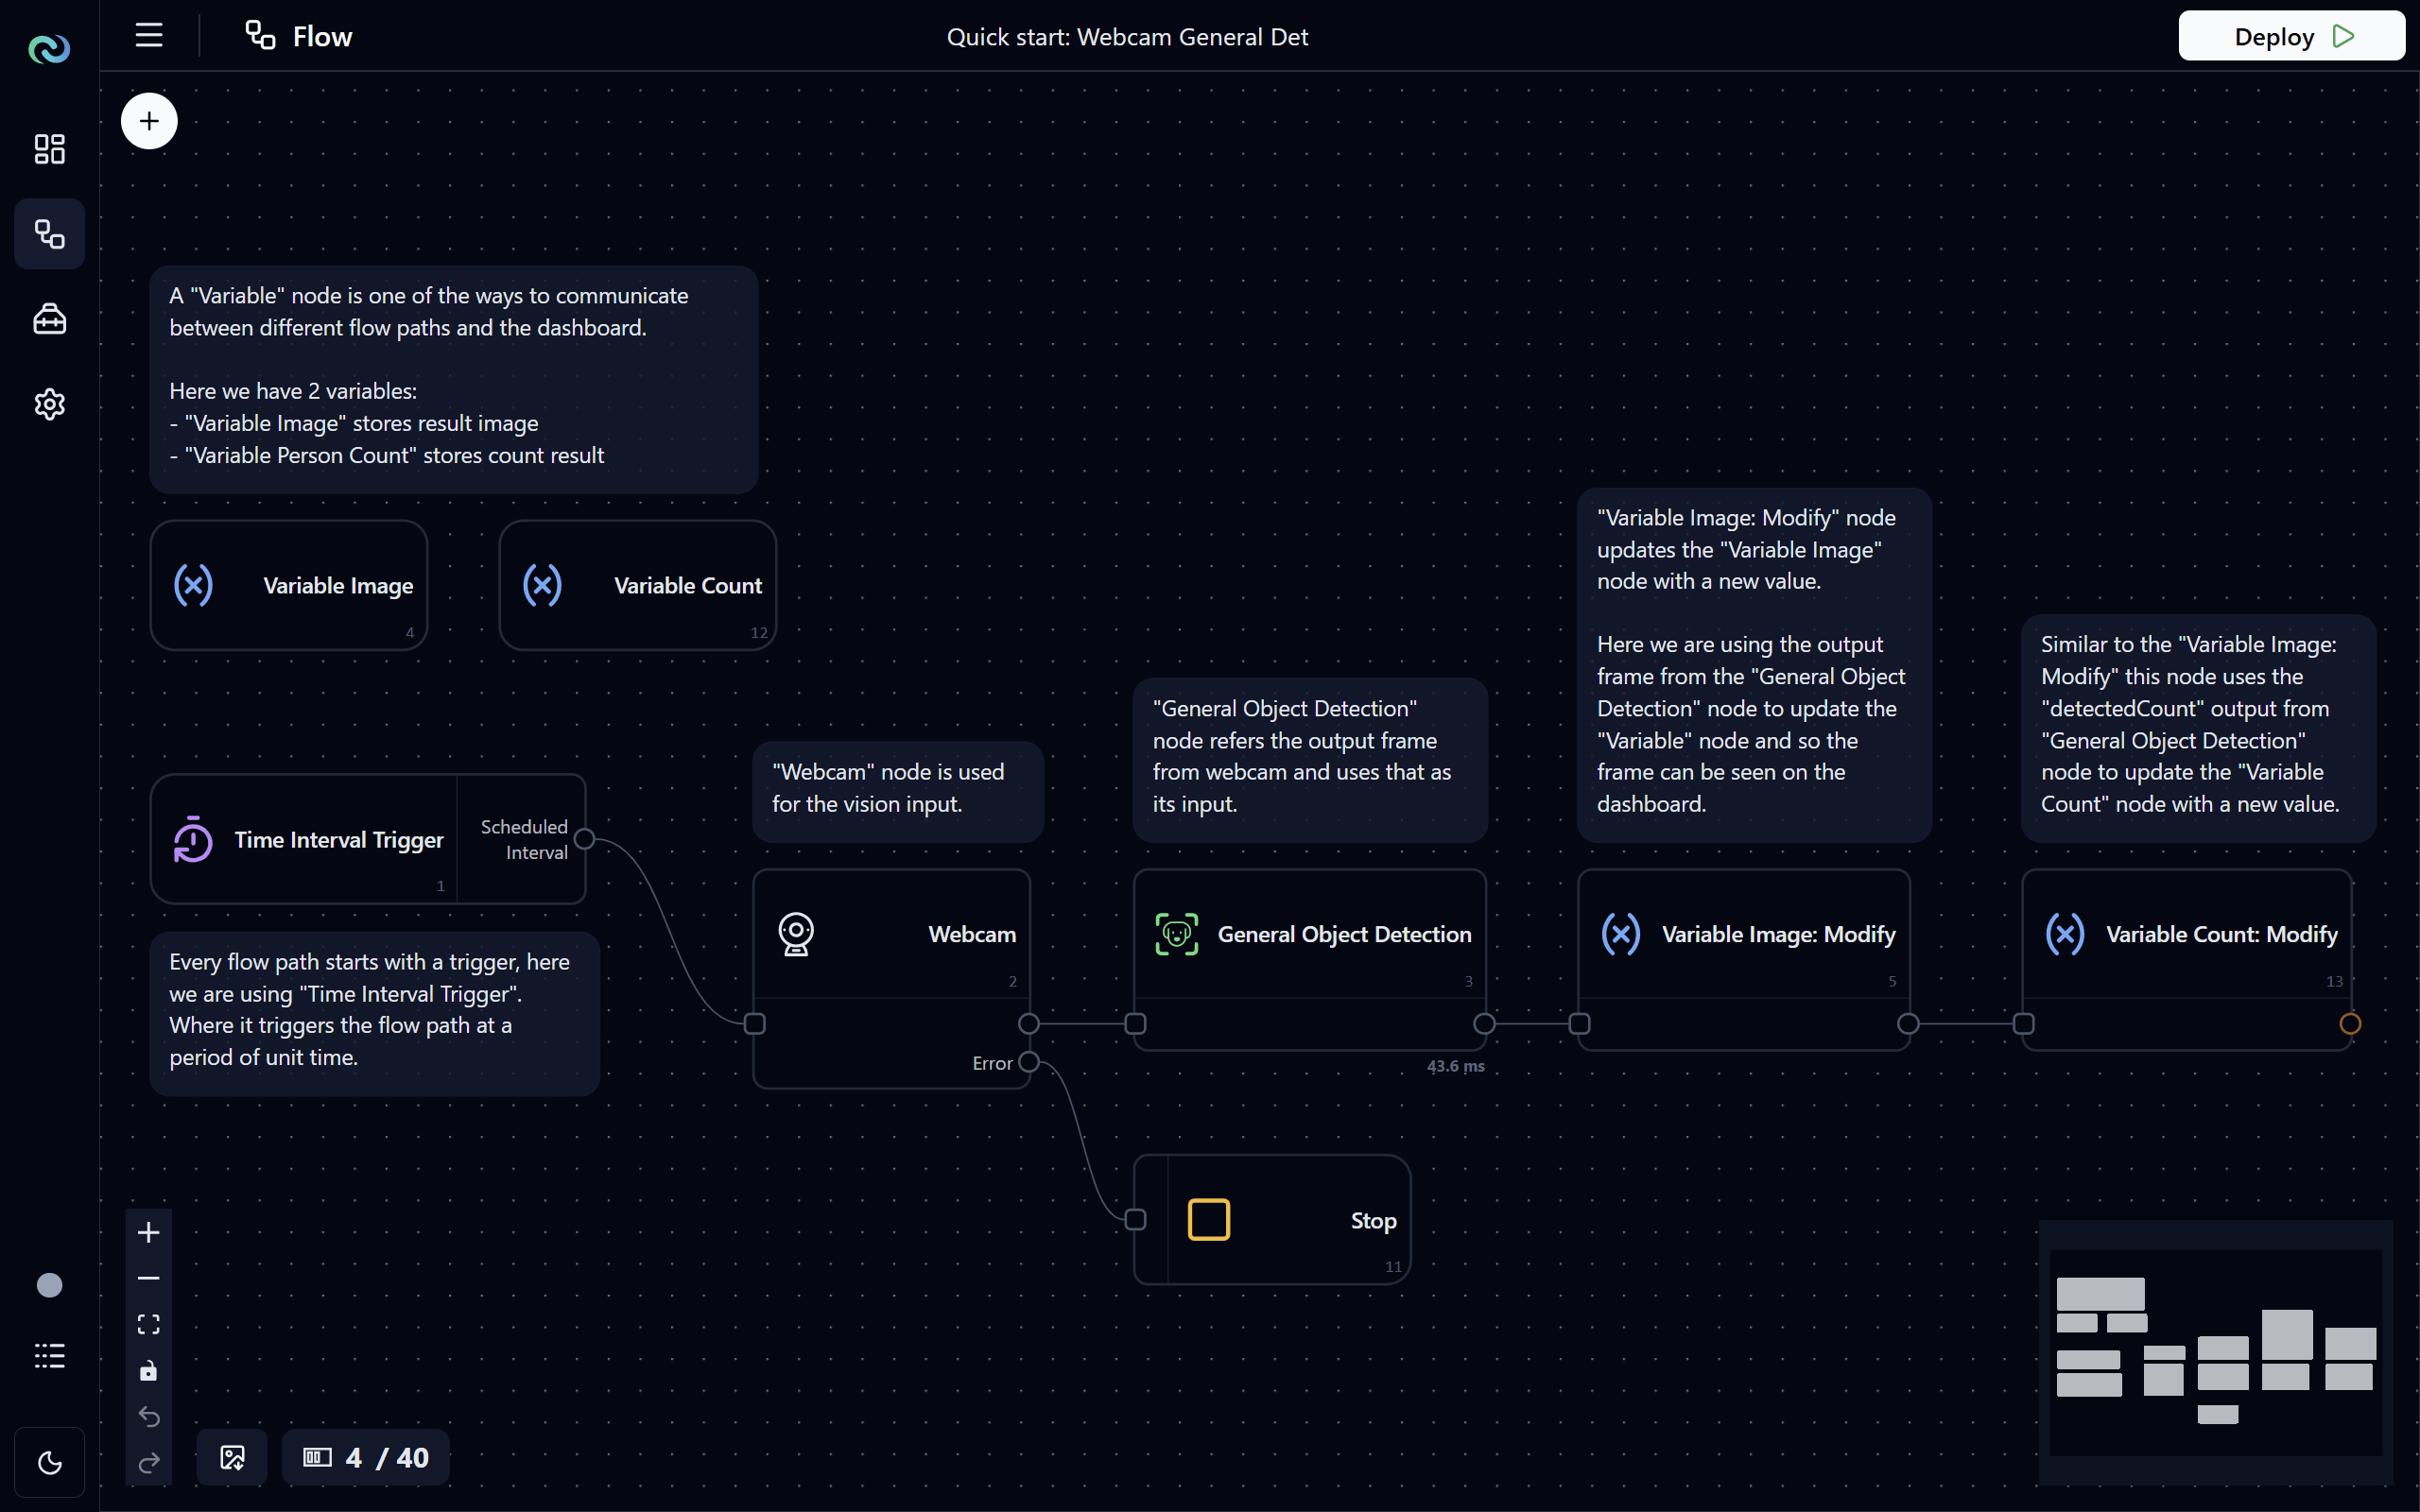
A flow is a collection of nodes that perform specific tasks. The nodes are connected together to define the data flow and processing steps. A flow can have multiple flow paths, which are represented by the lines connecting the nodes. Each flow path represents a single execution path in the flow.
- Flow: A collection of nodes that perform specific tasks.
- Flow Path: A single execution path in the flow, which is connected by edges between nodes. Each flow path is independent of each other, meaning that a node in one flow path cannot directly reference data from a node in another flow path, but they can both reference to the same independent data node to share data between them. A flow can have multiple flow paths.
- Node: A single task in the flow, which can be multiple types, such as input, output, processing, etc. Each node has its own configuration and functionality. See Node section below for details.
- Independent Node: A node that doesn't belong in any flow path, in other words, it's "global" to the entire flow. See Independent Node section below for details.
- Edge: The connection between two nodes, which represents the flow of data or execution between the nodes. See Edge section below for details.
Flow Toolbar

On the bottom-left corner of the flow page, you will find a toolbar with the following buttons:
- Zoom In: Click to zoom in the canvas.
- Zoom Out: Click to zoom out the
- Fit to Screen: Click to fit the whole flow into the screen.
- Lock/Unlock Canvas: Click to toggle between locking and unlocking the canvas. When the canvas is locked, you will not be able to move the nodes around.
- Undo: Click to undo the last action,
Ctrl + Z(orCmd + Zon Mac). - Redo: Click to redo the last undone action,
Ctrl + Y(orCmd + Yon Mac). - Download Flow as Image: Click to download the current flow as an image file.
- Slot Usage: Shows the current slot usage of the flow.
Node Selector
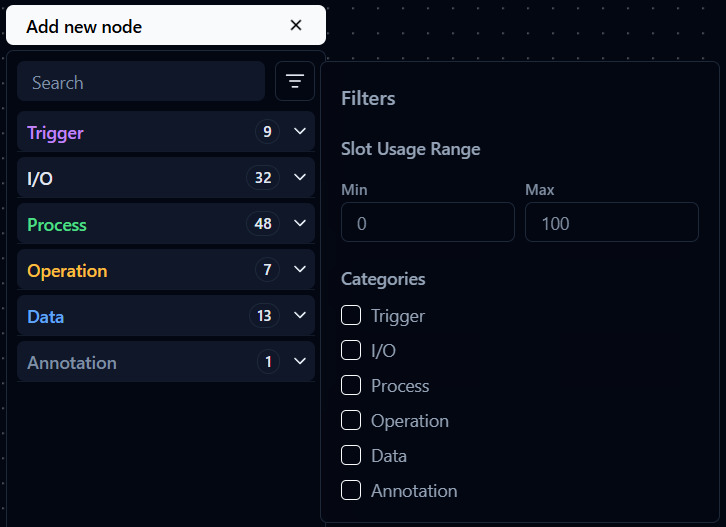
In the top-left corner of the flow page, you will find a Add new node button. Click on it to open the node selector, select expand the node categories and drag and drop a node onto the canvas to create a new node instance.
To filter the nodes, you can either use the:
- Search Bar: Type in keywords to search for specific nodes. The search supports fuzzy matching, so you can type in partial names or related keywords to find the node you are looking for.
- Filter Panel: Click on the filter icon () to open the filter panel, where you can filter nodes by categories and slot usage.
Node
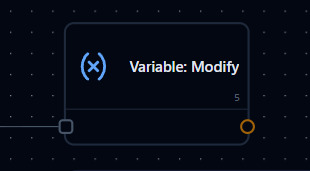
A node is a single task in the flow, which can be multiple types, such as input, output, processing, etc. Each node has its own configuration and functionality. A node can be connected to other nodes via edges to define the flow of data and execution in the flow.
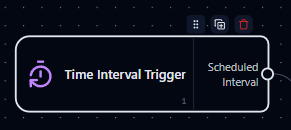
To select a node, click on the node. Once selected, it will be highlighted.
- Node Handle: The area on the node to click and drag to move the node around the canvas. You can also drag from anywhere on the node to move it around.
- Duplicate Node: Click to create a duplicate of the node with the same configuration.
- Delete Node: Press and hold to delete the node. Or select the node then use the
DeleteorBackspacekey on your keyboard to delete the selected node(s). - Node Configuration: Click on the button (highlighted when hover) on the node to open the configuration dialog, see Node Configuration section below for more details.
- Configuration Warning: If you see this icon on the node, it's likely mean that the node is not properly configured and may cause errors during deployment. Click on the button to open the configuration dialog and check if there are any warnings or errors in the configuration options that need to be resolved. Or you can try deploying the flow, and if there are any configuration issues, an error message will pop up indicating what is wrong with the configuration and which node(s) are affected.
Tip
You can hold Ctrl (or Cmd on Mac) and draw a box to select multiple nodes, and then move, duplicate, or delete them together!
Node Execution Time
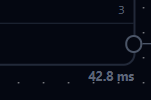
During deployment, you can see the moving average execution time in milliseconds (ms) of each node in the bottom-right corner of the node, which can help you identify the bottleneck in your flow and optimize the performance.
Node Configuration
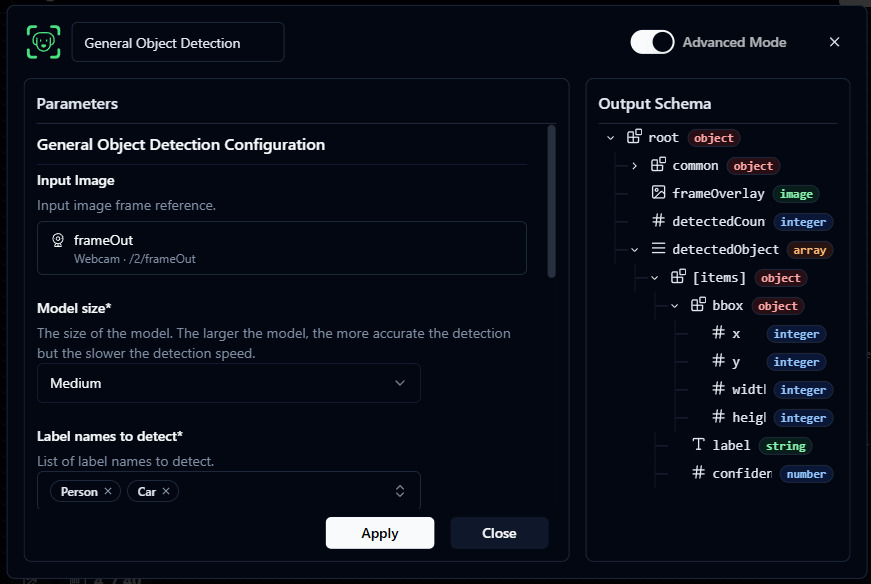
When you click on the node's button, a configuration dialog will open. The configuration options will vary depending on the type of the node. After making changes to the configuration, make sure to click Apply to save the changes, click Close (x button or anywhere outside the dialog) will close the dialog without saving changes.
Top section, from left to right:
- Node Icon: An icon representing the type of the node.
- Node Name: The name of the node, which can be edited by clicking on it. After editing the name, click the check () button to save the new name, or click outside the input box to cancel the editing.
- Advanced Mode Toggle: Some nodes have an
Advancedmode configuration which provides gives you more options to have more control over the node's behavior. Click on the toggle to switch between basic and advanced mode, default is basic mode. - Close Button: Click to close the configuration dialog. Make sure to click
Applybefore clicking this button to save any changes you made.
Main section:
- Configuration Options: The options to configure the node, which will vary depending on the type of the node. Make sure to click
Applyafter making changes to save the changes.- Apply: Click to save the changes you made to the configuration. If the configuration is:
- Valid: The changes will be saved and applied to the node.
- Invalid: An error message will be shown indicating what is wrong with the configuration, and the changes will not be saved until the issues are resolved.
- Apply: Click to save the changes you made to the configuration. If the configuration is:
- Output Schema Tree: A visual representation of the output data structure of the node, which can help you understand the data flow in the node and how to connect it to other nodes.
Node Port
The connection point on a node to connect to other nodes via an edge. Amber color is used to indicate that the port is not connected.
- There are two types of ports:
- Input Port: Shown on the left side of the node with a square icon, it is used to receive execution from other nodes.
- Output Port: Shown on the right side of the node with a circle icon, it is used to send execution to other nodes.
Edge
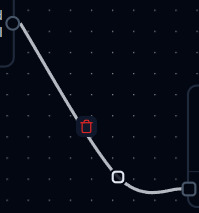
The connection between two nodes, which represents the flow of data or execution between the nodes. To select an edge, click on the line connecting the nodes. Once selected, it will be highlighted. Create an edge by dragging from an output port of a node to an input port of another node.
- Waypoint: Click anywhere on the edge to create a waypoint, which can be dragged to adjust the shape of the edge. Right-click on the waypoint to delete it.
- Delete Edge: Press and hold to delete the edge. Or select the edge then use the
DeleteorBackspacekey on your keyboard to delete the selected edge(s).
Flow Deployment
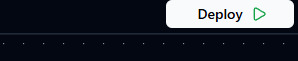
To deploy the flow, click on the Deploy () button in the top-right corner of the page. Once the flow is deployed, the button will change to a Stop () button which you can click to stop the flow.
After the flow is deployed, the canvas is locked and you will not be able to edit the flow or configure the nodes. You must stop the flow first to make changes.
Note
The flow will only deploy if:
- There are at least one
triggernode in the flow - All nodes in the flow are properly configured with valid configurations