
Database Table · Storing data in a table
Create a table with DB Table Initialize, define its Columns, and write rows with DB Table Row Insert or Modify, with a workshop that stores what the user enters on the Dashboard.
So far, every value a Flow produced lived in a Variable, which holds one latest value and disappears when the Flow stops. Real work usually needs data that accumulates and can be looked at later, like the number of boxes counted on each pass, or entries submitted by a user. That's what a Database Table in NARA is for.
The distinction worth holding onto is that a Variable answers what is true right now, and a table answers what has happened so far. Most real Flows need both.
This time we'll create a table and let the user enter a name, an age, and a course from the Dashboard, then store it.
How Mini Project 3 uses Database Table
Mini Project 3 writes one row to a table each time a parcel crosses the counting line. The Flow then calculates the total for a shift from the rows stored in that table. The concepts in this topic prepare you to build that process.
1. What a database table is made of
A database table looks like any other table, but there's some vocabulary worth knowing first, because it turns up in the Node settings.
| Example table | ID | NAME | AGE | COURSE |
|---|---|---|---|---|
| Row 1 | 1 | MINAL | 22 | COMPUTER SCIENCE |
| Row 2 | 2 | MRIDUL | 21 | CIVIL |
| Row 3 | 3 | MARAM | 19 | CHEMICAL |
| Row 4 | 4 | MOHAMMAD | 24 | ELECTRICAL |
- A Column (or Field) runs vertically and defines what the table stores. Here that's
ID,NAME,AGE, andCOURSE. Each Column has its own name and data type. - A Row (or Record) runs horizontally. One row is one set of data, so Row 1 is everything about MINAL.
- The Primary Key is the Column that identifies which row is which. Its values are never repeated anywhere in the table. Here it's
ID. - A Column Value is what sits in an individual cell, like
22in the AGE column of Row 1.
The table we're about to build follows exactly this example.
2. Nara's database Nodes
Nara's database Nodes come in two levels.
- DB Table Initialize is the parent Node. It defines the structure of the table: the table name and all its Columns.
- Child Nodes such as DB Table Row Insert or Modify, DB Table Rows Read, and DB Table Rows Delete point back at the parent and work with the data inside that table.
Put simply, the parent Node says what the table looks like, and the child Nodes say how data goes in and out.
3. Workshop · Laying out the basic Flow
Start by placing these three Nodes.
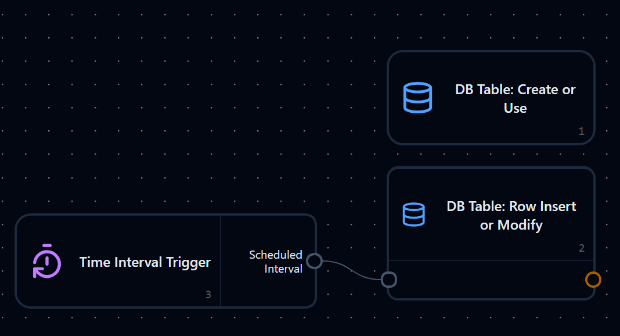
DB Table: Create or Use needs nothing wired into it, because it runs at Deploy time to get the table ready. DB Table: Row Insert or Modify, on the other hand, needs something to prompt it before it writes anything. Here we use a Time Interval Trigger so it writes the current values into the table on a set interval.
4. Workshop · Creating the table
Open the settings for DB Table: Create or Use.
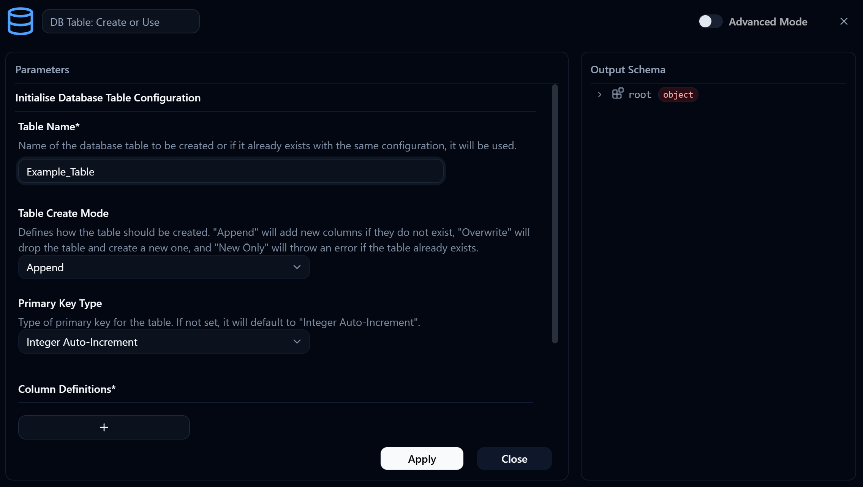
- Table Name is the name of the table. We'll use
Example_Table. - Table Create Mode decides what happens if the table already exists. The default
Appendreuses the existing table and adds any missing Columns.Overwritedrops it and creates a new one, andNew Onlyraises an error if the table is already there.Appendis fine while learning. - Primary Key Type can stay at
Integer Auto-Increment. Nara creates aprimary_idColumn for you and numbers it 1, 2, 3, and so on, so there's no need to create an ID Column yourself.
No spaces in table or Column names
Underneath, these tables are real SQL databases. A name with a space in it, like Example Table, makes the SQL statement read the name wrong and error out, either on creation or on write. Use _ instead of spaces, as in Example_Table, and avoid special characters too.
5. Workshop · Defining the Columns
Scroll down to Column Definitions on the same settings page and press + to add Columns one at a time.
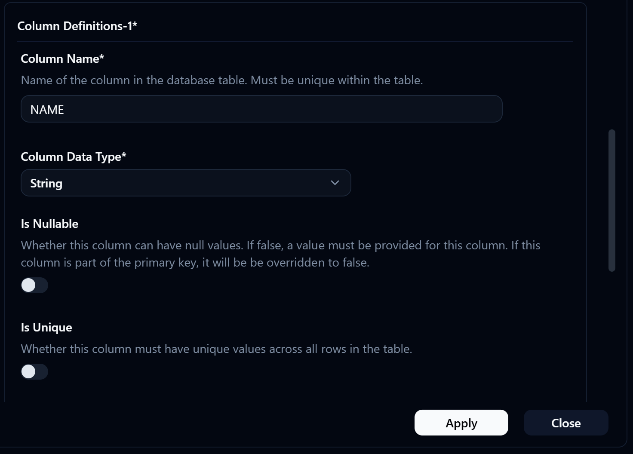
Each Column has two main settings, Column Name and Column Data Type. Pick the type that matches the data you'll actually store. Following the example table above, that gives:
| Column Name | Column Data Type |
|---|---|
NAME | String |
AGE | Integer |
COURSE | String |
Is Nullable and Is Unique can stay off. The first decides whether the cell is allowed to be empty, the second forces the value to differ from every other row.
6. Workshop · Preparing the Variables and the write
Values have to travel from the Dashboard into the Flow before they can be written to the table, so create three Variable: Create Nodes whose names and types match the table Columns.
| Variable | Type |
|---|---|
NAME | string |
AGE | integer |
COURSE | string |
Then open the settings for DB Table: Row Insert or Modify.
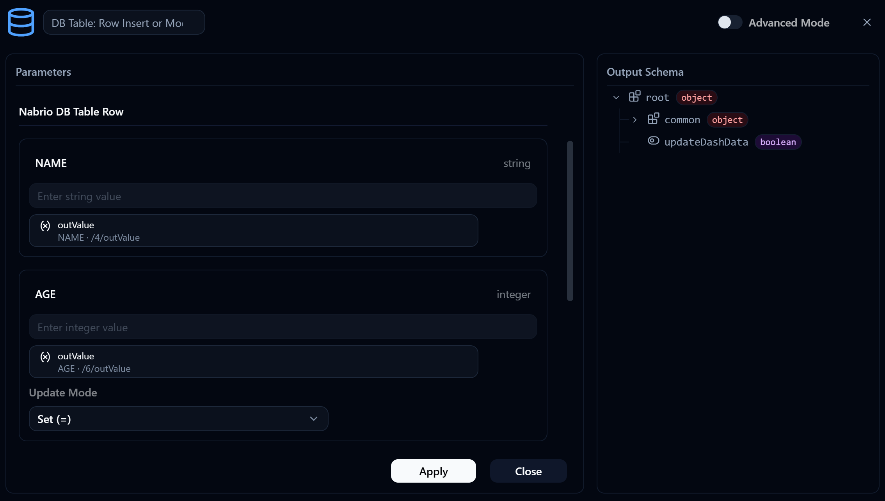
- Variable Source points at the DB Table: Create or Use Node we just configured. Once it's set, an input field for each Column appears automatically, following the table structure.
- For each Column, click Reference and pick the Output of the Variable with the matching name, so Column
NAMEreferences theNAMEVariable and ColumnAGEreferences theAGEVariable. - Update Mode on numeric Columns stays at
Set (=), meaning the new value replaces the old one. ChooseAddand it would add the new value to what's already there instead.
7. Workshop · The Dashboard side
Lay the Dashboard out however you like, as long as it has all three input fields.
| Widget | Variable Source |
|---|---|
| Text Input | NAME |
| Number Input | AGE |
| Text Input | COURSE |
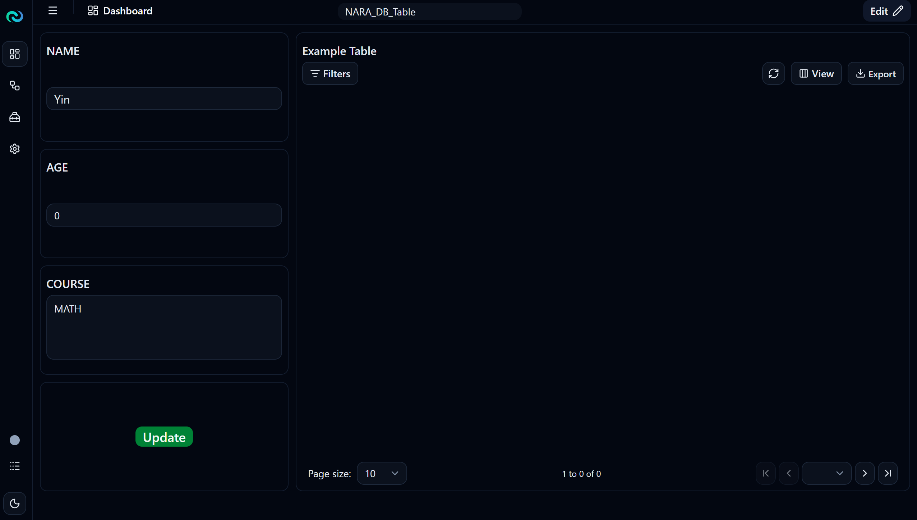
The Update button in the picture is a Trigger Button. If you'd rather save only when the button is pressed instead of on a timer, swap the Time Interval Trigger for a Dashboard Trigger bound to that button.
The other Widget you'll need is Array Object Table, which displays the contents of the table. Set its Data Source to Example_Table.
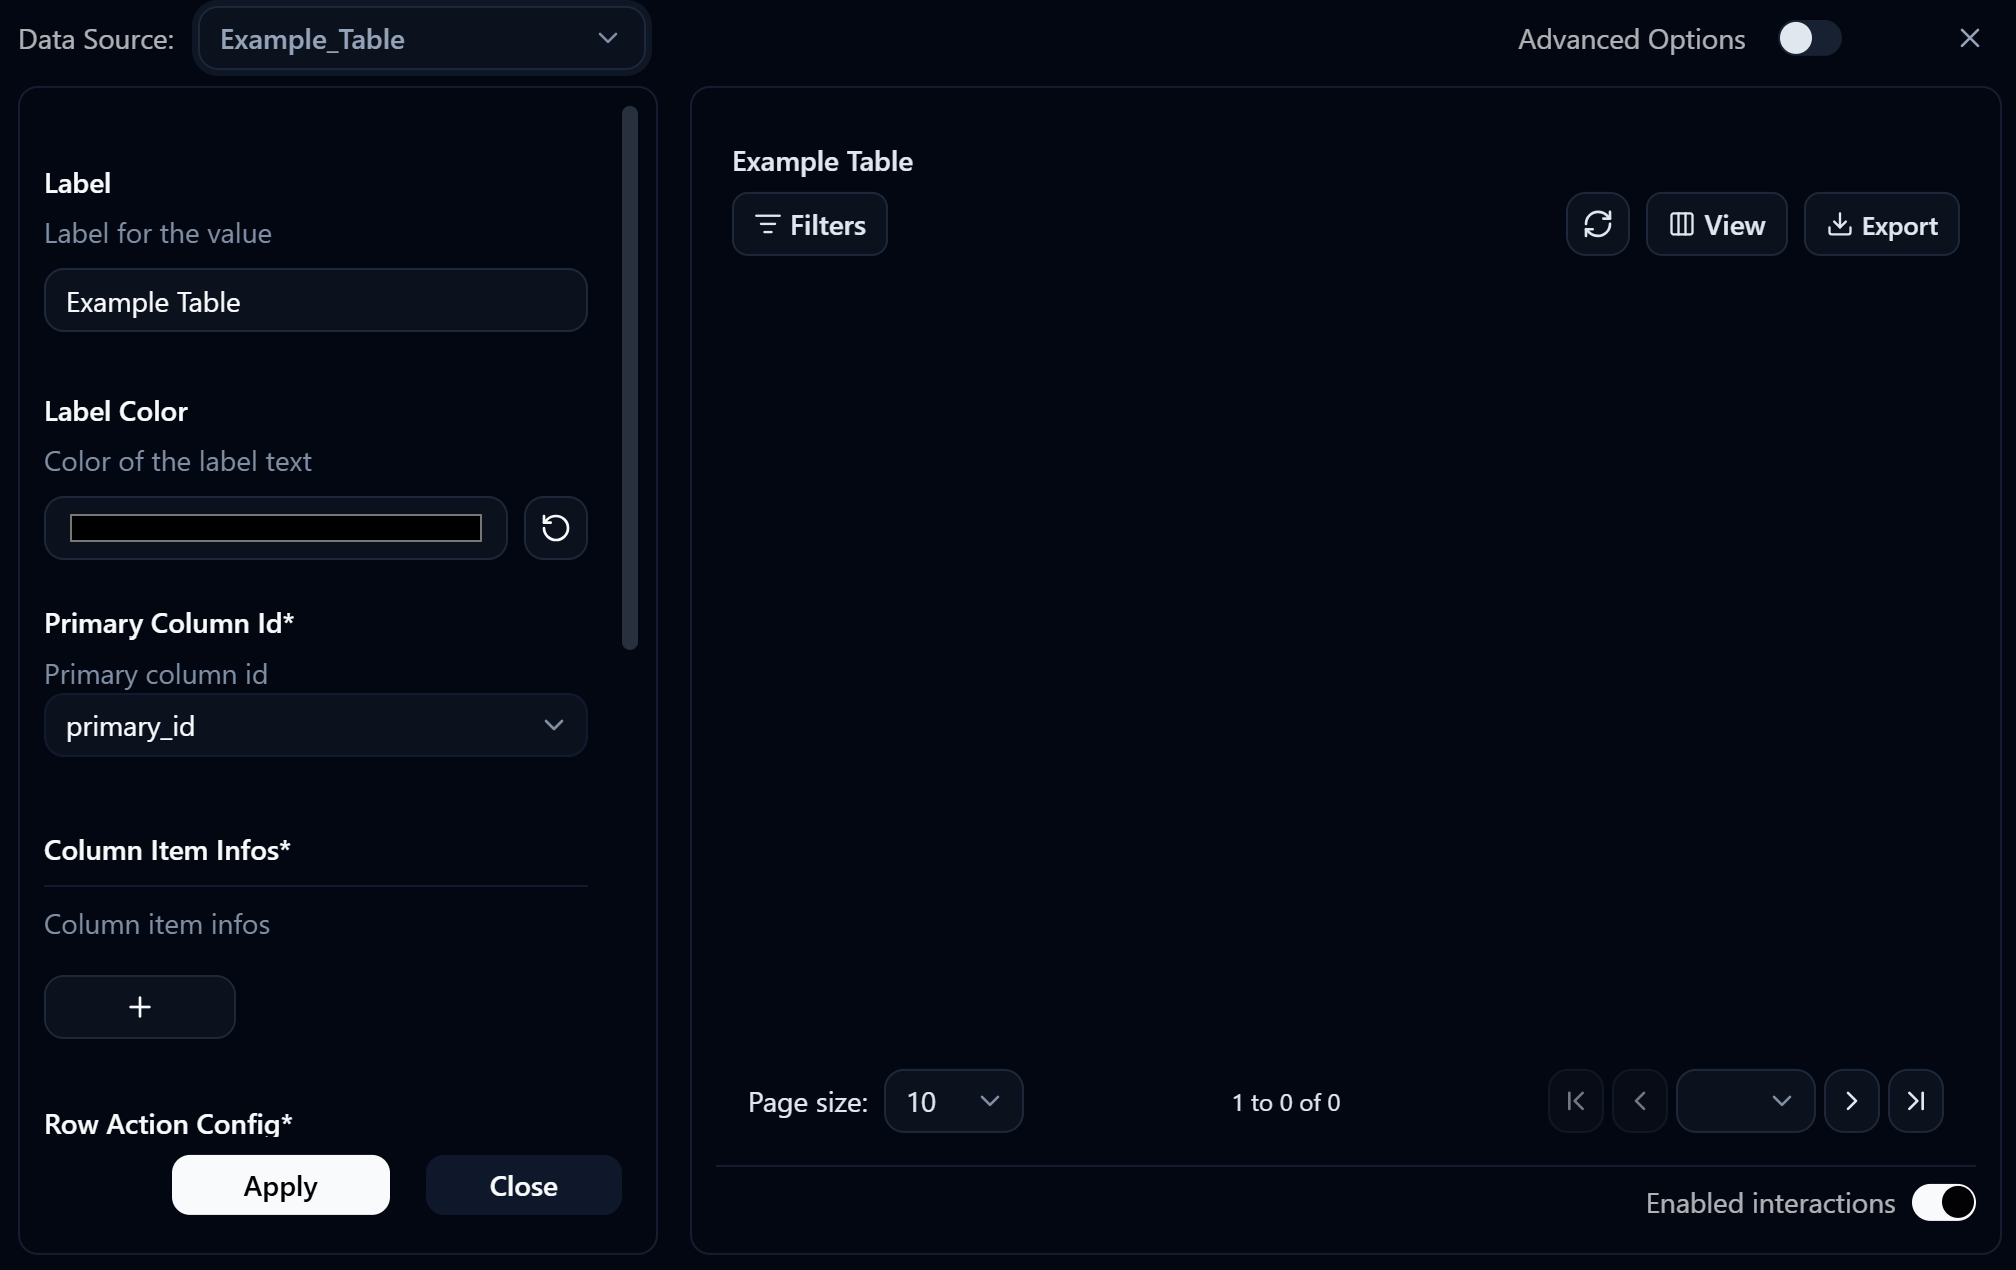
Everything else can stay at its default. Primary Column Id will be primary_id, which is the Column Nara created when we set Primary Key Type to Integer Auto-Increment. To adjust the headers, hide Columns, or make cells editable, see the Array Object Table page.
8. Trying it out
Deploy, then enter a name, an age, and a course. Wait for the Time Interval Trigger to come around, or press Update if you switched to a Dashboard Trigger, and the data appears as a new row in the table on the right, with a Primary_id numbered for you.
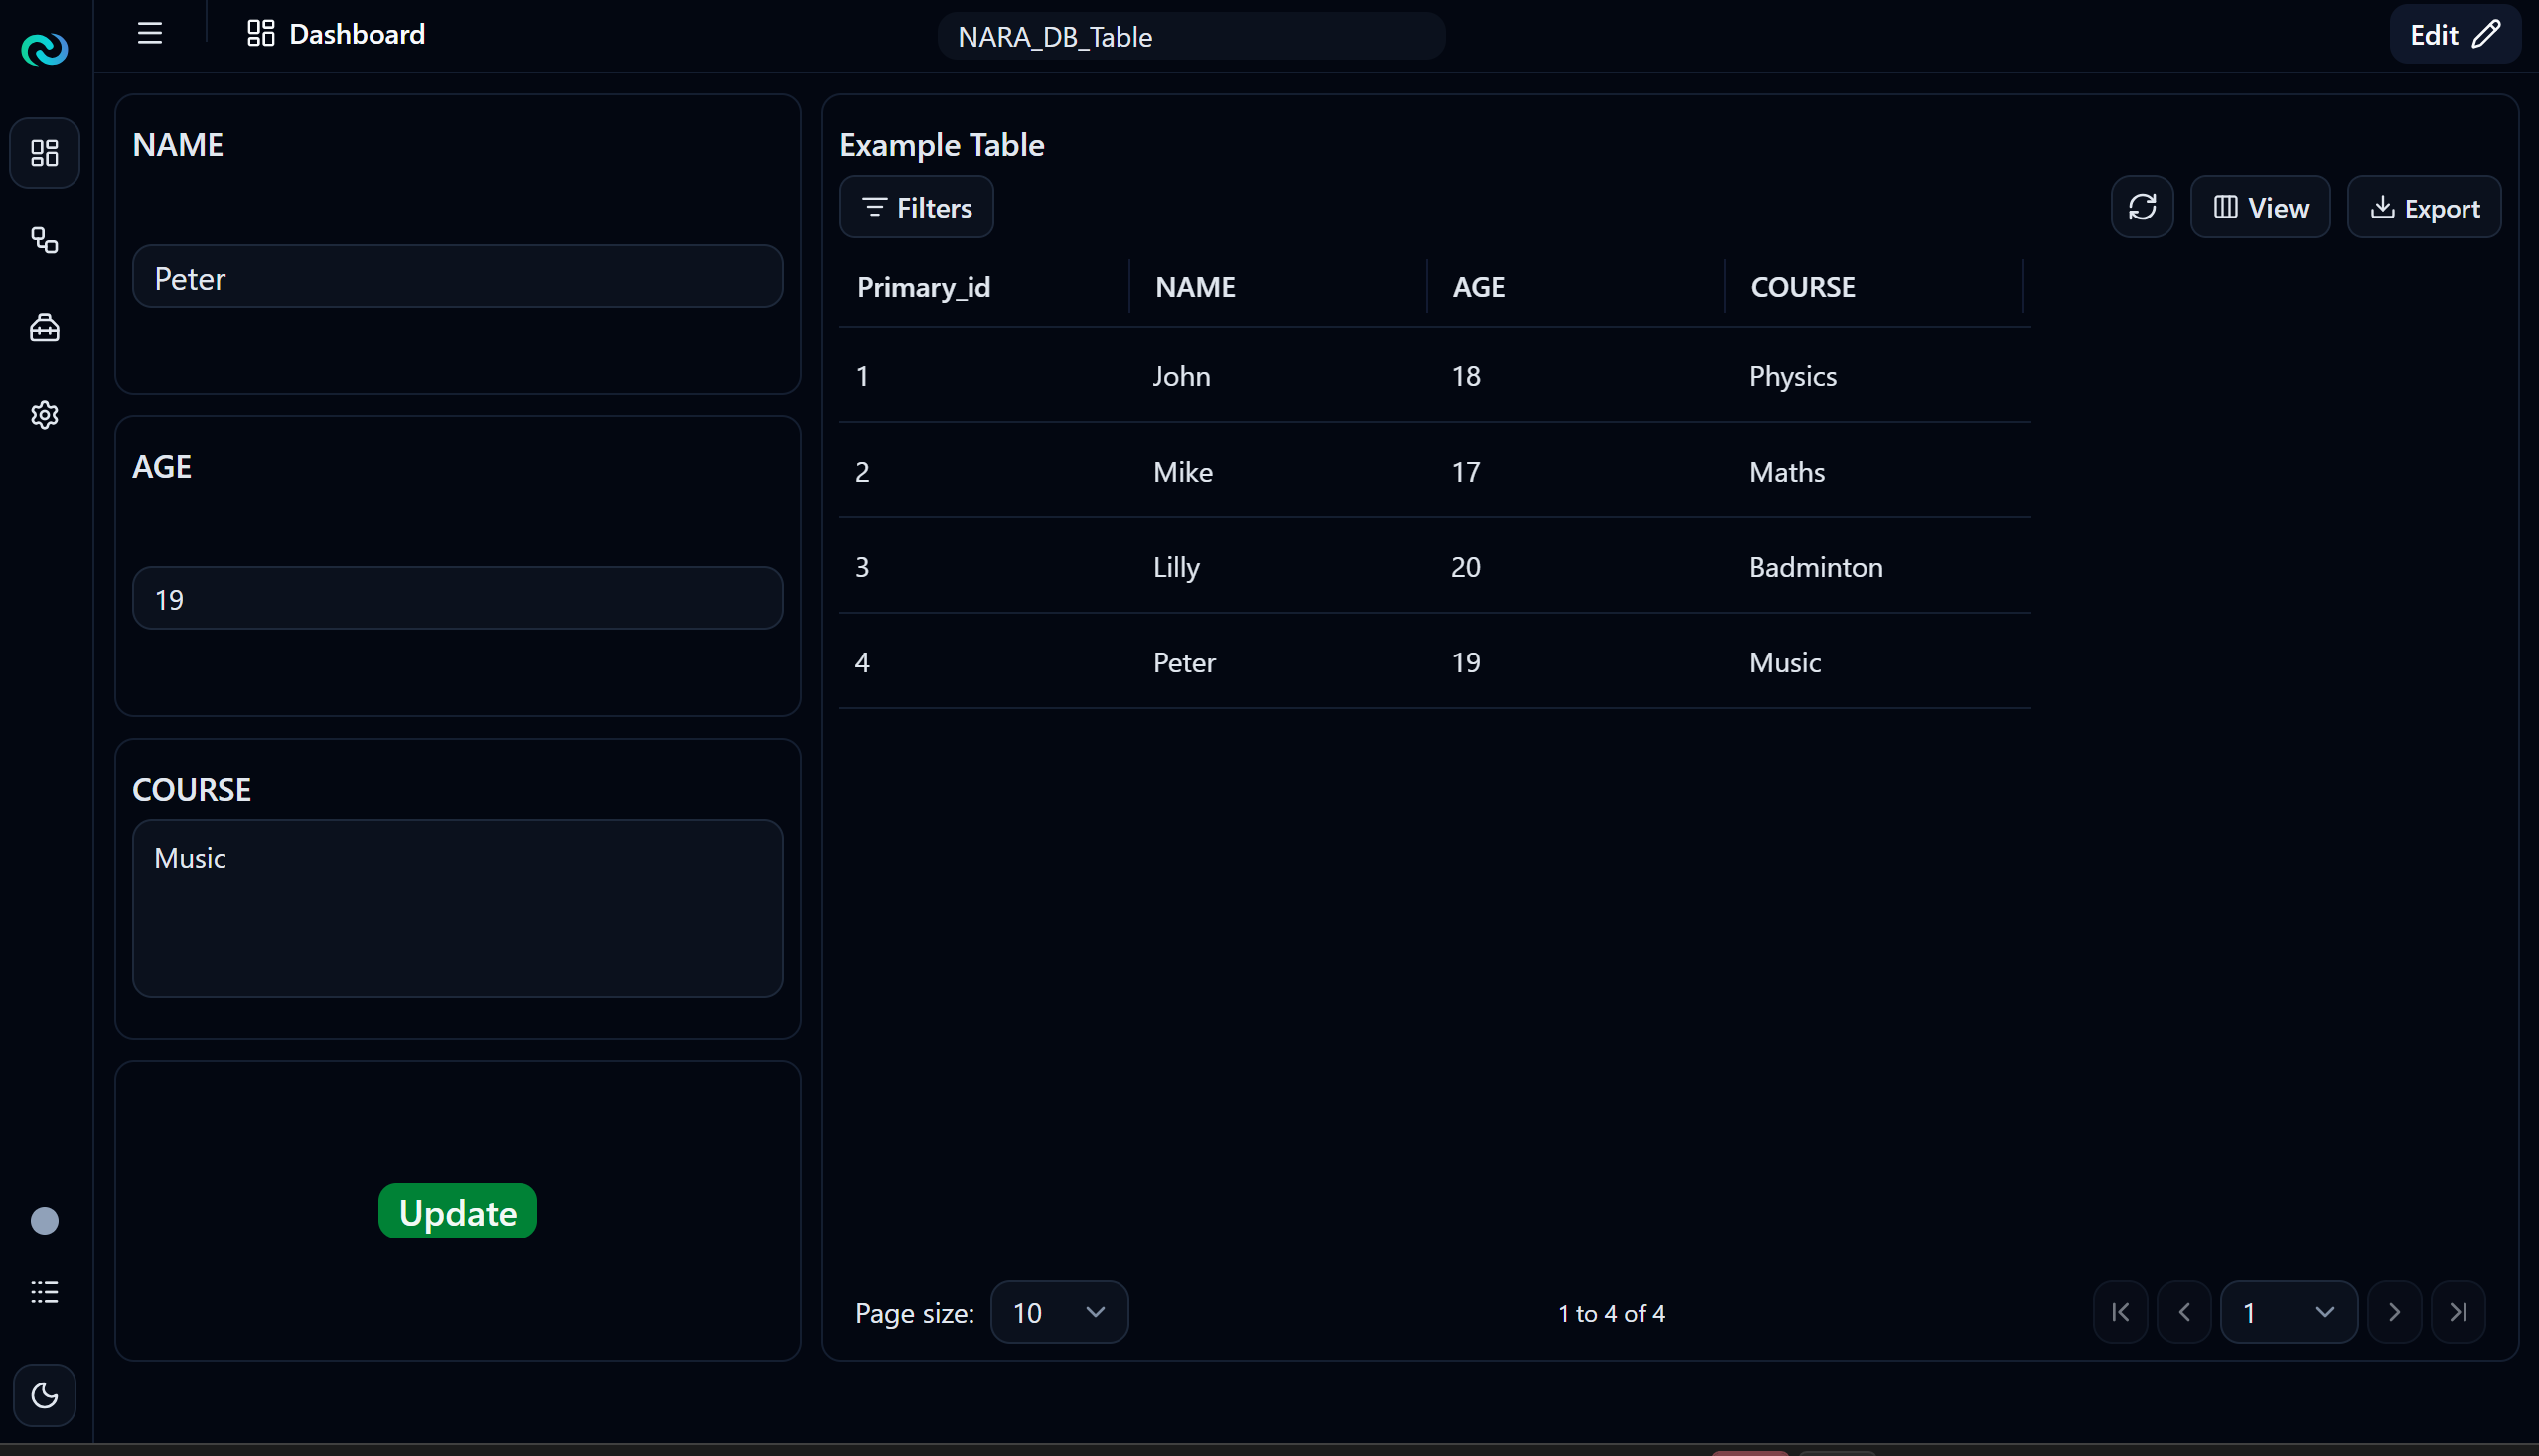
If the result isn't what you expected, work through these:
| Symptom | Likely cause |
|---|---|
| Deploy errors while creating the table | The table or Column name contains a space or a special character |
| The table on the Dashboard is empty | The Widget's Data Source isn't set to Example_Table |
| No new rows appear | No Trigger is running, or the Time Interval is set too long |
| Rows appear but the values are empty | The Columns in Row Insert aren't referencing the Variables |
| AGE doesn't match what was entered | The numeric Column's Update Mode isn't Set (=) |
| Rows pile up before anything is entered | The Time Interval is too short. It writes on every pass whether the values changed or not |
Next
Data is stored. What comes next is talking to the world outside Nara, which is what the IO chapter is for. Continue to Part 1 · Email · Sending mail from a Flow.
Moving Number Calculation
Use the Moving Number Calculation Node to work out a figure from the last few numbers that arrived, such as a moving average, a maximum, or a minimum, with a workshop that feeds values from a Slider and watches the average follow.
IO · Connecting to external systems
Learn how to send email notifications and exchange data with external systems over HTTP.